A fellow member asked if i could show him how i caped my turkey along with showing the wings being done. I was fortunate enough to kill my first bird of the year yesterday and spent today taking care of him. I know there are many different techniques and feel free to add suggestions.
Tools needed: stickpins, paper towels, several sheets of foamboard, clippers, scalpel( or x-acto), and razor saw( or dremel with cutoff wheel.
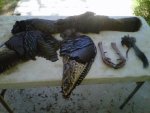
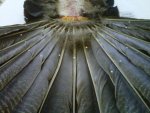
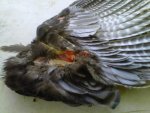
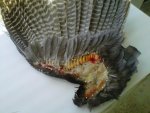
There are plenty of video's on youtube that show how to remove a cape. Briefly, hang the bird by the head. You will notice a distinct seperation of the feathers on the sides of the neck extending down the back, thighs, and ending at the tail. As you follow this line, you will notice that on the body you will see a strip of black, downy feathers that extend all the way to the tail. This is where you want to cut( from head to underneath the tail bone).
If you are preserving the wings, make sure to cut the skin wide( around the breast) to preserve the shoulder patch of feathers.
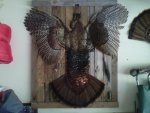
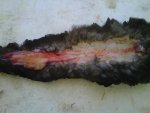
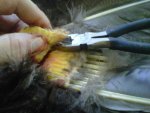
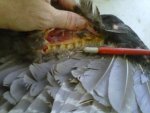
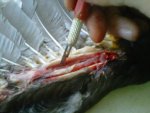
Remove all fat, blood, meat, and sinew from both wings and body cape. Be very careful and try not to cut the cape. If you do, sew it back together or staple it together. If you don't the cut will widen as it dries and can distort the shape if its big enough. (If you noticed on the first pic of a bird i did before, the neck is not right. This was due to a cut in the skin which pulled to the side when it dried). After that, i lay the cape skin side down on tin foil( or parchment paper) and straighten the feathers on the back to your liking. This is the last time you'll see the feathers till after it's dry, so make sure your happy with the look. Slide a foamboard underneath the tinfoil and then place another foamboard on top. Flip the boards over and remove the tinfoil.
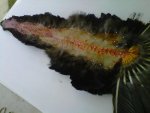
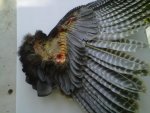
Now, look closely and you can see the midline on the cape. Pin the top of the cape and pull slowly on the fan till you get the skin taut. Now pin the skin on the rear just above the fan. Run a line of pins straight up the middle of the cape to the head. Now, every inch or so pin the side edges of the cape after pulling gently. Once you are done, it's time for the fan. Pull the outer fan feathers to open the fan. Pin both feathers, making sure to angle them so that they lay flat. Once you have the fan to shape, pin each feather and then liberally pour Borax.
The wings are time consuming, but just go slow and you'll be fine. The outer wingbone is very difficult to remove without destroying feathers, so i like to just remove all the meat from around it. Get it like you want and then follow the same process with pins and borax as you did the cape.
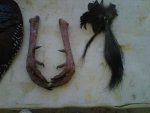
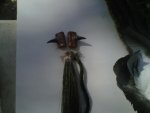
I used a dremel tool with cut-off wheel to cut the spur section off the legs. A quick push with a skewer pushed all the bone marrow and tendons out. All you want is the bone and skin. Borax them as well as the beard.
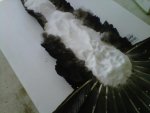
Place the foamboards in an out of the way dry place and let them sit for at least 6 weeks. Check it every few days. If you see cracks form in the borax powder, stir it a little and make sure to keep fresh borax on the skin. The moisture will cause it to clump, so you want to discard those and keep powder on it.
Here's a run of photo's to show the process i used.
If you have any questions, feel free to ask.
Hope this helps, Robert
Tools needed: stickpins, paper towels, several sheets of foamboard, clippers, scalpel( or x-acto), and razor saw( or dremel with cutoff wheel.
There are plenty of video's on youtube that show how to remove a cape. Briefly, hang the bird by the head. You will notice a distinct seperation of the feathers on the sides of the neck extending down the back, thighs, and ending at the tail. As you follow this line, you will notice that on the body you will see a strip of black, downy feathers that extend all the way to the tail. This is where you want to cut( from head to underneath the tail bone).
If you are preserving the wings, make sure to cut the skin wide( around the breast) to preserve the shoulder patch of feathers.
Remove all fat, blood, meat, and sinew from both wings and body cape. Be very careful and try not to cut the cape. If you do, sew it back together or staple it together. If you don't the cut will widen as it dries and can distort the shape if its big enough. (If you noticed on the first pic of a bird i did before, the neck is not right. This was due to a cut in the skin which pulled to the side when it dried). After that, i lay the cape skin side down on tin foil( or parchment paper) and straighten the feathers on the back to your liking. This is the last time you'll see the feathers till after it's dry, so make sure your happy with the look. Slide a foamboard underneath the tinfoil and then place another foamboard on top. Flip the boards over and remove the tinfoil.
Now, look closely and you can see the midline on the cape. Pin the top of the cape and pull slowly on the fan till you get the skin taut. Now pin the skin on the rear just above the fan. Run a line of pins straight up the middle of the cape to the head. Now, every inch or so pin the side edges of the cape after pulling gently. Once you are done, it's time for the fan. Pull the outer fan feathers to open the fan. Pin both feathers, making sure to angle them so that they lay flat. Once you have the fan to shape, pin each feather and then liberally pour Borax.
The wings are time consuming, but just go slow and you'll be fine. The outer wingbone is very difficult to remove without destroying feathers, so i like to just remove all the meat from around it. Get it like you want and then follow the same process with pins and borax as you did the cape.
I used a dremel tool with cut-off wheel to cut the spur section off the legs. A quick push with a skewer pushed all the bone marrow and tendons out. All you want is the bone and skin. Borax them as well as the beard.
Place the foamboards in an out of the way dry place and let them sit for at least 6 weeks. Check it every few days. If you see cracks form in the borax powder, stir it a little and make sure to keep fresh borax on the skin. The moisture will cause it to clump, so you want to discard those and keep powder on it.
Here's a run of photo's to show the process i used.
If you have any questions, feel free to ask.
Hope this helps, Robert
Attachments
-
 cape2.jpg41.3 KB · Views: 16,841
 -
 caping1.jpg38.8 KB · Views: 9,150
 -
 caping2.jpg46.7 KB · Views: 9,012
 -
 caping3.jpg27.5 KB · Views: 8,958
 -
 caping4.jpg31.8 KB · Views: 8,924
 -
 caping6.jpg33 KB · Views: 8,947
 -
 caping7.jpg32.7 KB · Views: 8,857
 -
 caping8.jpg32.4 KB · Views: 8,925
 -
 caping9.jpg33.9 KB · Views: 8,897
 -
 caping10.jpg35.3 KB · Views: 8,924
 -
 caping11.jpg29.7 KB · Views: 8,972
 -
 caping12.jpg45.2 KB · Views: 8,931
 -
 caping13.jpg25.5 KB · Views: 9,009
 -
 caping14.jpg42 KB · Views: 8,938
 -
 caping15.jpg33 KB · Views: 8,903
 -
 caping18.jpg33.2 KB · Views: 8,824
 -
 caping19.jpg39.7 KB · Views: 8,796
 -
 caping20.jpg32.3 KB · Views: 8,980
 -
 caping21.jpg42.7 KB · Views: 9,017
 -
 caping22.jpg40.7 KB · Views: 11,302
 -
 caping23.jpg19.2 KB · Views: 8,882
 Looks like some tedious work there Bama!!

