fishingguy61
Senior Member
Is there someone near Lake Lanier who knows his H-birds? Have an issue with my graph messing up over 5 mph. May need to have him take a ride on the boat to troubleshoot.
what type of boat? why 2 external transducers?
im assuming there is a reason you used 2 external transducers instead of a y cable and a shoot through. post those pics on BBC along with some pics from the side
The sonar transducer needs to be flush mounted in the hull for it to read on plane. Leave the si traduced for graphing at low speeds. But the sonar trans will never read on plane on the back of the boat
Brian. Is your DI Enhance sharpness on? I remember that causing an issue like that. Turn it off if so.
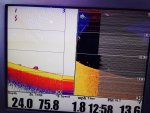
known bug when chart speed is set to 2
I would go with a shoot through transducer if it was me. has LJ offered any help since he did the install?
youre going to need a y cable as well. its also very important to prep and test areas in the bilge before you epoxy the puck down. check these out. Id be willing to start you a thread on BBC if youre willing to provide more pics of the installation. have you called humminbird as well?
http://www.bbcboards.net/humminbird...allation-networking-information-resource.html
How to Install Shoot-Thru (Epoxy In Hull) Transducer:
First: It is recommended to test the location prior to installation. Hull construction can have effects on getting good readings and it's best to find the best location. Air Pockets, Areas that Glass Matts Overlap, Delamination of Hull can effect the sonar performance. The best wasy is to disable automatic bilge pump temporarily and add a couple inches of water to the hull. Next build a small sand bag using a Ziploc bag. Place transducer in hull and using sand bag hold it down to find the best location for installation. Normally the closer to the rear of the boat and center of the boat the higher speed the sonar will stay locked on. Make sure the location is away from strakes underneath as these will cause aerated or turbulated water underneath and disrupt the clean water flow accross the bottom of the hull which can effect sonar readings.
Second: Mark the location of the best readings and drain the water and allow hull to dry. Hull must be dry for epoxy to adhere and set-up.
Third: I like to sand or smooth out area of hull the transducer is mounted so it's flat and smooth surface.
Fourth: Using Plumber's Putty or Play Do build a small dam around the Area the transducer will installed about an 1" wider than transducer to keep epoxy from flowing during installation.
Fifth: Use Slow Cure Epoxy - I recommend the epoxy that comes with the transducer direct from Humminbird. Slow Cure Epoxy stays cooler than fast cure. DO NOT use silicone or any other material than epoxy. Silicone can absorb sonar waves and creates alot of issues. Mix thoroughly until consist color. Avoid whipping while mixing to reduce creating air bubbles in the epoxy. The less air bubbles the better the final results and improved sonar readings.
Sixth: I like to apply a thin layer of epoxy on the transducer, I also like to apply a thin layer pressed into the bottom of the dam to squeeze out any potential air bubbles between epoxy and hull. Fill the rest of the dam with remaining epoxy.
Seventh: Installation of transducer. As you push transducer into the epoxy start 90° from foward and push and slowly turn the quarter turn. This will helps squeeze out air bubbles under the transducer.
Eighth: Using Sandbag from step one place on top of transducer to hold it in place. And allow the epoxy to cure for a minimum of 24 hours.
Ninth: Remove Sandbag and Plumbers Putty. Your Transducer is now installed and ready to use.
Tenth: Test Transducer in the Water to make sure you have good sonar readings. If not you may have air the epoxy and may need to repeat procedure to get good sonar readings.
Example of 2D Shoot Thru Transducer on my Skeeter FX20 (Transom to the right side)