HossBog
Senior Member
"We want more, we want more, it's good, so we want more!". Pics and story, that is!


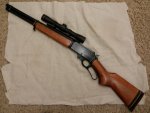
That's a great looking set-up!
That is sweet. I've been wanting to try a Scout style scope mounting.
Nice job on the rifle, and thanks for the post-fun one to follow along with.
I agree about the comb being low with a scope. Not sure if you have any interest in this but I put a leather cheek pad on my .336 and it brings your eye up to the scope.
How does your gun shoot after reducing the barrel length?
I have looked into options on raising the comb. Are you happy with your cheek pad? Which one did you get?
The cheek pad I got is one Cabela's (probably others also) sells. It's a leather "sleeve" with lacing on the bottom. I have been very happy with it. It works well and I like the traditional look of the leather.
I did have an issue when I 1st put it on with it sliding up the comb-this changed my p.o.i slightly. Luckly I found this out at the range before hunting season and took it home and really cinched it down pulling on the laces with pliers to get it as tight as possible. I haven't had any problems since.
If you decide on this they have different sizes depending on how high you want to raise your eye, so just double check how much you feel you need to raise it.

I finally had a chance to get the Lever Gun to the range. I had about an hour at the range to sight in this fella and check the zero on the 7 Mag. I went down to Chickasawhatchee WMA, which is just about 15 min from me. I like the range over there and with it being a Friday morning, I had the place to myself. They have good solid tables, and I brought my shooting rest.
I wanted to start at 25 yds, but the shortest distance was 50 yds. At that point, I was glad I had bore sighted it. I used an old splatter target so I could see my hits. I popped off the first 3 rounds. It hit about 6" low and about 4" left. Always good to be on paper with the first ones. I figured at 50 yds I wanted to be 1"-1.5" high. After a few adjustments, I was pretty well in the neighborhood of where I wanted to be. The barrel never really got really warm, but before I made the final adjustments I wanted it cool. I also sprayed a little Hoppe's on a bore snake and ran it through a couple times. My last 3 shots are the ones in the pic. That group was a little over 1" (remember this is at 50 yds, not 100). That was the best group of the day. In total, I think I sent 15 rounds down range. I like to do 3 shot group, adjust, 3 shot group, adjust. I feel like with a non-tack driver like this it gives me a better idea of where the gun is shooting. Main issue then is not warming the barrel up. 1 Shot, adjust, 1 shot, adjust, 1 shot, adjust is like chasing a balloon somebody blew up and let go.
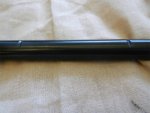
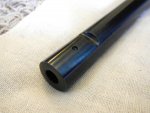
I used Federal Premium 125 gr HP factory ammo. I had never used this ammo before so I don't know how it grouped out of the gun before. When I get another chance to go to the range, I want to compare groups with the 125 gr Federal, 170 gr Winchester's, and 150 gr Remington's at 100 yds. Previously, this gun liked those other two loads pretty well. Without more range time, I can't make a judgment on the affect shortening the barrel had on accuracy. I will say though, I don't think anyone would complain about that last group. I don't have a chronograph so I can't test the velocity difference. There were two things that surprised me about the shorter barrel - muzzle blast and muzzle rise. I knew both would increase with shortening the barrel, but both increased more than I expected. I was wearing hearing protection, but I could tell the muffled boom had been replaced by a sharper crack. I was surprised how the muzzle jumped after the shot. With the new recoil pad, felt recoil was minimal, but it had a sharper jump to it.
I like the scope a lot. It points very naturally. I had read complaints about scout scopes not gathering light as well, but at dawn and dusk, I can see better through the scope than with the naked eye. It may not gather light as well as a conventional mounted optic with a larger objective, but it is more than sufficient. I was also concerned that the 2.5x magnification would leave me wanting more, but so far I am very happy with it. I have always shot a rifle with one eye closed. The scout scope works much better with both eyes open, which I know is a good habit to be in anyway. It is very comfortable to look through with both eyes open.
The Wild West Happy Trigger Kit is by far the BEST modification that I made to the gun. The trigger pull is lighter and breaks clean. It was well worth the money. I never though I'd say this, but… the trigger pull on my Marlin lever action is noticeably better than the trigger pull on my Remington 700!!! I'm gonna have to fix that, but that'll be a different thread.
It was a good hour at the range. I checked the 7 Mag, and she's still on.
I was so excited about the lever action that I took it deer hunting the next morning. It was a rainy morning and I wanted to do some scouting in the woods, so it was the perfect day to take it. Man, this gun handles so quick! I love it. It was great in the woods. I didn't hang it on every branch and vine in the county like I normally do. Now picking up the 7 Mag feels like I am shouldering an 8' 2x4. I can't wait to see some venison in the crosshairs.
Thank you for sharing! I have a 336 in a .35 that I bought used a couple of years ago. I want to dissasemble it and give it a good cleaning and possibly change the trigger. I watched the youtube video you posted on how to dissasemble and I found it to look very informative however, I could not find a video on how you reassemble. I would hate to take it apart and then have to take it to a gunsmith to assemble. Too bad you are on the other side of the state from me. I would like someone to guide me.