Another Lever Gun Project **Update 8/23/15**

hayseed_theology

Senior Member
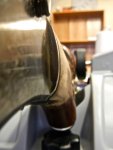
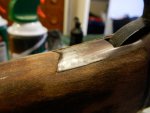
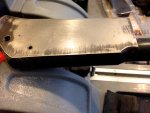
When I refinish the furniture on this gun, I will try to improve the wood-to-metal fit and finish. As it stands, it is pretty poor. I wanted to take some "before" pics that really showed how far off some of the wood is. The fit of the recoil pad is pretty bad too. It seems to me that the white spacers always shrink up on these old guns. Is that the case? If so, what causes them to shrink?

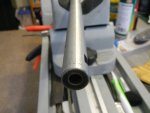
A new Pachmayr grind-to-fit 500B recoil pad and Pachmayr 1/16" white spacer came in the mail today from Midway along with a few other tools for an upcoming Remington 700 project.
 

Attachments

  • REV205.115.jpg
    REV205.115.jpg
    91.5 KB · Views: 1,001
  • REV205.116.jpg
    REV205.116.jpg
    67.5 KB · Views: 990
  • REV205.117.jpg
    REV205.117.jpg
    119.3 KB · Views: 998
  • REV205.118.jpg
    REV205.118.jpg
    83 KB · Views: 995
  • REV205.119.jpg
    REV205.119.jpg
    112.1 KB · Views: 1,003
  • REV205.120.jpg
    REV205.120.jpg
    78.4 KB · Views: 1,001
  • REV205.121.jpg
    REV205.121.jpg
    140.9 KB · Views: 992

roperdoc

Senior Member
That stock fit up is really poor!
Either a replacement or a really bad day for qc when it left the factory
 

Sharps40

Senior Member
Given the age, the wood has shrunk.

If its not oil soaked, glass bedding with dyed acra gel will restore the fit and will not look objectionable when finished.

A fancier option, if there is meat enough in the wood for small pins.....fit brass shims to the endgrain of the wood, pin and glass in place (countersink the pin hole in the shim) then trim the brass shim down to the surface of the wood during refinish.

Either will ensure better fit and last for many years to come.
 

hayseed_theology

Senior Member
Update #1 2/2/15

School and work have been keeping me pretty well tied up, but I finally got some time to pick this project back up. I hadn't planned on it being a year long deal, but it is looking like it will be.

I wanted to work on the fit between the buttstock and tang. The tang on this thing is different than a Marlin, and it uses a through bolt. I decided to start trimming the wood down using a rasp. I taped off the receiver so that the rasp would cause any major scratches. I knew the tape would last long once I switched to sandpaper. I wasn't worried about the sandpaper scratching the metal because it will get sanded a little before bluing anyway. I got the wood close with the rasp then switch to 120 gr and then 220 gr using a sanding block. I was able to get the fit much closer. I little more work while I am finishing it, and it should be in pretty good shape.

Tools: rasp, 120 & 220 gr sandpaper, sanding block, painters tape, elbow grease

Cost: Free
 

Attachments

  • REV205.129.jpg
    REV205.129.jpg
    75 KB · Views: 865
  • REV205.128.jpg
    REV205.128.jpg
    91.9 KB · Views: 866
  • REV205.127.jpg
    REV205.127.jpg
    90.3 KB · Views: 860
  • REV205.126.jpg
    REV205.126.jpg
    81.9 KB · Views: 860
Last edited:

hayseed_theology

Senior Member
Update #2 2/2/15

I also got the chance to work on the front sight. I cleaned up the dovetail cut in the barrel a little more. I am happier with it now. It is level across the bottom. It is slightly undersized and a little shallow, which is what I believe you want.

The front sight comes a little oversized, so you have to trim it down with the file. Do not open up the dovetail to fit a new sight! Make the new sight fit the existing dovetail.

When filing on the sight, try to remove material from only one side of the base. If you file on both sides, you run a greater risk of getting it crooked. Because my dovetail was shallow, I was able to remove some material from the bottom of the base by passing the sight over a 10" Mill file sitting flat on the table. Go slow on removing material and check it often. When you think it's close, a little gun oil can help it slide right in.

Generally, dovetail sights should press in from right to left, but mine decided it liked sliding in from left to right better. Go figure. I must not have cut the lead in correctly. The sight sits just a little crooked on the barrel. I think that's because I didn't have the cutting jig shimmed to account for the barrel taper when I cut it originally. Live and learn. It does not affect the sight picture at all, but I know it's not perfect, which bothers me.

The combination of the peep sight and fiber optic front sight is incredible! It points so naturally! I am really pleased with my choice on that. I didn't shoot it yesterday. In fact, I am not going to shoot it before bluing, because I went ahead and tore it all the way apart. I am just hoping my math was right when I calculated the proper sight height.

By the way, that nicely cut dovetail in the barrel can also double as knife blades. I drew blood on 3 different digits while fitting that front sight. Tap the sight back out when testing the fit, don't push it out with your thumb even though you can.

Tools: Mill file, small hobby files, safe-sided triangular file, chalk, digital caliper, hammer, brass punch

Cost: $20 for the Williams Fire Sight
 

Attachments

  • REV205.122.jpg
    REV205.122.jpg
    89.5 KB · Views: 864
  • REV205.123.jpg
    REV205.123.jpg
    72.8 KB · Views: 861
  • REV205.124.jpg
    REV205.124.jpg
    115.9 KB · Views: 870

devilchild

Member
Thanks for the post. I like to tinker with older or beat up firearms(not expensive or collectables lol) and appreciate the time and effort put in to documenting what you are doing. I learned a good bit and can't wait to see the finished product.
 

hayseed_theology

Senior Member
Update #1 8/19/15

It has been way too long. Life has been incredibly busy. School destroyed my spring. Work took my summer. We are about to welcome our firstborn child into the world in the next week, so I have been spending my spare time on nursery projects. This lever gun project is going on a year and a half. That was not the plan.

Finally got a little time to work because a case of the shingles has forced me to slow down a little.

Just to catch up, the next steps are refinishing the wood and refinishing the metal. I did some sanding on the smaller parts to prep them. From what I have read, 320 to 400 grit sandpaper is about as fine as you want to go for a rust blue project. I was able to sand out some minor pitting on the small parts, but some of the spots actually appear to be casting voids rather than rust pitting.

The receiver shows minor but widespread pitting. Rather than sand it out, the best place to start is filing. Draw filing is the recommended technique for filing out pits on a flat surface.

 
Last edited:

hayseed_theology

Senior Member
Update #2 8/19/15

I used a Single Cut 10" Smooth Mill file for draw filing. It's very important to have the right type of file for this, don't just use any old file. This is my first time trying this technique, and I have some learning to do. I got impatient and did a little cross filing which appears to have helped remove the pits, but it put scratches on it that will have to be worked on. I think I am going to regret the cross filing. Draw filing leaves a smoother, more even finish.

I was afraid to do too much filing for the sake of the serial number. Filing off a serial number is kinda frowned upon (read: ILLEGAL).

You can see that the receiver is far from perfectly flat on the right side.

The ejection and loading ports had some noticeable dings in them. I decided to use a half-round needle file to sort of chamfer the openings and remove the dents.

I have some more draw filing to do, then it will be time for some finish sanding. Then moving on to the barrel.


Tools: vise, chalk, 10" Smooth Mill File
Cost: Free
 

Attachments

  • REV205.134.jpg
    REV205.134.jpg
    72.1 KB · Views: 663
  • REV205.133.jpg
    REV205.133.jpg
    91.8 KB · Views: 661
  • REV205.132.jpg
    REV205.132.jpg
    80.9 KB · Views: 661
  • REV205.131.jpg
    REV205.131.jpg
    83.3 KB · Views: 659
  • REV205.130.jpg
    REV205.130.jpg
    88.5 KB · Views: 662
  • REV205.135.jpg
    REV205.135.jpg
    72.9 KB · Views: 660
Last edited:

hayseed_theology

Senior Member
Update #1 8/23/15

I continued draw filing the receiver over the weekend. I wish I hadn’t done any cross filing. I had to work a long time to get the filing scratches out. Lesson learned. The Pilkington’s Rust Blue solution recommends sanding to a 320 grit.

I tried sanding the receiver with 320 gr on a sanding block, but I don’t think the sanding block was very even. Wrapping the sandpaper around the file gave a more even surface. I sanded back and forth the same direction as I had been draw filing. The 320 gr doesn’t damage the stamped numbers and letters. So it is safe to go over the serial number with this sandpaper. I went over the rest of the receiver with some 320 gr. This sanding is not the final prep, so it is ok to leave some bluing behind.

Next I moved on to the barrel. Here’s a good video from Larry Potterfield on polishing a barrel:


The barrel had a fair amount of minor rust pitting towards the muzzle. To sand it out, I began with 220 grit cloth backed abrasive. This type of sandpaper comes in a roll. I got mine from Brownell’s. I used the 220 gr in a shoe shine motion moving back and forth down the barrel. The factory bluing shows me where I have sanded. I was able to get most of the pitting out with the 220. There were some dings and pits that just aren’t going to be sanded out. They are too deep.


Tools: vise, chalk, 10" smooth mill file, 220 & 320 grit cloth back abrasive, 320 grit wet/dry sandpaper, sanding block, sharpie
Cost: Free
 

Attachments

  • REV205.136.jpg
    REV205.136.jpg
    124.1 KB · Views: 530
  • REV205.137.jpg
    REV205.137.jpg
    105 KB · Views: 525
  • REV205.138.jpg
    REV205.138.jpg
    124.2 KB · Views: 536
  • REV205.139.jpg
    REV205.139.jpg
    65.8 KB · Views: 550
Last edited:

hayseed_theology

Senior Member
Update #2 8/23/15

Once the whole barrel received a round with the 220, I moved onto 320 grit wet/dry sand paper. Before I began sanding, I drew rings on the barrel with a Sharpie. These rings will show me where I have been sanding. For this round of sanding, I sanded lengthwise using a sanding block.
 

Attachments

  • REV205.143.jpg
    REV205.143.jpg
    118.3 KB · Views: 557
  • REV205.142.jpg
    REV205.142.jpg
    60.4 KB · Views: 534
  • REV205.141.jpg
    REV205.141.jpg
    109 KB · Views: 524
  • REV205.140.jpg
    REV205.140.jpg
    105.4 KB · Views: 529

hayseed_theology

Senior Member
Update #3 8/23/15

For the final round of sanding, I used 320 grit cloth backed abrasive. For this round, I drew lines down the length of the barrel with the Sharpie. As I polish with a shoe shine motion, these lines show me where I have been and where I haven’t. If you aren’t careful with the sanding, you will flat spot the barrel or make it wavy. I think I might have gotten the end of the barrel a little wavy, but we will see how it comes out after bluing.

I am not able to rust blue it anytime in the next couple weeks, so I put a very generous coat of oil on it and put it in the safe. When it is time to blue, it will need to be rubbed down with bluing and rust remover then carded with a wire wheel and steel wool.
 

Attachments

  • REV205.144.jpg
    REV205.144.jpg
    113.9 KB · Views: 533
  • REV205.145.jpg
    REV205.145.jpg
    95.1 KB · Views: 528
  • REV205.146.jpg
    REV205.146.jpg
    140.9 KB · Views: 546
  • REV205.147.jpg
    REV205.147.jpg
    152.8 KB · Views: 538

hayseed_theology

Senior Member
Update #4 8/23/15

I also worked on the grip cap. Sometimes plastic grip caps and butt plates develop a sort of mildew, oxidation, or build up in the checkering or grooves. I used synthetic safe gun scrubber and a dull pocket knife to clean out the checkering. I cleaned up the edges of the white line spacer with some 800 grit sandpaper. Everything looks as good as new.

Tools: pocket knife, 800 grit sandpaper, Synthetic Safe Gun Scrubber
Cost: Free
 

Attachments

  • REV205.148.jpg
    REV205.148.jpg
    92.5 KB · Views: 529
  • REV205.149.jpg
    REV205.149.jpg
    62.7 KB · Views: 528
  • REV205.150.jpg
    REV205.150.jpg
    77.5 KB · Views: 530

hunterofopportunity

Senior Member
Mine had the broken barrel screw but the biggest problem I have is a problem with loading it won't cycle correctly, hangs repeatedly. Did yours have any loading issues, and if it did how did you correct it?
 

hayseed_theology

Senior Member
Mine had the broken barrel screw but the biggest problem I have is a problem with loading it won't cycle correctly, hangs repeatedly. Did yours have any loading issues, and if it did how did you correct it?

Mine did not have the feeding issue, but it is not uncommon in these rifles. From what I've read, it is normally related to the elevator/carrier that lifts the cartridge up. There is a plunger, spring, and e-clip that help the elevator function properly. From what I've read on the net, the issue is often with one of those small parts.

Marlin lever actions can develop a similar problem, but the design is a little different.

That said. I have not personally encountered the issue. Just repeating what I've read elsewhere.
 

guesswho

Senior Member
Hayseed, what file did you use for the draw filing of the receiver? I'm going to redo my old Winchester and will be rust bluing it too.
 

hayseed_theology

Senior Member
I used a 10" smooth mill file. I think it's a Nicholson, but I can't remember. It is a single cut, which is designed for finish work. That's what I others recommend. Worked for me. I will say that it would be better with safe sides and beveled edges to reduce scratching.
 

one hogman

Senior Member
NEAT project, I would not have the patience to draw it out that long, I want it to be done too soon mhope to see more it is entertaining and informative, thanks for posting this.:yeah:
 
Top