Southeastern Style Arrow

Nicodemus

The Recluse
Staff member
This is gonna take awhile, so bear with me till I get all the writin` and picture postin` done.

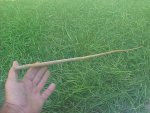
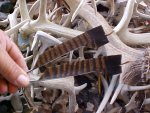
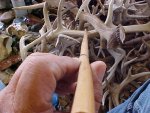
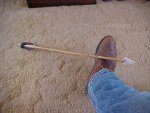
Dried rivercane, about 4 1\2 feet long.

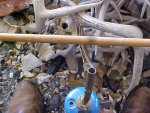
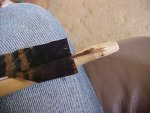
Second pic is heatin` the crooked section between joints prior to straightenin`. Get it purty hot, but don`t scorch it. This can also be done with coals raked out of the fire, but it`s too hot to be settin` over a fire today, so I`m cheatin`.

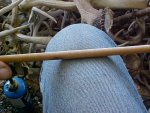
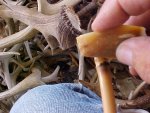
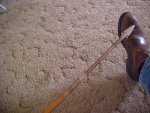
3rd pic is applyin` pressure to the heated crooked section usin` the knee. Be careful and don`t crinkle or crush the cane. You can feel it bend, but only experience will tell you when to quit. Do this on each section from one end to the other. Heat and straighten one section at a time.

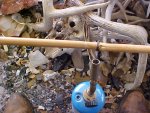
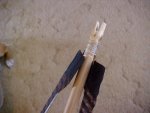
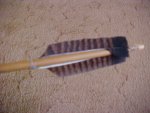
4th pic is all the sections straight. The joints have not been fooled with yet, and the shaft is actually more crooked than it was when you started. Don`t walk off scratchin` your head, it`s gonna get straight when you do the joints.

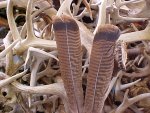
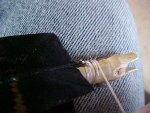
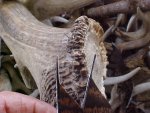
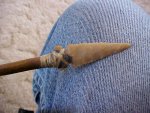
5th pic is heatin` the joints for straigtenin` . Be careful here, the heated joint will break easier than the sections will.
 

Attachments

  • MVC-114F.JPG
    MVC-114F.JPG
    78.2 KB · Views: 2,386
  • MVC-115F.JPG
    MVC-115F.JPG
    72.2 KB · Views: 2,318
  • MVC-116F.JPG
    MVC-116F.JPG
    83.3 KB · Views: 2,349
  • MVC-117F.JPG
    MVC-117F.JPG
    62.1 KB · Views: 2,312
  • MVC-118F.JPG
    MVC-118F.JPG
    86.2 KB · Views: 2,338

Nicodemus

The Recluse
Staff member
The shaft is gettin` straight now in this first pic. A little extra attention to the areas that ain`t quite right will get it perfect.

2nd pic, I`m scrapin` the joints smooth with a flint flake. a knife can be used as well. It can be finished with either sandstone or sandpaper.

3rd pic is the nock. It is important to cut this nock so that the bowstring rests up against the solid part of the joint for strength. Make sure to leave no sharp edges on this self-nock or it will cut the bowstring. This is the small end of the shaft. The point will go on the big end.

4th pic is wild turkey tailfeathers that will be cut and trimmed for fletchins`.

5th pic is the feathers cut to shape. Cut them identical with both outside parts of the feather the same way.
 

Attachments

  • MVC-123F.JPG
    MVC-123F.JPG
    74 KB · Views: 2,247
  • MVC-122F.JPG
    MVC-122F.JPG
    82.6 KB · Views: 2,259
  • MVC-121F.JPG
    MVC-121F.JPG
    92.7 KB · Views: 2,232
  • MVC-120F.JPG
    MVC-120F.JPG
    68.9 KB · Views: 2,242
  • MVC-119F.JPG
    MVC-119F.JPG
    74 KB · Views: 2,262

Nicodemus

The Recluse
Staff member
Make sure to leave a section of quill on the fletchin`. This will be glued and sinew wrapped on the shaft.

2nd pic is the back of the fletchins` glued to the shaft. Glue these as shown exactly, on the side.

3rd pic is a very fine, thin piece deer backstrap sinew that will be wet and wrapped around the fletchins`.

4th pic is wrappin` the sinew around the glued fletchins`.

5th pic is the finished back section of the fletchins`.
 

Attachments

  • MVC-005F.JPG
    MVC-005F.JPG
    41.6 KB · Views: 2,221
  • MVC-004F.JPG
    MVC-004F.JPG
    82.8 KB · Views: 2,225
  • MVC-003F.JPG
    MVC-003F.JPG
    73.1 KB · Views: 2,236
  • MVC-002F.JPG
    MVC-002F.JPG
    71.6 KB · Views: 2,227
  • MVC-001F.JPG
    MVC-001F.JPG
    63.9 KB · Views: 2,232

Nicodemus

The Recluse
Staff member
1st pic is the front of the fletchins glued in place. Attach these on TOP of the shaft 1\4 way around the shaft from where the back ends were attached.

2nd pic is sinew wrapped. It is VERY IMPORTANT that this front section makes as smooth a transition as possible. Take extra care to do this. Make sure the front part of the quill is smoothed down to almost nothin`. If you don`t, when this part of the arrow passes over your thumb when shot, it will gouge out a really nice chunk of meat and skin. In addition to throwin` the arrow off its target, this is gonna hurt.........a lot. Plus you`re gonna bleed all over your nice bow.

3rd pic is the point sinew hafted and sinew wrapped in place. This is a
point from my replicated collection, that I made, so I just used it as an example, since I don`t have a point to my likin` ready. On a point that I will be settin` on there permanent, I will glue it in place first. I personally like to haft the point so that at full draw the point is straight up and down, instead of flat to the ground. I don`t reckon it really matters though.

Here is the completed arrow in the 4th pic.
 

Attachments

  • MVC-006F.JPG
    MVC-006F.JPG
    59.8 KB · Views: 2,405
  • MVC-007F.JPG
    MVC-007F.JPG
    52.2 KB · Views: 2,232
  • MVC-008F.JPG
    MVC-008F.JPG
    35.3 KB · Views: 2,241
  • MVC-009F.JPG
    MVC-009F.JPG
    68.3 KB · Views: 2,216

Nicodemus

The Recluse
Staff member
Here is an arrow with a hardwood foreshafted point set in the rivercane shaft.

2nd pic is the union where the foreshaft joins with the rivercane shaft. All is sinew wrapped, although it doesn`t have to be.

3rd pic is the completed section.
 

Attachments

  • MVC-010F.JPG
    MVC-010F.JPG
    89.8 KB · Views: 2,220
  • MVC-011F.JPG
    MVC-011F.JPG
    74.3 KB · Views: 2,225
  • MVC-012F.JPG
    MVC-012F.JPG
    80.5 KB · Views: 2,197

Hoss

Moderator
Great looking arrow and lesson in how to do it. Great series showing us how it's done. So just how long did this entire process take?

Hoss
 

Nicodemus

The Recluse
Staff member
Although this can be done entirely with modern tools, it can also be done with stone age tools, in a primitive settin`, if desired. Arrow makin` is an art that is a fine way to pass the time settin` around a fire at night. :D

A special thanks to my Friend, Ben Kirkland, for teachin` this to me years ago. This is a technique that he learned and passed on to me.

Hoss, I figure around 45 minutes or more, just to work the shaft. That`s why I care more about it than I do the point. I can make the point so much faster, and with less aggravation than actually makin` the shaft.
 

dutchman

Senior Member
Thanks Nick for taking the time to do this and photograph it along the way. I see you didn't have any helpers around to hold the arrow for you to make the picture.:bounce:
 

Nicodemus

The Recluse
Staff member
Dutch, when I take an arrow makin` spell, everybody runs for the hills for some unknown reason?! :huh: Something about too much concentration on gettin` em straight, grouchiness, and not wantin` to carry on a conversation? :eek:Just reputation I guess, I`m harmless! :rofl:

DC Hunter, this is how the Indians of the Southeast made their arrows, although some of the shafts might be 4 feet long, longer than the arrows that I generally make. The way the feathers are cut and attached to the shaft, makes it look like a 4 fletch, but in reality, it`s just a 2 fletch. They do make for a stable arrow flight though, and are easier (for me) to make than the Plains style 3 fletch. You can also make them into a flu-flu arrow by not trimmin` the excess off the feathers.

What`s funny, is when I`m at rondyvoos and Indian festivals with them, folks oooh and aaaaw over the purty "toys". These thangs ain`t toys, they`re deadly. ;)
 

ramsey

Senior Member
Now that's interesting, informative, and took a great deal of your time to post for other members. Might be the best post I've seen on this board. thanks Nick
 

Hoss

Moderator
So when your arrow making, you mean the kinder, gentler Nic is on vacation?::ke:
If you hunt with em, I guess you really want to make em count cause if you loose em, a lot of effort down the drain.

Hoss
 

Nicodemus

The Recluse
Staff member
Very true Hoss! Specially on the effort to make them. If you`re in a tight spot, a bent limb will make a temporary servicable bow, but if the arrows ain`t right, the best bow out there won`t fling em worth a hoot. :)
 

bam_bam

Senior Member
sweet looking arrows nic, arrow makin makes me grumpy also too much concentration involved.
 

Southbow

Senior Member
Great tutorial Nick. Thanks for taking the time to write it up.

I cut about two dozen river cane shafts this morning after the hogs got done making me look stupid.

chris
 

Nicodemus

The Recluse
Staff member
Thanks ya`ll!

Sixes, I already have an atlatl around here somewhere, and a Hardin won`t be no trouble. That slate bannerstone though, that`s gonna take awhile!!! :bounce:

Southbow, were you blackpowderin` or bowhuntin`?
 

fflintlock

Useles Billy’s Clubhouse Maintenance man
Thanks Nic !
I've been wanting to make some, now I have no excuse LOL
Great job on the tutorial, them photos are what really helps.
Jerald
 
Top