TVM Late Lancaster Kit

Darkhorse

Senior Member
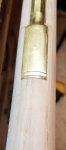
Here is a photo of a finished forearm from the muzzle. This is a good example, if you do it just like this your rifle will look fine. If it is flattened instead of being well rounded it will look slabsided.
I would have filed it straight from the ramrod rails to the curve, cutting out that little bit of sorta round material on the bottom sides. Then blend it with the top radius with blocked sandpaper. I think that would make the shape of the forearm more prominent.
JMHO
 

Attachments

  • Forend.jpg
    Forend.jpg
    46.4 KB · Views: 149

leoparddog

Senior Member
All 3 Thimbles are done. I might massage some more wood off the bottom of the handguard after looking at Darkhorse's photo again. Turned out acceptable. with a slight gap on the transition from the tail to the pipe on the entry thimble. I don't know when I'm going to pin them in. Seems like I inlet the parts and put off the drilling and pinning.

after a little more work around the lock and side plate transitions, I need to go back to the buttstock and finish that and deal with the crack in the toe. Ugh
 

Attachments

  • 20180422_213151.jpg
    20180422_213151.jpg
    42.1 KB · Views: 133
  • 20180422_213238.jpg
    20180422_213238.jpg
    118.6 KB · Views: 133

Darkhorse

Senior Member
I do mine a little different than you do. Not to say it's any better, just different, your looking pretty good right now.
I inlet the majority of my parts first doing little shaping to the wood. Then I go back to the butt and starting there finish the butt, wrist, lock panels, and on down with rasps, chisels, whatever it takes. When all the shaping is done I go back to the butt and start sanding.
When I do the cheekpiece area I super glue the sights on the barrel. I concentrate on a spot on the wall, mount the rifle then check to see where my sights are. By rasping and rough sanding the cheekpiece I keep working it until when I mount the rifle the sights are on target.
Somehow I've managed to get mine real close this way to the sights being on target at my natural point of aim.
 

leoparddog

Senior Member
Last night I drilled and pinned the trigger guard and thimbles. I now have a functional rifle. Very excited. I took it out side today, put some powder in the pan and dropped the hammer on it just to make it spark and light the powder. Yes I flinched. LOL
 

Attachments

  • 20180424_160415.jpg
    20180424_160415.jpg
    67.1 KB · Views: 118

Darkhorse

Senior Member
Now that's a fine looking rifle Leoparddog. You did real well for a first rifle. You did a lot better than most. It's not easy building one of these the first time is it?
Are you planning on doing any molding lines?

I can help you cure that flinch if you want.
 
Last edited:

leoparddog

Senior Member
Thank you Darkhorse, I'd love to shoot with you anytime and work out my flinch.

Molding lines: Yes I'd like to run one down each side of the forearm and end in a "squiggle". I think I can cut a guide block out of maple and embed a sharpened screw into it to cut a straight line. I'd also like a line up the bottom of the buttstock to the trigger guard. Also think I can make a wood jig that I saw in one of my reference books for that. I'd like a few grooves in the cheek piece as well. I think I'll need some practice on scrap before I go carving there.

I have a patch box and I think it needs one. The maple isn't that fancy on that side and would give it some visual appeal. I also have a hunter's star that I'd like to put above the cheek piece.

I'd dearly like some simple incise molding at the rear of the cheek piece but I need a lot of practice before I go past "straight lines". I'm thinking of finishing it and then maybe spend this summer practicing my carving and doing it on the next rifle.
 

Darkhorse

Senior Member
When you get that rifle up and going we'll try and do some shooting. In the meantime you can actually work on this at home now, in the condition the rifle is at present. There is a lot of neat stuff going on with a flintlock. Big hammer with a flint hitting a frizzen, making sparks, setting off the prime, which sets off the main charge. We can't help but look at it, even if we don't know we are doing it. After a few shots it's fixed in our subconcious. And each time we shift our eyes to look at it our sights move.
So I put together a little something that will cure this if applied right and with patience. I taught martial arts for years and this training is the same basic concept as we used to teach our students. Repetition, concentration, repeated until it becomes muscle memory and instinctive.


How to cure the flintlock flinch
Don’t rush the process. The point is to drill this into your subconscious and create muscle memory that will last, and improve over time.
Replace flint with a whittled down piece of wood. You can dryfire inside your house at this step if you wish. Cock your rifle and aim at a defined point. Try to drive the front sight into that point. Now while concentrating on the front sight pull the trigger. Is the front sight still on your mark or close? Or is it a few inches away? If it has wandered off target this is because of the flinch, and you are trying to watch the hammer and flint strike the frizzen.
Now do it again and concentrate harder on ignoring the hammer fall and more on your front sight. Keep trying to drive that front sight into the target.
After a day or two you will start to notice you’re paying more attention to that front sight and less to that distracting flintlock. What ever you do don’t rush to the next step because you’re not ready. You will just relapse. Continue to practice this step for one to two weeks. 2 weeks are much better as it takes time to teach your mind and develop muscle memory. Just keep doing this over and over until that front sight remains stuck on the target every time you pull the trigger.
When you are satisfied that you have mastered this step put the real flint back in the lock and plug the touchhole with a toothpick, you can push it on through into the barrel later. Now go outside and pick you out a new target. Prime the pan. We are now introducing a distraction to the process. Cock your rifle, aim hard at the target and pull the trigger. Don’t be surprised if you flinch. Just keep doing it over and over until you ignore the flash and that front sight remains pasted on the target. If you continue to flinch go back to step one and repeat at least one week because you didn’t do it long enough the first time.
Again I want to stress that you not rush the process. Continue a minimum of 7 days and 2 weeks is not too long.
You should not be flinching at all before moving to the next step which is a rifle loaded with a light charge. If you practiced step one and two long enough then you won’t flinch with a light charge. If you find yourself flinching just go back to step one and start over.
The keys to success are learning to concentrate on that front sight and ignoring the flash in the pan. The longer you practice both steps the greater the success at conquering the flinch. If you keep at it you will begin to notice that the front sight is really pasted on the target, and then the rifle goes off and when the smoke clears that front sight is still pasted on the target.
 

SASS249

Senior Member
Went by today to pick up powder from a group buy. I got to see the progress on this rifle in person. I was impressed. For a first build (or any build) this rifle looks great. I liked the look and balance of the gun and the trigger pull is just right. This gun should be a great shooter as well as a great looker. The inlets were good an tight, and the forearm mostly where it should be. People do not really believe how thin the forearm on these guns needs to be. Good Job Leoparddog, looking forward to see some shooting results.
 

leoparddog

Senior Member
Thanks Bert! I appreciate you bringing your Issac Haines rifle by and giving me some input. Much better to get the visual image in my head by holding a good example - much better than photos. If I can shoot it next weekend, I'll post a target.
 

Darkhorse

Senior Member
Fine praise from SASS249, most first rifles don't turn out so good. It was obvious to me early on that Leaporddog possess'es some fine skills in woodworking, and metal working also.
But don't get cocky, your not finished yet. I split a forend of a stock when pinning the front pipe. Split in 2 pieces 8 inches long with just a thin web holding the 2 together. It could have been a real disaster but it all worked out, and now the repair is hard to find.
Just got to be careful.
 

Darkhorse

Senior Member
Molding lines.....While I have some skills in working and making things with simple hand tools, I have not the slightest bit of artistic talent. The best way for me to ruin a good rifle is to try and decorate it. So it was with some trepidation that I decided to cut simple incised molding lines.
I thought about using a scratch block with a sharpened screw to try and cut a good line but decided against it.
What I did was find some aluminum angle with a long leg that would fit across the top rails and the short leg fell close to the penciled in molding line location. I used wooden shims to raise the metal angle off the rails until the short side fell right on my line. Then I taped angle, shims, and all tight against the stock.
Then using a Flex-Cut 70 degree "V" tool, I held one side against the guide and pushed the tool cutting a thin line right down the pencil mark. I went back over it several times cutting deeper each time. Then I reversed the angle piece and repeated the same process on the opposite side.
Then using a triangular file with the tip cut to the file cuts and angled back towards me, I worked the file in the line to smooth the cut and straighten any wobbly spots.
For the buttstock I made a similar guide from wood to cut the butt molding.
These guides made cutting straight incised lines as simple as possible.
The Flex-cut tools are made with a palm handle to push and they are razor sharp! Really. I've heard that some people just replace a tool when it gets dull and throw away the dull one. The cost is low enough to do this.
The next time I cut moldings I'm going to try using a 60 degree "V" tool and a triangular file.
A 3 sided file is a Equilateral Triangle and the angles are each 60 degrees. By cutting in with a 60 degree V tool and by finishing with a 60 degree file I expect to get better incised lines.
For the squiggly lines I think I'll use the Flex-Cut.

http://www.woodcarverssupply.com/PALM-TOOL-V-70-6mm-FR307/productinfo/993736/

http://www.woodcarverssupply.com/41-10mm-MASTERCARVER-TOOL/productinfo/401413/

I did something similar for the cheekpiece. Both as a guide for cutting and as a guide to keep separate incised lines pointing towards the lock area.
 

Attachments

  • Set triggers (1024x768).jpg
    Set triggers (1024x768).jpg
    161 KB · Views: 84

leoparddog

Senior Member
Well, now I've gone and done it. I went to carving on the rifle last night. Lesson #1: Stop while you're ahead. The straight lines on the forearm went OK actually. It was the curls at the end where I went too deep on one side. The 60 degree V chisel got tilted just a bit and opened it up a bit too much. Seems that when the surface starts to tilt, keeping that V perpendicular to the wood is key. Carving curls on a flat block is much easier than on a curved surface.

So she now has a pretty side and a less pretty side. LOL. Since I'm now knee deep I will see if I can figure out a modest incised pattern on the buttstock.

I think it will still look fine once I get it finished with Aqua Fortis and sealed with Tried & True Varnish Oil.
 

Darkhorse

Senior Member
I hear you. From what little practice I've done with the curves and squiggly lines I think it is a learned technique. And for me will require more practice.
Could you blend your straight line into the now larger squiggly line with a triangular file? A gradual blend may not catch the eye.
 

leoparddog

Senior Member
:shoot:
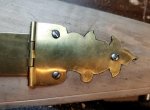
Nope no hiding it. This is the pretty side. I'll just have to ugly those deer to death with it. :shoot:
 

Attachments

  • 15251345719944301443135058942218.jpg
    15251345719944301443135058942218.jpg
    70.2 KB · Views: 64
Last edited:

Darkhorse

Senior Member
Once the rifle is stained and the finish is applied you might be pleasantly surprised. Those fine lines don't show up nearly as well with darker stock wood.
Keep this is mind. Most of us can only see one side of the rifle at a time.
 

leoparddog

Senior Member
sure is slow around here...

I have been working on it though. Inlays take me a long time. I've got the star done and the patchbox is well underway. I've also been doodling on what to carve on the buttstock. I think this is pretty close to what I'm going to do. Someone suggested using a wood burner to lay down the initial design. So I taped a copy of my doodle onto a piece of scrap maple and burned through the paper onto the wood. Then took the paper off and burned it a bit more. Not sure if this will be the path I'll take on the gun with the woodburner. I may just redraw this in pencil.
 

Attachments

  • 20180513_214458.jpg
    20180513_214458.jpg
    99 KB · Views: 73
  • 20180513_200824.jpg
    20180513_200824.jpg
    352.3 KB · Views: 76
  • 20180513_201002.jpg
    20180513_201002.jpg
    158.4 KB · Views: 72

leoparddog

Senior Member
Still been working on this. I think I've decided to skip the carving until I can practice it a bunch. Still working on the patch box though. I have the finial done and filed almost flush with the wood and now have the lid done and the buttplate recessed for it. Starting on the sideplates. This should be engraved but I can do that next winter.
 

Attachments

  • 20180531_210835.jpg
    20180531_210835.jpg
    88.1 KB · Views: 21
  • 20180531_221354.jpg
    20180531_221354.jpg
    174.8 KB · Views: 21

leoparddog

Senior Member
AND we're back! I got the patch box done during the down cycle. Not really happy with the inletting job. I practiced inletting this patch box about 3 times and this wasn't the best attempt. The finial turned out ok but the side plates have some gaps around the curves. The curves give me fits. I tried to fill the gaps with some sawdust + glue. Meh. We'll see when I finish it how it turns out.
I'm going to go back and do some filing on the star to get it closer to flush to the wood and then I think I'm calling it done and will start prepping for the aqua fortis, stain and sealing
 

Attachments

  • 20180604_230316.jpg
    20180604_230316.jpg
    144.1 KB · Views: 11

Darkhorse

Senior Member
I've seen a lot worse inletting from more experienced people. Not bad for the first time at all. It should look better when the stock is stained and finished.
I wouldn't worry about the carving as it doesn't affect the function of the rifle. I would rather see a rifle with the correct lines and shape, with a few incised lines, than one with poor carving any day.
 
Top