DIY Flooring

HuntinJake_23

Senior Member
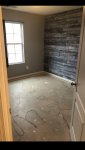
With three dogs and a new born coming home soon, the wife and I agreed it was time to ditch the old grungy carpet and outdated linoleum. We are doing it ourselves and decided upon Select surfaces click together laminate from Sams Club ($1.78/sqft) made in Germany and 14mm thick with backing. We have pulled out most of the carpet and linoleum (I have a new found hate for tack strips on a slab). I am scraping the old glue and carpet pad up with a flat shovel and it’s working great. My shop vac is getting some miles as I suck up all the debris.

Any words of wisdom from anyone with experience in doing flooring? I’m winging it right now with some YouTube videos and a little common sense. We are doing 900sqft.
 

Attachments

  • E21C68EC-E023-46A9-9678-DD2D19189EC4.jpeg
    E21C68EC-E023-46A9-9678-DD2D19189EC4.jpeg
    147.6 KB · Views: 100
  • 62AEFA2C-C65A-4DE9-A58F-87D677FFF8DB.jpeg
    62AEFA2C-C65A-4DE9-A58F-87D677FFF8DB.jpeg
    133.6 KB · Views: 100
  • 9BD285FE-8419-4325-BA21-77085E84E496.jpeg
    9BD285FE-8419-4325-BA21-77085E84E496.jpeg
    146 KB · Views: 99

RedHills

Self Banned after losing a Noles bet.
I've put some of the interlock down...put down the vapor barrier AND a cushion layer(if budget permits) some of the lesser expensive flooring can be aggravating getting the interlocks sealed and not breaking off. Just work at finding the best procedure for getting them locked. Rubber mallet helps but be careful. A fine tooth blade or it chips when you cut it. They make a particular blade for it. Post installation, don't wet mop the snot out of it.
 

seeker

Senior Member
Bring it inside and open the boxes to acclimate to your home.
Use spacers to bring it out from the walls on every side. That allows for expansion and contraction.
But the most important thing for me is to set the first course straight. I do this by snapping two or three courses together first and then slide them to the wall.
 

Rick Alexander

Senior Member
Make darn sure that floor is flat. If you have dips - use a leveler before you start or you'll drive yourself nuts trying to get the snaps to stay together 100%. By the time you start adding rows any imperfections start to multiply and you'll start having a heck of a time getting it to snap together. DAMHIK

It looks so easy in the videos------
 

Gator89

Senior Member
Invest in a laminate shear (maybe rent one) so you can cut the planks without having to get up and walk to the chop saw.

Otherwise, a Harbor Freight sliding miter saw for cross cuts and a table saw for rips, (use fine tooth blades) and a laminate installation kit and you are ready to go.
 

Anvil Head

Senior Member
Just like carpet, don't skimp on underlayment prep. Level and clean, don't use cheapest pad, and start "square" with a good true baseline. It'll go pretty fast once you get a few lines down. Just take your time making the odd cuts.
 

divinginn

Senior Member
Bring it inside and open the boxes to acclimate to your home.
Use spacers to bring it out from the walls on every side. That allows for expansion and contraction.
But the most important thing for me is to set the first course straight. I do this by snapping two or three courses together first and then slide them to the wall.
This,they need to be in the house for a week in low humidity,I learned this the hard way.
 

oops1

Buzzard Expert
Get you some good knee pads and a bottle of motrin.If you have any questions message me

FH knows his stuff and talked me through getting started on mine. One tip that was golden. Wood glue is your friend around cased openings doors and walls. You’re going to have to cut the tongue side off of some pieces to get them to fit but the glue holds them in place.
 

oops1

Buzzard Expert
Also..I bought the sams wood as well. It had the pad on the back so I skipped the Polly barrier. FH said that would be okay as long as the slab was cured.
 

mattuga

Banned
You can use quarter round to finish if there is a gap between floor and bottom of molding. That was an issue with our house when we replaced carpet with floating laminate floor. Looks like you are doing great with the first picture of it getting laid.
 

jiminbogart

TCU Go Frawgs !
Late to the party.

Set up a saw table outside with a mitre saw and a skil saw(for rips). Set a box fan up to blow the dust away from you(you don't want to breath it and it clogs up your eyes.

Cut some scraps to use as bang pieces to get the floor tight.

On transitions strips use construction adhesive in stead of the plastic click channels. Put something heavy to hold it down for 24 hours.

In a doorway(when parallel to the wall), break it somewhere in the middle, slid a piece in from the middle to one side and the middle to the other side and then tap them from opposite ends to get them tight in the opening. Then finish the left and right side runs on that row.

We have installed and had others install for us 1,000's of boxes of that Sams flooring. It's good stuff. I was happy when they stopped using the Chinese stuff and started using the German.

It goes down easier than any other laminate we've used. Holds up to traffic and animals too.

Keep one person on the floor and have the other person spot the laminate and cut. If the floor is prepped you can throw down one pallet of laminate in less than a day once you've done it a time of two.

Get a black betty to use for tight spots.


black betty.png
 

HuntinJake_23

Senior Member
We are progressing along, we’ve hit some frustrating corners and angles but we’ve pushed through it. It’s looking great!
 

Attachments

  • 52DEB622-3D75-465C-989D-C6A1D6438FA2.jpeg
    52DEB622-3D75-465C-989D-C6A1D6438FA2.jpeg
    186.6 KB · Views: 21

HuntinJake_23

Senior Member
Got my sons room done, should be done with the rest in a day or two!!
 

Attachments

  • B9D67355-62BD-4E87-B490-F5BAC1404795.jpeg
    B9D67355-62BD-4E87-B490-F5BAC1404795.jpeg
    74.1 KB · Views: 14
Top