A First-timer's Bow Setup and Tuning Thread

Brewskis

Senior Member
Hey guys, I recently bought a new bow which has never been set up or tuned. Typically, I would have given Kris87 a call, and found out when I could drop it off with him. I've always felt like bow setup and tuning was something best left for the experts to do (I still kinda feel that way). However, this DIY Archery forum got me to thinking. The text under the forum title says, '...Learn how to set up and tune your archery gear yourself!'. For me, nothing beats the feeling of DIY. Worse case, I have to make a trip to the ER, buy another bow, and then take it to Kris, right?

Everyone's probably seen the two threads documenting the setup and tuning of JT's bow last off-season (if not, see Part 1 and Part 2), and those were a great help to me as I was researching how to do this myself. I'll be primarily following the steps documented in those threads. However, since I've never done this before, I know there are a lot of blanks that need to be filled in along the way. I'm planning on taking my time, and will probably ask a lot of 'dumb' questions.

Therefore, I thought it'd be helpful to start a thread chronicling this process from start to finish from the perspective of someone doing it for the first time. That way I could have a place to keep track of everything. Perhaps, there are others out there who are looking to do the same thing, but have never tried it. I'm hoping all of us can get the answers and help needed from our resident experts here.

Plus, it's been kinda slow over here in the DIY Archery forum.
 

Brewskis

Senior Member
So, I ended up getting a great deal (surprisingly, my wife agreed :love:
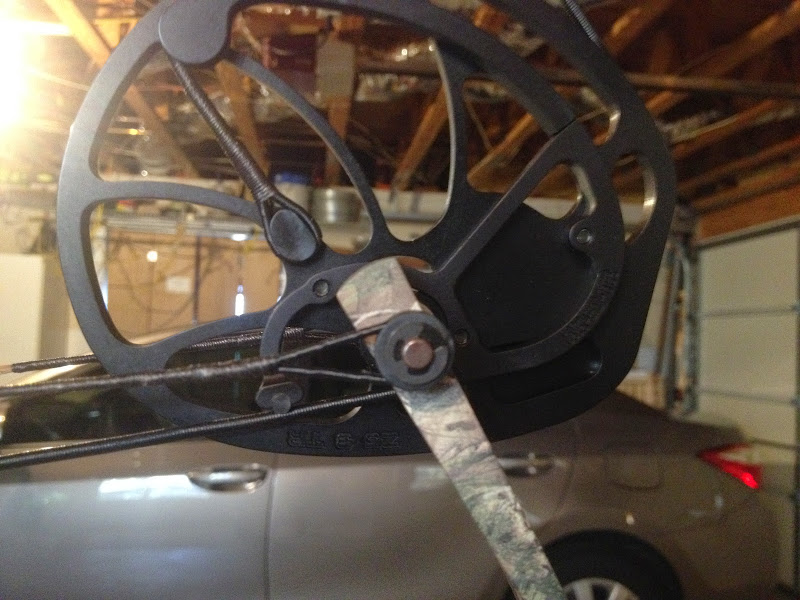
) on a closeout 2014 Hoyt Carbon Spyder 34. It's a #3 cam, 50-60 lbs draw weight, 29.5" draw length.

This will end up being my primary hunting bow, so I'm want to set it up to be a near duplicate of my Hoyt Faktor 34 which will become my backup bow. Between some great deals on the internet and my spare parts bin in the garage, I was able to find everything I need to do that.

  • Montana Black Gold Widow Maker sight (2" Big Dog sight ring with 5 pins)
  • Vaper Trail Limbdriver Pro V drop-away rest
  • Bee Stinger Sport Hunter Extreme Stabilizer (10")
  • Fletcher TruPeep Peep Sight (Max Hunter 1/4")
  • Paradox Custom Cobra Bow Sling

IMG_7464%255B1%255D.JPG


Soybean talked about the 'tooling up' in another thread here in the DIY forum. Based on what I've read here and on AT, these are the kinds of things I'll need, and have gotten together:

  • Bench
  • Draw board (should be done soon using 'plans' and suggestions I found here on the forum and elsewhere on the internet)
  • Scale (Taylor Dial Style Industrial Hanging Scale - up to 70 lbs)
  • Scissors-style bow stand (decided to try this out instead of buying vise yet after seeing it used by others for this purpose)
  • Bow press (Bow Master w/ split limb adapters)
  • Bow square (Saunders Forked Horn Square)
  • Bow levels (R.S. Nok-EZ and Snap-on String Combo)
  • Pliers (needle-nose and Viper Archery Products Loopset Pliers)
  • Hex wrenches
  • Calipers
  • BCY #24 loop material
  • BCY nock point & peep tying thread
  • Lighter
  • Knife
  • Paper tuner (homemade using Schedule 40 pipe) and target
I know some guys can get away without certain things listed above, but I figured as a newbie it's better to have something on-hand and not need it than the other way around after getting started.

So is there anything else I'll need or that may be helpful that I may have left out?
 

Kris87

Senior Member
Great thread. I'll be happy to participate and walk you through it all. Be prepared to take pics so others will see. Let's go. What's your first step?
 

Brewskis

Senior Member
Sounds great, Kris. I finished my draw board earlier this afternoon. I modified my workbench so it has a 2x6 on the front. I'm hoping I made it long enough..

Quick question, I duct-taped the yardstick for now since I wasn't 100% sure where it's supposed to start. Should the 1.75" mark be right where the bow grip will contact the post on the draw board?

Drawboard.jpg


Regarding my first step, I'm actually not sure what it should be. As I read the two setup/tuning threads for JT's bow, I made the following high-level outline of the process:

  • Mount the rest
  • Set the centershot
  • Check cam sync
  • Tie soft nocks
  • Tie D-loop
  • Check bow specs (axle-to-axle distance, brace height, draw weight, draw length)
  • Shoot bow - bareshaft through paper (not sure if this is necessary at this point or just for curiosity's sake?)
  • Check cam sync again
  • Check cam lean at brace
  • Check cam lean at full draw
  • Shoot bow - bareshaft through paper
  • Troubleshoot arrow flight
  • Mount sight, stabilizer, sling
  • Determine peep sight location, and serve in
  • Adjust sight pins
  • Shoot bareshaft with fletched arrow at distance
Is this about right (steps and their order)?

I figured it'd be a good idea to have an idea of the basic steps and overall order of those steps, and then cover the details of each step as I move along through the process.
 

Brewskis

Senior Member
Also, it's a 50-60 lb. draw weight bow, and I want to set the draw weight at 55 lbs. I've read that I should bottom out my limbs before doing anything. Is that correct? If so, at what point in the above outline do I set my draw weight to my desired poundage?
 

Kris87

Senior Member
OK, yes, set tape at 1.75" at the post. That will be the AMO draw length.

Bottom the cams, then mark them with a silver sharpie so u can measure your turns in/out. Set to 55#. Now go on to tuning sequence.
 

Kris87

Senior Member
Take that foam off and set the 1.75" there. I can tell by your photo that its not right yet.
 

Kris87

Senior Member
Once u get poundage close, mount the rest, eyeball it level for now, then set the cam sync. While setting cam sync first time, set the prelean where u want it. When adjusting the yokes, it affects sync, so go ahead and get it in the ballpark.
 

DABAU

Member
This should be a very helpful thread and I will follow closely. I just got done building a draw board and collecting similiar tuning equipment to start doing my own stuff. I'm putting a new string on my bow this weekend and plan on re-tuning everything so I'm excited and nervous I'm going to mess something up all at the same time. Only way to learn is to dive right in.
 

Brewskis

Senior Member
I'll be getting back to this tonight. However, I'm not sure I know the best way to check cam sync?

Should I just pull the bow down using a hook I have attached above in a floor joist (it's definitely securely fastened and strong enough), or should I use the draw board? I didn't know if it's OK to draw the bow back on the draw board without a D-loop? It seems like the link/carabiner connected to the string could possibly slip up the string causing who knows what kind of havoc.

Also what am I looking for when I check the cam sync? I've read that hybrid cams should be set up so that the drawstop on the top cam hits slightly before the drawstop on the bottom. Perhaps, I'm confusing cam sync and cam timing? :confused:
 

Kris87

Senior Member
Definitely don't put it on the draw board without a d loop. I usually mount and eyeball the rest, then mark the string with a silver sharpie where the nock is. Then for preliminary cam sync, I do use the hook. Still be careful doing this. The reason I don't go ahead and do the loop first, is that when u do adjust the sync, the loop moves either up or down according to which cable u twist.

I generally like to have the top stop hit 1/16" before the bottom. But the bow will eventually tell u where it tunes best.
 

Brewskis

Senior Member
OK, yes, set tape at 1.75" at the post. That will be the AMO draw length.

Take that foam off and set the 1.75" there. I can tell by your photo that its not right yet.

OK, I removed the foam, put a level on the post, then moved the tape so that the 1.75" mark is at the edge of the post.

IMG_7599%255B1%255D.JPG


However, if I put the foam back on, it obviously adds some thickness (even after it compresses from drawing the bow back). Any suggestions for protecting the bow grip, but not adding so much thickness?

IMG_7551.JPG
 

Brewskis

Senior Member
I bottomed out the limb bolts, marked the bolts, and then turned them out equally until the draw weight was at 55 lbs. (required 2 full turns - interestingly, the Hoyt manual said that on a 60 lb. bow each turn is approximately 2.5 lbs.).

IMG_7546.JPG


IMG_7570.JPG
 

Brewskis

Senior Member
I figured before I mounted the rest, I needed to located the Berger hole on the other side of the riser since the rubber 'Silent Shelf' covers it. I poked a pin through the center of the Berger hole, and then used a silver Sharpie to mark the shelf where the pin came through it.

IMG_7518.JPG


IMG_7520.JPG


I then mounted the rest on the bow, and eyeballed it level (OK, I put a level on it. My wife says it's the German in me. Didn't work very well anyways. :smash:
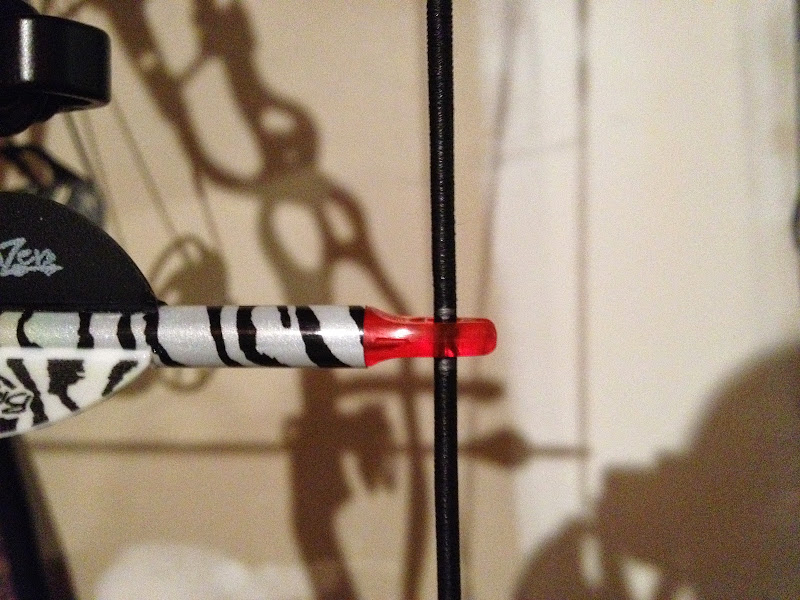
). I wasn't sure where to mount the rest fowards/backwards, so I looked at my Faktor. I noticed it was mounted all the way forward, so I did the same on this bow. I did not touch the vertical adjustment yet. However...

IMG_7554.JPG


I nocked an arrow so that it was level while sitting on the rest, and noticed that the arrow was below the mark I made indicating the Berger hole.

IMG_7543.JPG


I went ahead, and lightly marked the nock location with a silver Sharpie.

IMG_7523.JPG


However, later I recalled something I'd read about how the center of the arrow should intersect the center of the Berger hole, or even a little higher? Is there a specific starting point for setting the rest height in relation to the Berger hole?
 

Brewskis

Senior Member
Now regarding cam sync...

I used the aforementioned hook in the ceiling to carefully draw the bow. Here's where the cams are at as of right now out of the box..

Top cam (barely touching):

IMG_7582.JPG


Bottom cam:

IMG_7585.JPG


I'm not sure how large that gap is, but it definitely looks bigger than 1/16". I'm guessing this is where twisting/untwisting the yoke(s) comes into play?
 

Kris87

Senior Member
Higher is generally better than lower on a hybrid cam bow because of the downward nock travel. Just don't be lower than center. Just start center of shaft with center of berger and go from there.
 

Kris87

Senior Member
Yes that would be a bit much. I hardly ever see one out of the box like that. Normally its the other way around. Keep in mind, if this bow hasn't been shot then the cables are going to stretch, specifically the buss cable. When it does, its naturally going to move that bottom cam closer to the cable. U can move it now, but you're going to have to move it again after they settle.
 

Brewskis

Senior Member
Yes that would be a bit much. I hardly ever see one out of the box like that. Normally its the other way around. Keep in mind, if this bow hasn't been shot then the cables are going to stretch, specifically the buss cable. When it does, its naturally going to move that bottom cam closer to the cable. U can move it now, but you're going to have to move it again after they settle.

To my knowledge, the bow hasn't been shot at all, so I can totally see what you're saying about the bottom cam coming closer after the strings and cables are shot in. In fact, I checked my Faktor 34, and after shooting it countless times last season, I noticed that the bottom cam is now hitting before the top cam (that project will have to wait..)

So are you saying it'd be safe to proceed as it is, and then make adjustments later if necessary? You mentioned adjusting cam sync can affect nocking point, so in addition to adjusting the cam sync later (if necessary), would I also have to move the nocking point up or down?
 

Kris87

Senior Member
If it were mine, I'd add one full twist to the control cable, then go onto the nock. Once they settle, it won't be hard to get it back right by a twist or two. I use the tiller a lot to make fine adjustments to the nock point. An 1/8 turn in a limb bolt doesn't really affect a bow's tune, but does move the nock point up and down. That's just an old trick.
 
Top