A new journey

dm/wolfskin

Senior Member
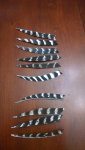
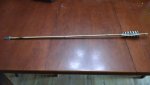
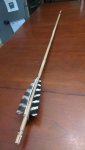
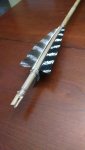
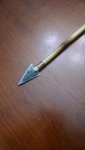
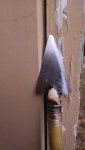
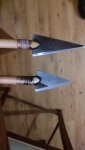
Things coming alone nicely Todd. I can't remember how I broke the coral snake arrow. I need to make another one. I had a red white and blue arrow and I do remember how it got broke. I shot over a doe and she went right after the miss and turned around and side kick it on her way by it. Wood arrow sure do paint up nicely.
 

Todd Cook

Senior Member
I'm getting a little better at this. I got one of those snap off razor knives and I can control it much better. I modified my pattern a little bit too.
 

Attachments

  • 009.jpg
    009.jpg
    330.3 KB · Views: 213

Todd Cook

Senior Member
I've had a couple people ask how exactly I was doing the arrow shafts so I thought I would give a little more detail. First thing is the boards themselves. Pick through them until you find one with very straight grain. You want the grain to run the length of the shaft if possible. A little run off is ok, but less is better. I use a bandsaw; it justs wastes so little wood. A tablesaw works fine too. I rip the boards into 3/8 squares, 36" long. With poplar to get a 48-50 or so spine, I end up with between 5/16 and 11/32 shaft. If you want to make bigger diameter shafts, maybe start with 7/16 squares.
 

Attachments

  • 002.jpg
    002.jpg
    278.9 KB · Views: 216

Todd Cook

Senior Member
The key to this operation is this tool here. I actually made 2 shafts with a scraper I use to tiller bows with. It worked fine, but took a long time. I tried a little cheap block plane I had, one of those 2 inch deals, but it wasn't very adjustable and was a pain to use. I bought this at Sears, a 6 inch adjustable block plane. It is perfect for this. It has good steel with a fine adjustment and you can get it SHARP! $23.00 I think.
 

Attachments

  • 003.jpg
    003.jpg
    409.7 KB · Views: 217

Todd Cook

Senior Member
As you can see in the photo above, I place the square blank on my work table, between 2 boards and face one edge straight up. I then plane that edge down till it looks like this. I adjust it to take a thin shaving all the way down, maybe a 1/64" per pass, maybe less. 8 or 10 passes gets it like this.
 

Attachments

  • 004.jpg
    004.jpg
    345.5 KB · Views: 223
  • 005.jpg
    005.jpg
    378.3 KB · Views: 216

Todd Cook

Senior Member
At this point its 8 sided and somewhat round. I put one end of it into my drill and while the drill spins it, I hold a piece of sandpaper with the other hand against the shaft. I use 80 and 120 grit, you could finish it finer if you like. I sand it round and spine test, and adjust till it's right.
 

Attachments

  • 007.jpg
    007.jpg
    405.4 KB · Views: 215
  • 008.jpg
    008.jpg
    371.1 KB · Views: 211

Todd Cook

Senior Member
Went a little farther yesterday and today. I started working on some cane. I spined several pieces and found 5 that were just about right. I took my time and got this one pretty straight. Shoots really good. About 525 grains. I've got to get better at my wrapping.
 

Attachments

  • 008.jpg
    008.jpg
    286.2 KB · Views: 190
  • 007.jpg
    007.jpg
    277.6 KB · Views: 185
  • 005.jpg
    005.jpg
    306.4 KB · Views: 185
  • 003.jpg
    003.jpg
    329.5 KB · Views: 187

Jake Allen

Senior Member
The cane arrow looks perfect; fletching, wraps, nock and hafted point. It should be a killer.
Rivercane; Nature's carbon
Nice work man.
 

SELFBOW

Senior Member
Looks good but I learned the hard that you need to secure the point w more than sinew and super glue. If you don't have pitch I'd suggest mixing the epoxy for lams for it. It really needs to become one w the arrow if ya know what I mean. The one in my avatar wasn't as secure as it needed and you can see how it looks after a shot.
 

longbowdave1

Senior Member
Great looking cane arrow Todd. Hope to see one of those in the "Traditional kill thread" soon.
 

Todd Cook

Senior Member
Looks good but I learned the hard that you need to secure the point w more than sinew and super glue. If you don't have pitch I'd suggest mixing the epoxy for lams for it. It really needs to become one w the arrow if ya know what I mean. The one in my avatar wasn't as secure as it needed and you can see how it looks after a shot.

I've got lots of epoxy, but I like the sound of pitch. Does it set hard? How do you make it?
 

Clipper

Senior Member
Looks like we are all getting an education with this post. I know I certainly am and enjoying every picture.
 

longbowdave1

Senior Member
Me too! BTW, those feathers look familiar?:fine:


Todd, I sent you a "Pile O' Feathers". You have have turned them into some fine looking Barred Turkey fletchings. :cool:

If your looking to make some easy pitch in the future, I made mine from Ferr-l-tite, and some finely crushed charcoal briquet. Just heated up a tuna can on the side burner of my gas grill, melted the Ferr-l-tite in the can , and stirred in the charcoal powder to get a nice black color. While it was still melted, I spun the new "black goo" on to a stick, kinda like a pitch loli-pop, and let it cool. Then when I need the pitch, I can just hold the loli-pop over a flame and drip the pitch on the desired areas. You can take the "pitch on a stick" in your traditional tool box" for field use as well.:flag:
 

Attachments

  • Ferrl tite pitch 001.jpg
    Ferrl tite pitch 001.jpg
    87.1 KB · Views: 118

Todd Cook

Senior Member
I really liked the pitch idea, so I made some. I scraped about a cup full of sap and cooked it down to liquid. Then I strained the trash out and had maybe 3 ounces of clean liquid. I had some charcoal out of my fire pit and ground it pretty fine, then mixed about 2 tablespoons full into the liquid. I tried for a 3 part sap, 1 part charcoal mix. I'm not sure if the ratio's exactly right or not; it seems a little soft, but it may need to cure overnight? we'll see.
 

Attachments

  • 010.jpg
    010.jpg
    297 KB · Views: 110
  • 018.jpg
    018.jpg
    274.4 KB · Views: 110
  • 019.jpg
    019.jpg
    276 KB · Views: 107

SELFBOW

Senior Member
Rabbit pellets will harden it up w fiber. I put too much in my first batch and it was too hard. Trial and error ....
 
Top