elhoward622
Senior Member
Rod Resurrection: A DIY Rod Reclamation Project
Every angler has them; the forgotten, the forlorn, the forsaken. They come from poor decisions, closeout sales, bargain caves, combos, techniques no longer practiced, species no longer pursued. Some stack them in corners, some hide them in the attic. Mine are stacked on top of my rod rack. I am talking about unused rods. I have quite a few myself. Most of those rods are cheap rods, but a few are technique specific rods that don't apply to bass fishing. Well, its time to do something with these unknown soldiers!
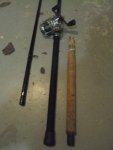
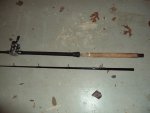
Our case study deals with a 10.5 ft CatMaxx rod from Bass Pro that I bought for chasing catfish and stripe when I lived near a dam tailrace. This heavy, cork handled, casting rod has absolutely zero applications in the bass world. Unless, of course, I use it to fend off jet skis or erect a mast for sailing in the bottom of my Commander. But, in all seriousness, I have been toying with this idea for a couple of years. A way to cut this rod down into a usable, big bait rod. A rod that I could toss 8" swimbaits, heavy Alabama rigs, or big striped bass lures with ease. I had initially planned to trim both ends of the two piece rod and replace the connecting ferrule. Waaaay too much trouble and slim margins for error. Finally, I decided to attempt to trim the butt section of the rod. This would retain the true action of the rod and the tip, but achieve the goal of shorter overall length. The main obstacle is the reel seat. S.O.P is to cut off the reel seat and attempt to replace with a new one, often the guides must be removed for a true, fitted reel seat. That is no bueno in my book. I decided to take the easy, risky way out and break the reel seat free, remove the bottom guides, and attach the reel seat farther up the handle. This is one time I said "thank God for Chinese reel seats!"
The process below details the steps I took to reclaim, to resurrect, my rod. Now, let me make this clear, this process is not a 100%, fool-proof method. It wont work every time, with every rod. There are a ton of variables that fell in favor of pulling this off for me. Do not, I repeat, Do not try this with your expensive rod. Any rod with a valuable blank should be treated as such.
Tools Used: vice, channel lock pliers, heat gun, sharp knife, 1/2" masking tape, 2 part epoxy, saw, para cord
Terminology: reel seat-tension device attaching the reel to the blank, arbor-the spacers typically made of tape that hold the reel seat off of the blank
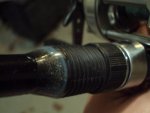
1. Cut away all grip material in front of and behind the reel seat leaving butt cap.
2. Heat reel seat evenly while constantly turning so as not to melt one spot. This loosens the bond of the epoxy holding the reel seat, arbor, and blank together.
3. Clamp reel seat in vice securely with some padding to prevent damage. Firmly grasp butt cap with pliers and twist/pull the blank to free the reel seat from its bonds.
4. Remove guides that will no longer be used.
5. Continue to work the reel seat up the rod blank until all remnants of the tape arbor are cleared and the reel seat inside is clear and resting directly on blank.
6. Determine exact location of reel seat placement and mark on the blank the front and rear edges of the reel seat.
7. Wrap masking tape in concentric circles to build up a solid, thick arbor to support the reel seat. Space three arbors evenly across the reel seat area. Carefully check and add or remove tape so the the reel seat can slide over the arbors. Leave space for epoxy to make its bonds.
8. Mix and apply epoxy to arbors filling the gaps between the arbors fully.
9. Slide the reel seat onto the arbors and align properly with guides. It helps to put the reel in the seat to center the reel seat.
10. After curing, measure and cut off handle to desired length.
11. Attach new or old butt cap using a small masking tape arbor and epoxy.
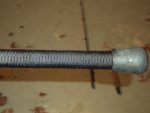
12. Wrap the handle area with para cord for an easy, comfortable handle.
Every angler has them; the forgotten, the forlorn, the forsaken. They come from poor decisions, closeout sales, bargain caves, combos, techniques no longer practiced, species no longer pursued. Some stack them in corners, some hide them in the attic. Mine are stacked on top of my rod rack. I am talking about unused rods. I have quite a few myself. Most of those rods are cheap rods, but a few are technique specific rods that don't apply to bass fishing. Well, its time to do something with these unknown soldiers!
Our case study deals with a 10.5 ft CatMaxx rod from Bass Pro that I bought for chasing catfish and stripe when I lived near a dam tailrace. This heavy, cork handled, casting rod has absolutely zero applications in the bass world. Unless, of course, I use it to fend off jet skis or erect a mast for sailing in the bottom of my Commander. But, in all seriousness, I have been toying with this idea for a couple of years. A way to cut this rod down into a usable, big bait rod. A rod that I could toss 8" swimbaits, heavy Alabama rigs, or big striped bass lures with ease. I had initially planned to trim both ends of the two piece rod and replace the connecting ferrule. Waaaay too much trouble and slim margins for error. Finally, I decided to attempt to trim the butt section of the rod. This would retain the true action of the rod and the tip, but achieve the goal of shorter overall length. The main obstacle is the reel seat. S.O.P is to cut off the reel seat and attempt to replace with a new one, often the guides must be removed for a true, fitted reel seat. That is no bueno in my book. I decided to take the easy, risky way out and break the reel seat free, remove the bottom guides, and attach the reel seat farther up the handle. This is one time I said "thank God for Chinese reel seats!"
The process below details the steps I took to reclaim, to resurrect, my rod. Now, let me make this clear, this process is not a 100%, fool-proof method. It wont work every time, with every rod. There are a ton of variables that fell in favor of pulling this off for me. Do not, I repeat, Do not try this with your expensive rod. Any rod with a valuable blank should be treated as such.
Tools Used: vice, channel lock pliers, heat gun, sharp knife, 1/2" masking tape, 2 part epoxy, saw, para cord
Terminology: reel seat-tension device attaching the reel to the blank, arbor-the spacers typically made of tape that hold the reel seat off of the blank
1. Cut away all grip material in front of and behind the reel seat leaving butt cap.
2. Heat reel seat evenly while constantly turning so as not to melt one spot. This loosens the bond of the epoxy holding the reel seat, arbor, and blank together.
3. Clamp reel seat in vice securely with some padding to prevent damage. Firmly grasp butt cap with pliers and twist/pull the blank to free the reel seat from its bonds.
4. Remove guides that will no longer be used.
5. Continue to work the reel seat up the rod blank until all remnants of the tape arbor are cleared and the reel seat inside is clear and resting directly on blank.
6. Determine exact location of reel seat placement and mark on the blank the front and rear edges of the reel seat.
7. Wrap masking tape in concentric circles to build up a solid, thick arbor to support the reel seat. Space three arbors evenly across the reel seat area. Carefully check and add or remove tape so the the reel seat can slide over the arbors. Leave space for epoxy to make its bonds.
8. Mix and apply epoxy to arbors filling the gaps between the arbors fully.
9. Slide the reel seat onto the arbors and align properly with guides. It helps to put the reel in the seat to center the reel seat.
10. After curing, measure and cut off handle to desired length.
11. Attach new or old butt cap using a small masking tape arbor and epoxy.
12. Wrap the handle area with para cord for an easy, comfortable handle.
Attachments

Last edited: