rip18
Senior Member
I've been meaning to post this to my blog, but Kadiddlehopper's question about using flash in bright light made me go ahead & write this up and share it here first...
Kadiddlehopper, your question is answered in the first two posts, but the other posts show some other examples (that I've actually used with birds at times as well...).
Bear with me, it's going to take me 7 posts to complete this example...
I was working on a presentation about how I photograph reptiles and amphibians and talking about modifying light using flash, diffusers, and reflectors. I had photographic examples of how we use all of those during a herp workshop with herps in controlled situations, but I did NOT have an example showing a single scene where we’d used all of those tools, so I recruited my buddy Gary Carter to help me shoot a series of a single scene.
Light (the quantity, quality, direction, etc.) is THE key to creating a great photograph. Seeing good light enables you to create better images. Understanding how you can MANIPULATE light to enhance your images allows you much greater creative control and lets you create better images under more difficult conditions.
With today’s digital tools, you can often modify how we perceive the light to have been when the image was created (think about how modifying white balance, color temperature, tone curve, shadows/highlights, etc. changes the image). Post exposure manipulation, however, does NOT change the light conditions when the photo was taken. Changing the actual light recorded on the sensor may result in a more pleasing image with less computer work needed. Having the image come off the memory card with little work needed is always a big plus in my world.
This series of images was shot to illustrate some of the results of using different light manipulation techniques . All but the last of these images are basically straight out of the camera with no effort made to optimize their color/contrast.
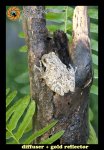
For our subject, we had a nice gray treefrog (Hyla chrysoscelis) on a small dead limb with some attractive green ferns around it. I didn’t attempt to get the frog to “pose” for this series, but instead let the frog get to where it was comfortable so that it would more likely stay in place while I completed this series of images. All of these images were shot with a tripod-mounted Nikon D300s in aperture priority mode (aperture set at f/16) and an old manual focus macro lens. For two of the shots, the self-timer was used because we didn’t have enough people to hold the diffuse, reflector, AND man the camera. If I had been by myself, I COULD have propped the diffuser & reflector up with spare light stands/clamps, etc., but having more people to help certainly makes using some of these tools MUCH easier…
For the first shot, we simply had the frog out in the bright sunlight about 10:00 in the morning (I know, the EXIF data says 9:00, but the camera thought it was over in Mississippi on central time when we were really in North Carolina on eastern time). There is a marked brightness with a lack of detail in the shadows coupled with several bright highlights with no detail. The color temperature was 4350 degrees Kelvin with some small over-exposed white areas and some pure black areas – both with no detail.
Kadiddlehopper, your question is answered in the first two posts, but the other posts show some other examples (that I've actually used with birds at times as well...).
Bear with me, it's going to take me 7 posts to complete this example...
I was working on a presentation about how I photograph reptiles and amphibians and talking about modifying light using flash, diffusers, and reflectors. I had photographic examples of how we use all of those during a herp workshop with herps in controlled situations, but I did NOT have an example showing a single scene where we’d used all of those tools, so I recruited my buddy Gary Carter to help me shoot a series of a single scene.
Light (the quantity, quality, direction, etc.) is THE key to creating a great photograph. Seeing good light enables you to create better images. Understanding how you can MANIPULATE light to enhance your images allows you much greater creative control and lets you create better images under more difficult conditions.
With today’s digital tools, you can often modify how we perceive the light to have been when the image was created (think about how modifying white balance, color temperature, tone curve, shadows/highlights, etc. changes the image). Post exposure manipulation, however, does NOT change the light conditions when the photo was taken. Changing the actual light recorded on the sensor may result in a more pleasing image with less computer work needed. Having the image come off the memory card with little work needed is always a big plus in my world.
This series of images was shot to illustrate some of the results of using different light manipulation techniques . All but the last of these images are basically straight out of the camera with no effort made to optimize their color/contrast.
For our subject, we had a nice gray treefrog (Hyla chrysoscelis) on a small dead limb with some attractive green ferns around it. I didn’t attempt to get the frog to “pose” for this series, but instead let the frog get to where it was comfortable so that it would more likely stay in place while I completed this series of images. All of these images were shot with a tripod-mounted Nikon D300s in aperture priority mode (aperture set at f/16) and an old manual focus macro lens. For two of the shots, the self-timer was used because we didn’t have enough people to hold the diffuse, reflector, AND man the camera. If I had been by myself, I COULD have propped the diffuser & reflector up with spare light stands/clamps, etc., but having more people to help certainly makes using some of these tools MUCH easier…
For the first shot, we simply had the frog out in the bright sunlight about 10:00 in the morning (I know, the EXIF data says 9:00, but the camera thought it was over in Mississippi on central time when we were really in North Carolina on eastern time). There is a marked brightness with a lack of detail in the shadows coupled with several bright highlights with no detail. The color temperature was 4350 degrees Kelvin with some small over-exposed white areas and some pure black areas – both with no detail.


 Might be a lot more then me and my normal traveling companion the Kodak will ever get to try but it does make me see how trying to get a different idea of how light shines on a subject can make a world of difference.. To me this means maybe just snaping a shot to get one then moving , mushin and moving again and then moving again.
