Dr. Strangelove
Senior Member
I brought an old drafting table home from my parent's house today. Family lore is that it was hand built by my great great grandfather, probably sometime in the 1880's to 1900 timeframe. It appears to be a drafting table, because when the top is assembled on the base, it will adjust and lock into any angle from horizontal to almost vertical.
It was in my dad's home when he was a kid, and in mine(his) when I was a kid. It's been stored for 15+ years in a backyard shed exposed to summer and winter temps and at some point some the shed had a water ingress problem in bad rains.
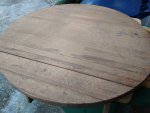
The top appears to be glued strips of wood, one section of which is about to give up the ghost, it has a huge crack across the whole top and flexes, I'm sure I could tear it off if I tried. It appears to be made of red oak (?) and I'm sure the original finish was almost certainly oil based varnish of some sort due to the time frame. My mom applied some kind of finish to the top of top probably thirty years ago, I'm sure some kind of Minwax polyurethane product. That has also now powdered and is flaking off.
Top (with crack along the glue line):
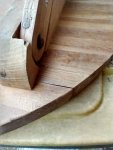
Crack from the bottom, this is what is flexing and could pretty much be torn off:
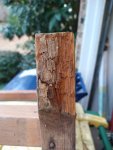
The base has some rot on the bottom of the legs, enough to make it unstable. One side is worse than the other.
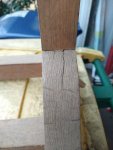
The base is cracking as well, overall the piece looks like it has dried out considerably and then rotted on the bottom where the legs were in contact with water:
Lastly, the base seems catty-whampus and out of square altogether:
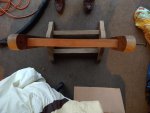
My goal is to partially restore the table and use it for a nightstand or perhaps in my office. I want to repair the damage to the top where it appears to want to fall apart and strip/refinish the rest of the wood. My woodworking experience to date has been building houses 30+ years ago and some limited experience on boats. I'm guessing I need to remove all the rot in the legs to good wood and decide if I want to graft something else onto it to match the original profile or just install some shims and call it good.
I have a decent selection of tools, belt sander, orbital sander, saws, chisels, etc. Chime in here, but I plan to strip it, sand it, repair the top somehow, and refinish. Any suggestions are welcome, but mostly how to repair the top and what finish to use at the end? I've always used Cetol Marine finishes on boats but that seems a bit of overkill here. What's a good wood finish that would hold up to a drink being sat down/spilled on it or worse?
Also, the top, best way to repair the faulty glue section? Tear off and re-glue and clamp? Biscuit joiner? Dowels? Something else?
Thanks for any and all input! I look forward to a fun winter project!
It was in my dad's home when he was a kid, and in mine(his) when I was a kid. It's been stored for 15+ years in a backyard shed exposed to summer and winter temps and at some point some the shed had a water ingress problem in bad rains.
The top appears to be glued strips of wood, one section of which is about to give up the ghost, it has a huge crack across the whole top and flexes, I'm sure I could tear it off if I tried. It appears to be made of red oak (?) and I'm sure the original finish was almost certainly oil based varnish of some sort due to the time frame. My mom applied some kind of finish to the top of top probably thirty years ago, I'm sure some kind of Minwax polyurethane product. That has also now powdered and is flaking off.
Top (with crack along the glue line):

Crack from the bottom, this is what is flexing and could pretty much be torn off:

The base has some rot on the bottom of the legs, enough to make it unstable. One side is worse than the other.

The base is cracking as well, overall the piece looks like it has dried out considerably and then rotted on the bottom where the legs were in contact with water:

Lastly, the base seems catty-whampus and out of square altogether:

My goal is to partially restore the table and use it for a nightstand or perhaps in my office. I want to repair the damage to the top where it appears to want to fall apart and strip/refinish the rest of the wood. My woodworking experience to date has been building houses 30+ years ago and some limited experience on boats. I'm guessing I need to remove all the rot in the legs to good wood and decide if I want to graft something else onto it to match the original profile or just install some shims and call it good.
I have a decent selection of tools, belt sander, orbital sander, saws, chisels, etc. Chime in here, but I plan to strip it, sand it, repair the top somehow, and refinish. Any suggestions are welcome, but mostly how to repair the top and what finish to use at the end? I've always used Cetol Marine finishes on boats but that seems a bit of overkill here. What's a good wood finish that would hold up to a drink being sat down/spilled on it or worse?
Also, the top, best way to repair the faulty glue section? Tear off and re-glue and clamp? Biscuit joiner? Dowels? Something else?
Thanks for any and all input! I look forward to a fun winter project!


