My Today's Projects

rmp

Senior Member
@Railroader I don't know what kind of detail this is going to be. One can will be plenty! It doesn't matter how much you spray on an IPSC target it will not be the same on the stock :D It will give you a heads up if nothing else.

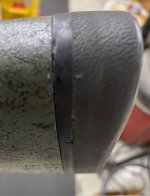
I tried to hold it a little farther away hoping that it would dry a little on the way making the texture a little stronger. Dries in 5 minutes and handle in an hour. I will let it go over night. Spraying temps should be between 50 and 75 with low humidity according to the can. Just so happens the shop is 71 and 48%.

I did over cover in a couple of places (bottom 2 pics)...the spray nozzle fans top to bottom and I didn't try to change it. I will look tomorrow to see if you can change it to a flat fan.

Hers is the result:

View attachment 1236704
View attachment 1236705
View attachment 1236706
View attachment 1236707
You’ve got good taste with color selection. Rust Oleum Matte clear holds up surprisingly well as a top coat. Back in the day, krylon webbing was popular. Still have some silver.
IMG_6908.jpeg

image.jpg
 
Last edited:

Jester896

Senior Clown
Thanks
looks like the only two they make anymore is Black Lava and Gold Chiffon. I came real close to using something closer to spruce for the base coat. I have a Stocky's Stock that is close to the OD base on my .22-250
 
  • Like
Reactions: rmp

Jester896

Senior Clown
@Railroader the texture is AWESOME

the valve will not change. The fan is vertical but it would would be awesome if you could change it to horizontal for this project...IMO

i might be leery of buying paint on Amazon from now on. The Krylon Ultra Flat Camouflage they sent had rust under the plastic cap and the valve was really hard to press. The webbing paint seems fine...or the first can does. The Aluma-Hyde the valve seems to be stopped up to a degree...it doesn't spray right..it is all over my fingers..uneven first coat. Getting replacement valve from inside and going back out to get a second coat with the new fan nozzles i picked up from Brownell's recently.

edit:
the new fan nozzle made the second coat cover evenly. I might be disappointed if this matte clear turns out to be satin clear when it cures.

shhh...i might slip it in PGs oven @195* while she is at work to quick cure it tomorrow.
 
Last edited:

Dub

Senior Member
Using her oven......living dangerously.

Mess around and find out.

Much respect. :rofl:


That stock is looking awesome. :rockon:

I think of the the Tikka synthetic stock I had several years ago. Sucker was slick & slippery.....especially with fleece gloves on.

A base coat, some webbing and a clear coat would've really made it much more user friendly.....and look great, too.
 

Jester896

Senior Clown
I ordered a EGW and a YHM thread protector since I wasn't sure it was a YHM we used...it wasn't BTW....so I ran up to my buddy's this morning and fit the EGW to it. We put it in the lathe and made it a little shorter. I left about a .012 lip on it to help protect the crown a little better. Just got it re-blued and came in to type this ...since I am still waiting for paint to dry. Might hit it with the heat gun a little before I bring it into her oven...just to see. It still has more sheen than I had hope for.

IMG_1700.jpg
IMG_0359 (2).jpg
 

Jester896

Senior Clown
Still too shiney to suit me...won't fit in PG's oven. I did hit it with the heat gun to get the tacky feel GON. I guess it is wait the 14 days cure time to re-coat it.

The inconsistent spray (original nozzle) and satin finish are indications the talc didn't mix and the can wasn't shaken enough...smh. Going to set the timer on my phone for 5 minutes next time...not just the 2-3 minutes and hands numb stuff I did last time. May take it to a paint store and let them shake it.
 

Darkhorse

Senior Member
Interesting thread that applies to many different rifles out there. A few years ago I painted the stock on my Tikka because it was just too slick. Solved the problem. I'm including the post I made at the time as it might give some ideas to someone contemplating something similar.

"
[IMG alt="Darkhorse"]https://forum.gon.com/data/avatars/m/0/938.jpg?1527958734[/IMG]

Darkhorse

Senior Member​

I've had this rifle for a long time now, I can't find the bill of sale but I think I bought it around the second year they began importing them. I like it pretty well but there are a few things I don't care for....the bottom piece is plastic instead of metal....the LOP is too long with winter clothing on....and the plastic stock was slick as our Georgia red clay roads after a hard rain. It would slide against my cheek and hand when shooting offhand and it would move around when on sandbags, I never could get it too really lockdown like a wooden stock does. The Tikka is not my only synthetic stock but it is the only one that's this slick.
So I started thinking about painting it to make it a little more grabby. Did a lot of research, then just jumped right in.
The Tikka stock is notorius for being difficult to bed or paint because nothing sticks to it, so this is how I did it.
First thing was a good wipedown with alcohol. Then I removed the recoil pad and plastic filler and the sling studs. And started sanding. Most references say to use 220 grit but I used 100 grit, because I'm not after a smooth finish I'm after a rough finish, something that helps paint stick. I sanded it until all the slick black was off and the surface was gray and rough. Then a trip to the air compressor to blow everything off. Then another good wipe with a clean cloth and alcohol.
Now I'm wearing rubber gloves and outside with the stock hanging on a wire attached to a recoil pad screw. And another good wipedown with alcohol. After drying good it was time to paint. First was several light coats of a Primer/Paint mixture. This was a good rich satin brown. I took care not to let it run.
Two days later I sprayed several light coats of a textured brown paint and let it dry 48 hours. I didn't like it. The surface was just too gritty, it felt like 60 grit sandpaper. So I cut a piece of scuff pad and began to lightly sand the surface. First I took off the sharp points on the entire stock, then applying more pressure I sanded the really offending places, where my cheek contacts the stock, the wrist, and the forend. Now it felt a lot better, still plenty of good grip but nothing sharp now and the cheek, wrist and forend were very comfortable. Next another trip to the air compressor and a light wipedown with alcohol.
Lastly I sprayed several light coats of clear, matte topcoat.
For Camo I took a wadded up paper towel, sprayed a puddle of flat black on a piece of cardboard, dobbed the paper towel and blotted it on the surface.
I think it came out good for a rattle can paint job and fixed the slick surface problem.
Next I cut up some pipe insulation into small square chunks and filled the butt, and compressing the foam with a stick every few handfuls. Now most of that hollow drum sound is gone.

SS850131_1024x768.jpg
"

This past year I added a new Limbsaver recoil pad and discovered the bottom hole was stripped out. I haven't fixed it yet because I wasn't sure how I wanted to proceed. But after reading this post I like the idea of just filling the hole with an epoxy mix and running the screw right down through it. Precoated with a release agent of course.
I also lost my original clip the last day of deer season and anybody who's ever needed a Tikka clip knows how expensive they are. Well I found a good price on a 10 round clip through Beretta and promptly ordered one.
At the same time I bought a new recoil pad from Beretta. The clip works great. The new recoil pad from Beretta just won't fit right. If a new pad is needed check out Limbsaver.
 

Jester896

Senior Clown
I remember that...hard to believe it was 5 years ago. I hit the like button then.
I am familiar with sponge painting...did it above the chair rail in the kitchen and dabble on a couple craft item.
Dry sponge works pretty good too...dip it... blot it on something... then blot it on the item

thanks for adding this

if you changed the LOP the factory pad will need to be adjusted. Your welcome to swing by and use my jig to custom fit a pad. Your aren't that far...head out early one Saturday..get it done...grab lunch...back home early afternoon.
 
  • Like
Reactions: Dub

Dub

Senior Member
Man....you've got into my head with this project.

I have been watching and grinning.....enthused to see it unfold.

I have a rifle that I believe will make a worthy project for such.....I just have to get some other projects with other guns knocked out first.

Gonna keep watching this one unfold @Jester896

Thanks for linking up the thread on that super Tikka @Darkhorse

Ya'll have shown the way to taking these synthetics and making them into what is what your want them to be.


EDIT: typo removed
 
Last edited:

Jester896

Senior Clown
the cavity in my stock is small but I may add the foam to deaden it just a little...if I don't add shot and epoxy :D
 
  • Like
Reactions: Dub

Darkhorse

Senior Member
if you changed the LOP the factory pad will need to be adjusted. Your welcome to swing by and use my jig to custom fit a pad. Your aren't that far...head out early one Saturday..get it done...grab lunch...back home early afternoon.
I think the LOP and pad will work out fine. Limbsaver used to list 2 pads for the Tikka, a prefit and a grind to fit. Now they list a third one, it's also a prefit but a little thinner than the others. That's the one I bought.
 

Jester896

Senior Clown
on the way to the shop past the kennels...
I blurted out...talk to me...tough stuff...smh

I reloaded this little pick up piece. It has a hecho en Mexico tag in the back corner. Going to replace my humidor table with it and gain a little storage to boot.

The top is cracked so I got it of and will try to find a suitable piece of pine to remake the top.

IMG_1708.jpg

The top came off fairly easy but I cracked the top drawer support. I think a little glue and clamp will fix that right up. I'll take it to my buddy's tomorrow and make one on his bigger table saw with the router table and maybe put a little different edge on it. Hate to dress the cheap pine look up too much.

I got the rest of it pretty much stripped with that orange gel...still in the process of wiping it down and will get more pictures of that as I go along, The drawers are going to be a small pain in my backside to clean up.
This is what it looked like before I stripped it.

IMG_1707.jpg

while I had the stripper out I thought I would try a little on this one since the Zylene wouldn't touch the top coat what ever it was. The stripper softened it up pretty good...turned it a chalky white.

IMG_1711.jpg

the Zylene should take the paint off underneath the top coat.
This is a L/A BDL type HS Precision with the cheek piece and a bedding block. It was bedded and with a Holland lug. It used to be a HBAR STW before I robbed the action from it. It has a narrow front with a single swivel.
 
  • Like
Reactions: Dub

Jester896

Senior Clown
well I finished the chest
IMG_1722.jpg
IMG_1723.jpg

While I had the Boiled Linseed Oil out I finished the Hawk handle and assembled the Weeping Heart hawk head on it
IMG_1724.jpg

someone told me when I got it together they would help me get a good edge on it....ifin I could just remember who dat wuz ;)

Got the stock taped back off, again and hung up to coat again since the 14 day cure time is up. I made a good point to shake the stew outta the can this time. I even cleaned up my other mess a good bit while I shook it in every direction imaginable while I was doing so. The agitator ball was moving freely for sure. I hit it one more time as lightly as I could but still had coverage so I don't lose my texture.

Disappointed is an understatement. Aluma-Hyde II Matte Clear is Semi-Gloss Clear mislabeled.

I went back to the Brownell's site a few minutes ago and see that it is only listed as clear now after my inquiries. The only place the word matte is now is in the 12 oz can matte description line. I felt compelled to leave a review and try to find something flat-matte to spray over the top of that...in another 14 days when it is cured.

IMG_1729.jpg
IMG_1725.jpg
IMG_1728.jpg
IMG_1726.jpg

added new pics
 
Last edited:

Jester896

Senior Clown
Been getting after it a little over the past few days. I have been making little circles with light gray Scotchbrite (800 grit)...trying to get this to dull up a little. It is getting there but I think I need to go a little more.

I got it this far together this afternoon.
IMG_1747.jpg
IMG_1749.jpg
IMG_1750.jpg
IMG_1748.jpg

Scope looks like it will be as long as the stock if I use the sun shield ;)
IMG_1751.jpg

Got a few more little things to do to finish it up. The cant level I ordered was for a Weaver rail and will not attach properly the the picatinny...if someone needs one for theirs send me a PM.

I left enough room behind the rear ring to install a tube mount type. I may go ahead and put this tube mount where I purchased it to go and grab the rail mount off of that one to go on this.
 

Attachments

  • IMG_1753.jpg
    IMG_1753.jpg
    89.5 KB · Views: 4

Big7

The Oracle
Been getting after it a little over the past few days. I have been making little circles with light gray Scotchbrite (800 grit)...trying to get this to dull up a little. It is getting there but I think I need to go a little more.

I got it this far together this afternoon.
View attachment 1242040
View attachment 1242047
View attachment 1242041
View attachment 1242043

Scope looks like it will be as long as the stock if I use the sun shield ;)
View attachment 1242045

Got a few more little things to do to finish it up. The cant level I ordered was for a Weaver rail and will not attach properly the the picatinny...if someone needs one for theirs send me a PM.

I left enough room behind the rear ring to install a tube mount type. I may go ahead and put this tube mount where I purchased it to go and grab the rail mount off of that one to go on this.
I think you will need to buy a bigger bolt handle.
::ke::bounce:
 

Jester896

Senior Clown
that is one of those bolt on ones. I have a DD Ross and several from PT&G to choose from. Maybe next time I am at my buddy's place we can put it in the lathe to cut and thread the factory knob.
 
Top