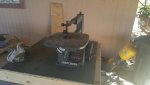
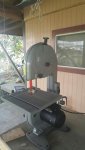
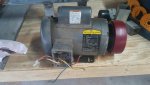
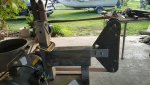
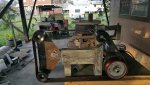
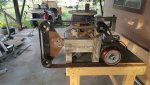
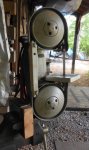
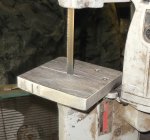
Thanks for all the great information and comments. Now I started building my tools supply to make it easier, if you want to call it that. Someone gave me 2 of the tools, a Craftsman scroll saw and a Ryobi drum sander. I then purchase a Band saw and started making a 2"x 72" belt sander. I picked up my 1 1/2" HP electric motor today the machine shop installed my 2"x 6" wheel. I also build me a new work table.
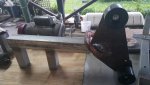
I laid out how I wanted my belt sander that I'm building, and I changed a few things this morning. I worked on the belt sander for a couple of hours and completed the welding. Made the tracking wheel, still have to install the spring for the tension. Any advice or more information would help, Thanks Tim.
Looking pretty solid so far.
Long as you are fabricating - go ahead and make up a bar with spindle for 8 - 10 contact wheels and a yoke bar for small radius double bearing contact wheels in 5/8", 1" & 1 1/4", you won't regret this later.
Might also want to weld up a verticle stand for a portaband metal saw similar to one in pic below - easy to do and extremely hand tool.
here is some info I found about the red stripe blade.
Red Stripe is an M2 steel - here are some of its properties...
Carbon 0.78 - 1.05
Chromium 3.75 - 4.5
Iron Balance
Manganese 0.15 - 0.4
Molybdenum 4.5 - 5.5
Phosphorus 0.03 max
Silicon 0.2 - 0.45
Sulphur 0.03 max
Tungsten 5.5 - 6.75
Vanadium 1.75 - 2.2
Heat Treatment: Preheat at 1450 F before heating for hardening. Then heat rapidly from 1450 F to 2200 F and hold for 3 to 5 minutes followed by quenching in oil, air or salt bath.
Forging: Forge at 2050 F down to 1700 F. Do Not forge below 1700 F.
Annealing: Anneal at 1625 F and slow furnace cool at 40 F per hour, or less.
Tempering: Temper at 1050 F for a hardness of Rockwell C 60 to 65.
Points to ponder...
i) attempt forging below 1700F and the material crumbles like cottage cheese
ii) to anneal the blade so that one can make chisels, think about that cooling rate < 40F/hr!
That translates into something like 30 hours of cooling. It's actually less than that as you cool it slowly down to about 500 - 600F and then switch off the furnace and leave it there to cool down further overnight or something. (working from memory - my data sheets are at home)
What it boils down to is that some steels are beyond old blacksmithing techniques. Like David, I have a furnace with a programmable digital controller that allows me to ramp up and down as required. Might take some of the fun out of heat treatment but it's consistent and repeatable.
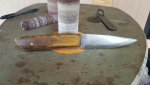
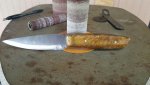
Thanks lot of work. Easier to buy blades that takes less time. I see the blades laying around the machine shop so I thought I give it a go. Like I said they throw them away.
I made a couple of knives with them. I could not drill holes in it for the handles. I had to grind a slot for them. I even heated it to red hot and wrapped it in some ceramic wool with a big piece of red hot metal and let it slow cool for hours and still could not drill it. then I read the specks to anneal and saw why that did not work. I don't have the equip. to anneal this stuff. Then I noticed it was tempered at 1050 degrees, so I figured I could grind it without getting hot enough to lose its hardness and you can but it will take a lot of belts if you grind from the cutting edge up to the spine. Mine ended up just being beveled a little ways up the blade. It wears a belt out really quick. I didn't get to try a ceramic belt. It is a lot easier to make a knife out of 1084 or something like that.
I also tried heating it with my cutting torch still couldn't drill, I then heated the spot where I decide to put the pin and cut or melted a small hole. I must of went through 2 packs of belts. A bad way to try and start a new hobby. But once I did get the knife sharp it is VERY VERY sharp. I going to buy the right stock next time.
Thanks for posting that info Dougie. Knew someone had it on hand.
Like I said, makes great leather working blades. I used side grinder to bulk out the primary bevel (lot cheaper than belts) then cleaned and finished with ceramic and micron belts.
They make great scrapers and sens.
Tsharp - now you know why we try to get everyone to start with a known blade steel like 1084. Makes a great blade and so much easier to work with with regular shop tools. Gotta learn to tie on the hook if you want to fish.
Thanks for the great information. I'm almost finish the last one I cut last week The handle is made from acrylic that most oldest son makes duck calls with. I have a little more sanding with wet sand paper then apply a coat of sealant. I will try to finish my belt sander I'm working on this week.
Looking good T! Nothing wrong with repurposing materials, and brass rod's not all that cheap. Little hint for the next one: roll the brass pin material on a hard surface under a coarse file to give it a slight knurling texture. It will help the epoxy lock everything up tight. That acrylic looks almost like bone in the first pic, not a bad look.
Tsharp ... Don't know how I missed this thread ....
Looks like you started out just like I did with a unknown metals ... few tools and lots of ideas !! I like where you went so far ....
Lot of great guys on here that don't mind sharing the "learning" they got( I suspect they got most of their learning the same way) ....
I am too gathering materials to build a 2" x 72" belt grinder ... have most of what I need ... just haven't put it together yet .... some thing you may want to look at is a spring loaded idler to keep the belt tight ... I know you have the bar adjustment ... but in my research ...I see lots of spring tension .... I am sure these guys that have been at this for a while could 'xplain this a whole lot better than a beginner ...
I am retired ... so I need a job to pay for the tools I need ... but then I would not have the time to "build" and "tinker" .... so I'm in a circle going no where fast !!
Good Luck and hope to see you at one of the Knife Makers Guild meetings soon ...
Here is a link to some Corby rivets ... they work well for the handles ... Pop's Knife Supply is where to get'm .... but this shows what they look like .... http://www.knifemaking.com/category-s/363.htm