How did I do? Camo gun

No-Limit

Senior Member
Hey guys,

I do more lurking than posting here on the forum but I just finished a project that I'm pretty proud of and I wanted to share.

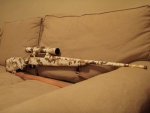
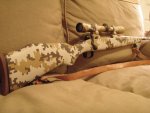
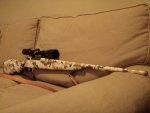
I decided to give my Savage 110 30.06 a desert colored digital camo transformation. I did a lot of research and watched some youtube clips...printed out some digital camo stencils and went to town. I went ahead and painted the scope too (cheap Simmons scope that came with the rifle). Also included a pic of the gun with my Nikon Monarch 3-9x40 w/ Talley Lightweight rings.

It was a pretty intricate and involved process and I have over 20 hours in the paint job but I think the finished product speaks for itself.

If anyone wants to try this on their own, I'd be glad to give some tips/tricks or at least guide you in the right direction. I'm certainly not an expert but I learned a lot during the process.

I may have shot myself in the foot (no pun intended) because my intention with the paint job was to sell it to free up some cash for another project but now I don't want to let go of it! I haven't decided what I'm going to do yet, but maybe some of your comments will help me make up my mind!

The pictures make it look a lot lighter than it actually is. The lightest color (looks white in pics) is actually desert sand. Then the next darker is a tan color, then the darkest is a dark brown. All are ultra-flat camouflage paints...and then I gave it a couple coats of flat clear to protect it.

Opinions/comments/questions are welcome!

Edit: I've added some instructions a few posts down.
 

Attachments

  • savage (110).jpg
    savage (110).jpg
    200.3 KB · Views: 698
  • savage (111).jpg
    savage (111).jpg
    131.7 KB · Views: 637
  • savage (114).jpg
    savage (114).jpg
    201.8 KB · Views: 655
Last edited:
I love it. I really would love to do my turkey gun in the dark green digital pattern that the USMC wears.
 

Dub

Senior Member
Your Savage looks great.

That was time well spent.

Thanks for posting this.
 

73Cj5

Senior Member
I'm getting ready to do one of my guns, but want to go with the green digital. What type of paint did you use? Any tips that you found out might make it easier next time? Any other advise, because this will also be my first go at this. But, I'm totally looking forward to it, can't wait.
 

No-Limit

Senior Member
Thanks for the kind words.

I used Aervo Military Digital Pattern Camo Paint in Desert Sand as the base color. Zynolyte also makes a Camo Paint, which is what I used for the other two colors. The light brown is Zynolyte Sand and the darker color is Zynolyte Earth Brown. I clear coated everything with Valspar Clear Flat enamel. You definitely want to use a flat paint, which are hard to find in different colors (from a rattle can) unless you get the "camo" paint. I actually paid way too much for the Aervo because I couldn't find a flat rattle can desert sand color anywhere around here...so I had to order it...shipping and all came to around $16 for one can! I had a vision in mind and I was willing to pay that to do it right.

First, of course, you completely disassemble the gun...applying tape everywhere you don't want painted. Cotton balls work well stuffed into both ends of the barrel and the inside of the stock.

The way I did the stencils: I found some free stencils online (I can PM you the website) and printed them out. Then I covered a sheet of wax paper with blue painters tape, overlapping each strip by 1/16 inch. Then you secure your stencil to the painters tape and cut through everything with a box cutter/exact-o knife. Then peel off the wax paper and you have an adhesive stencil to lay on the gun. These are the male stencils. You paint the gun the lightest color first, then lay on a layer of your adhesive male stencil, then spray the next color, lay on another layer of stencils, then spray the last color (darkest color). After that, you carefully peel off all the layers and then you can go back and use the female stencils (which were made when you pulled the male stencils off of the wax paper) to add to any areas that you want (this is what gives it a true digital camo look). Of course you have to be really careful to cover the rest of the gun with plastic or paper during this process so you don't have any problems with over-spray.

One of the toughest parts was visualizing what you wanted the final product to look like because you have to work backwards with the paint colors. The lightest color goes on first, then the next darker, then the darkest. The reason I say it's backwards is because you cover up wherever you want that particular color to stay with the male stencil, then spray over top of it as opposed to using a female stencil to spray the color you want in the area you want. Make sense?

You wouldn't believe it, but removing the painters tape from the wax paper was the most time consuming and tedious part of the job. Separating the two layers without ripping the little "arms" of the painters tape that you created when you cut out the stencil is actually quite difficult. Also, cutting out the stencils is pretty tedious and your fingers will hurt for a week. Your vision will also suffer from staring at digital camo for 3 days straight.

But, other than the onset of arthritis and going blind...no negative side effects and you come out with a really cool looking custom paint job that you have the satisfaction of knowing you did yourself.

I hope all of that made sense, but if not...feel free to ask more questions and I'd be glad to help you out.

Thanks again for the compliments.
 

olchevy

Senior Member
Awesome...I might try that on a XD.....I have painted/coated a good many rifles, but never really attempted digital....Well I tried but like you said getting the tape off without it tearing in the corners is a pain in the butt!
 

No-Limit

Senior Member
thanks for the kind words guys. Just wanted to let ya'll know (shameless plug) that i did put it up for sale today. i'm not going to provide a link because i'm not sure if there are rules w/ that but you can find it at the gon marketplace.

hopefully someone will like it as much as i do!
 
Top