Another Lever Gun Project **Update 8/23/15**

hayseed_theology

Senior Member
Since I finished up the Lever Gun Project, I have been hunting a new victim. I decided my next project would be another lever action or a revolver. Hours of scouring the marketplace, Gunbroker, and every gun/pawn shop in the state have finally paid off. I happened upon a Revelation Model 205 in .30-30 Winchester.

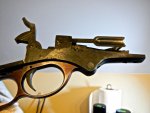
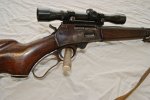
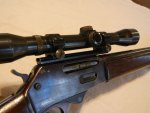
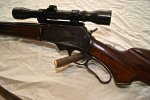
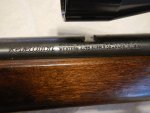
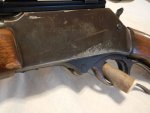
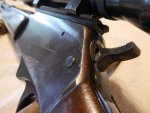
When I first laid eyes on it, I thought it was a Marlin 336. While it’s almost a dead ringer, you Marlin guys will notice that the extractor, lever retaining screw, tang shape, and trigger location are different. It appears that some small parts might be interchangeable, but the internals are quite different. So who did manufacture it? O.F. Mossberg and Sons! Yep, it is essentially a Mossberg 472 that was made sometime in the 70’s. It was made for Western Auto and sold under their Revelation brand. All parts interchange with the Mossy 472. A little reading on the internet revealed that this model is generally accurate and reliable, but the most common failure was a cycling issue caused by a worn/broken/missing carrier spring.

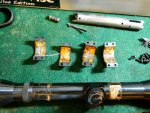
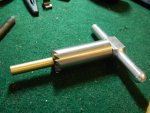
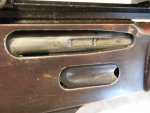
Mechanically, what kind of condition is it in? Inoperable. The gun DOES NOT FIRE. That was the first thing the salesman told me when he handed it to me. I inspected it and noticed that it appears to be missing the striker portion of the firing pin assembly. That would explain why it wouldn’t fire. It cycles snap caps flawlessly, so I think $10 worth of parts will have it shooting again. Bore is in good shape.

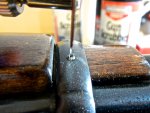
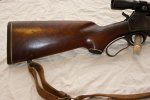
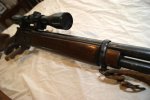
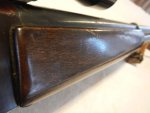
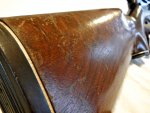
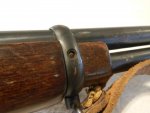
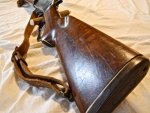
Cosmetically, what kind of condition is it in? Rough. Blueing is worn off in places. There is surface rust scattered all over the gun with some light pitting in places. The furniture is heavily scratched, but there are no chips or cracks. I believe the wood is salvageable.

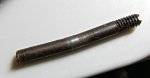
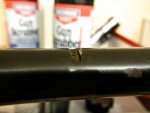
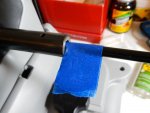
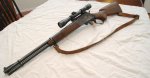
So what’s on tap for this project? The first step will be to getting it shooting again. Next step will be to repair or replace any broken parts (like the barrel band screw with the head broken off). Next, I will have to decide if I want to return to iron sights or scope it. That will either entail replacing the sights and/or figuring out what kind of scope to put on it. Next, the fit and condition of the recoil pad is poor so that will be replaced. After that, I will refinish the wood. Finally, I want to make my first attempt at slow rust blueing to refinish the metal.

So I need some input from y’all, particularly some of our resident experts.
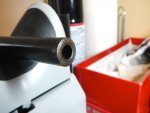
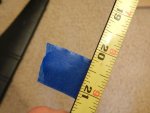
- Should I leave the barrel at 20” or cut it down to 18”? Or 16.5”? I am leaning towards leaving it alone, but since it’s not a JM stamped Marlin or a classic Winny, it would be a good candidate for a chop.
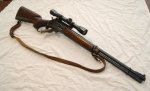
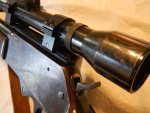
- Iron sights or scope? I would love to keep the scope that is on it, but it has a good bit of rust on it. The scope is an old steel tube Weaver K4-1 with a tapered post and fine crosshair reticle. It’s a classic scope with a relatively unique reticle, which makes it pretty cool to me. The glass is sufficiently clear. Is it possible to reblue a scope without ruining the seals? If not, maybe it needs a peep sight.
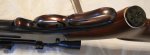
- Is the furniture walnut or birch? The buttstock looks like walnut to me, and the forend looks like birch. On a rough, old gun like this, I still struggle to tell the difference sometimes. If the pics aren’t clear enough, I’m sure I will figure it out after I strip the finish.
- I plan on using Pilkington’s Classic American Rust Blue. This is will be my first attempt at it, and I am concerned about the frame and lever accepting blueing. They appear to be more of a plum color while the barrel, magazine tube, and base plate appear to have a traditional dark blue color. It doesn’t translate well in the pics, but the frame and lever have a strong purple hue. Does this mean that they are a different alloy and may not blue well?

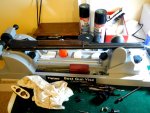
I have noticed a funny thing while taking pictures of guns. A beautiful gun never looks as good in a photo as it does in real life, and a roughed up gun never looks as bad in a photo as it does in real life. Here are the “Before” pics. I took a bunch so you could get a good idea of what the starting point is.
 

Attachments

  • REV205.1.jpg
    REV205.1.jpg
    65.4 KB · Views: 3,153
  • REV205.2.jpg
    REV205.2.jpg
    86.6 KB · Views: 3,168
  • REV205.3.jpg
    REV205.3.jpg
    90.5 KB · Views: 3,132
  • REV205.4.jpg
    REV205.4.jpg
    83.8 KB · Views: 3,114
  • REV205.5.jpg
    REV205.5.jpg
    77.8 KB · Views: 3,110
  • REV205.10.jpg
    REV205.10.jpg
    70.9 KB · Views: 3,087
  • REV205.9.jpg
    REV205.9.jpg
    87.2 KB · Views: 3,115
  • REV205.8.jpg
    REV205.8.jpg
    117.4 KB · Views: 3,116
  • REV205.7.jpg
    REV205.7.jpg
    105.2 KB · Views: 3,100
  • REV205.6.jpg
    REV205.6.jpg
    73.1 KB · Views: 3,091
  • REV205.11.jpg
    REV205.11.jpg
    94.3 KB · Views: 3,166
  • REV205.12.jpg
    REV205.12.jpg
    76.5 KB · Views: 3,063
  • REV205.13.jpg
    REV205.13.jpg
    102.3 KB · Views: 3,208
  • REV205.14.jpg
    REV205.14.jpg
    86.5 KB · Views: 3,064
  • REV205.15.jpg
    REV205.15.jpg
    80.5 KB · Views: 3,067
  • REV205.20.jpg
    REV205.20.jpg
    73.4 KB · Views: 3,026
  • REV205.19.jpg
    REV205.19.jpg
    118.7 KB · Views: 3,028
  • REV205.18.jpg
    REV205.18.jpg
    95.5 KB · Views: 3,042
  • REV205.17.jpg
    REV205.17.jpg
    92.8 KB · Views: 3,075
  • REV205.16.jpg
    REV205.16.jpg
    51.3 KB · Views: 3,074
Last edited:

Sharps40

Senior Member
There is almost no value, beyond parts, without functionality. Get it running...should be easy if you are only missing the aft firing pin...might even be able to make one from lasalle steel for a dollar2nintyfive.

Then have at it. Its a fine project.
 

Sharps40

Senior Member
The plumb color on the steel means the original bluing is now turning into patina....i.e. collectalble rust. Sand it off and blue it.

Your wood is nice quality walnut. Treat it well.
 
- I plan on using Pilkington’s Classic American Rust Blue. This is will be my first attempt at it, and I am concerned about the frame and lever accepting blueing. They appear to be more of a plum color while the barrel, magazine tube, and base plate appear to have a traditional dark blue color. It doesn’t translate well in the pics, but the frame and lever have a strong purple hue. Does this mean that they are a different alloy and may not blue well?
.

All is steel, probably slightly different alloys of same. The color difference is more likely due the heat treatment of the frame and lever, which can affects how those parts take the blue, especially as they age.

How that will affect the blue you intend to use, I don't know. You could always case finish those parts.
 

hayseed_theology

Senior Member

Sharps40

Senior Member
Very cool. I thought it interesting that this little known firearm had a nearly complete bin of parts up there at numrich. Must not be much call for spares. Gonna make a nice refinish whatever direction ya decide to go. No paint though. Paint is for fences and walls and trucks and such....not guns.
 

hayseed_theology

Senior Member
Very cool. I thought it interesting that this little known firearm had a nearly complete bin of parts up there at numrich. Must not be much call for spares. Gonna make a nice refinish whatever direction ya decide to go. No paint though. Paint is for fences and walls and trucks and such....not guns.

No paint. I really want to do the rust blue. Part of the reason for even doing the project is so I can learn how to do it. I will have to buy a tank. I am thinking this one: black iron tank. Will my 3 burner gas grill be enough to bring a 40" tank to boil?
 

Sharps40

Senior Member
That's the tank I have and it should boil but prolly slow w/o a lid. I cover with tinfoil. test it first about 2/3 full it'll hold more than 4 gallons of water full up....

Any lil stove, even a coleman fuel stove will melt a 10 lb pot o lead for casting.

Practice on scraps first.....get yer technique afore ya rip the old blue off the gun.

PS....yer gun already has the "hot ticket super custom folks worrie bout it too much way cool bragging rights look at how much I spent on my marlin 336" accurizer modification.....A stock thru bolt!
 

hayseed_theology

Senior Member
Thanks! Got the striker, striker retaining pin, barrel band screw, and a hammer spur extension on order from Numrich. We should have her back slinging lead in no time.

Parts came in last week. Got the striker and retaining pin installed last night. It looks like that will take care of the problem.

One of the many small things that make this gun different from a 336 is the lever retaining pin. The 336 uses a screw. The Mossy 472 uses a large pin with a groove cut in the center for a detent that holds it in place. It pops out with a light tap from a punch and a hammer. On side eject lever guns, it seems to me that the easiest way to remove the bolt is to open it about halfway. Make sure hammer is cocked. Remove pin or screw holding lever in place. Lever comes down. Pull bolt out from the rear. Be careful not to lose the ejector when removing the bolt.

Here are a couple videos showing the disassembly and reassembly of this gun:


I also checked the scope with my bore sighter. It was way off. But, it adjusted smoothly. So, the glass, crosshairs, elevation, and windage adjustments seem to be in good working order. If I can figure out what to do with the finish, I think I can salvage the scope.

While I had the bolt out, I ran a few patches down the bore to give it a quick clean. Always best to clean from the breech end, but that doesn't normally happen with a lever action. Man, the inside is gunked up big time. It will get a good cleaning after I test fire.

Also added the hammer spur extension to aid in cocking and lowering the hammer.

Tools: Lyman deluxe hammer and punch set, gunsmith screwdriver set, Tipton gun vise, gun cleaning kit, laser bore sighting tool

Cost: $15 for striker, retaining pin, and hammer spur extension
 

hayseed_theology

Senior Member
Range Report 5/5/14

Got to test fire the rifle on Saturday – good news and bad news.

First, the good news – it now goes BOOM when the hammer falls! I took a few shots at 25 yds to adjust the scope. Then I took 3 shots at 100 yds to get a baseline group to see what we are working with.

Now, for the bad news – 100 yd group measured 6”. See the last pic. We are gonna have to do something about that. I could blame it on a number of things:
- Maybe it didn’t like the ammo.
- The crown shows some wear and nicks, perhaps recrowning will take care of accuracy.
- Trigger pull is ridiculously heavy! Bad trigger = poor groups.
- Bore probably needs a deep clean.
- Could just be shooter error.

Whatever the case, I will try to eliminate some of these issues. I don’t expect to shoot sub-MOA groups with a beat up lever action and an old 4x scope, but I’d like to cut that group size in half.

The goal for Saturday was to get it shooting again. Now, I can work on accuracy.
 

Attachments

  • REV205.21.jpg
    REV205.21.jpg
    159.3 KB · Views: 2,618
  • REV205.22.jpg
    REV205.22.jpg
    151.2 KB · Views: 2,618
  • REV205.23.jpg
    REV205.23.jpg
    257.1 KB · Views: 2,646
  • REV205.24.jpg
    REV205.24.jpg
    100.6 KB · Views: 2,650

hayseed_theology

Senior Member
Update 5/7/14

Well, it's in a bunch of pieces now.

I had a couple hours free last night so I listened to the Braves win and disassembled the Revelation 205. It was dirty. No telling how many years of gunk are built up on the inside of the receiver. Judging by some of the screws, it looks like somebody else tried to take it apart without using the proper screwdriver. This can't be emphasized enough - if you are going to tinker with guns, don't use your Craftsman screwdrivers. Get a set of gunsmith screwdrivers bits. I will add that I got a Tipton gun vise for Christmas. Boy howdy! Cleaning, disassembly, and reassembly are 10 times easier with a gun vise. Trying to hold a gun still on the table or my lap while trying to break loose a struck screw is for the birds. The gun vise is worth the small investment.

Disassembly went pretty much as described in the videos I posted, so I won't rehash all that. I will say, he had trouble getting the hammer down and out through the receiver, and I had trouble too. There is some trick to it, and I am not sure what it is. You Marlin guys will notice another difference. Pretty much the entire action, including hammer and loading gate, comes out with the bottom plate. Nifty idea, but I think it makes it tougher to get everything apart.

The rear barrel band screw was broken off at the head, and I have been concerned about how I would remove it without damaging the barrel band. I got a new screw from Numrich, but they were sold out of the band. Havlin Sales is the other go to source for parts on these puppies, but they only had the brass barrel band in stock. Unlike the Marlins, this one threads on the opposite side from the head (like a normal screw). I started oiling the screw several weeks ago hoping that it would penetrate the threads and loosen up. There was a small portion of the screw sticking out the backside. I decided to put a cutting wheel on the Dremel and cut a groove in the exposed portion of the screw in hopes that I could turn it with a flat head bit. That way, I could unscrew it from the backside. And... much to my surprise, it worked! At one point, I got too close to the band with the Dremel and cut it a little. Live by the Dremel, die by the Dremel. It's a great tool, but is second only to rust when it comes to ruining decent guns. I think some sanding and the reblue will take care of my blemish.

It appears that recoil had bent the screw. You can see the screw and the spot on the barrel where it made contact (not exactly where it was supposed to). Based on the fact that both sides of the head popped off the screw, I would guess that after a shot the recoil bent the screw and popped the head off. Pieces are probably laying on a range or below a deer stand somewhere. Because of the way it broke, I doubt there’s a screwdriver to blame.

There were a couple of surprises. Masking tape on the scope rings? Never seen that before, but apparently it was an old trick to keep the scope from slipping. I’ve never thought of that as a huge problem for a .30-30, but I suppose the steel tube Weaver is a little heavier than today’s aluminum stuff. It appears that the tape contributed to rust under the rings, but it’s no surprise that masking tape held moisture. I was going to junk the rings anyway, but I had been kicking around the idea saving the scope. The other surprise was that the bottom plate is aluminum. Didn’t see that coming. Not really sure why either. So, rust bluing will not work for it. The finish is pretty good but has a few scratches here and there. I may leave it alone.

I’ve been chewing on this project for a while trying to figure out what direction to go. The fact that it has no collector value and that the crown is a bit roughed up were pushing me toward cutting the barrel down to 16.5”. If it shot a beautiful group, I was going to leave it alone. Well, it didn’t. The other problem with chopping it down was what kind of sights/optic to use. I had wanted to keep the cool steel tube Weaver, but I just don’t think it will work. I could throw a cheap 3-9x40 that I have laying around on it, but I don’t feel like that really improves the gun (if I am gonna scope it, I want it to be quality glass that really adds to the gun). Plus, I don’t like the way the scope mount sits on it. It just looks awkward. No one makes a scout rail for it. It’s missing the rear sight, so even if I wanted factory irons, I would have to buy the rear sight. Then I had an idea – how bout I chop it down to 16.5” and pair a Skinner Lo Pro on the receiver with a classy, gold bead dovetail front sight. Yessir, I think we might be able to turn this dirty ole junker into a sweet shootin’ looker.

Tools: gun vise, gunsmith screwdriver set, gunsmith hammer and punch set, stainless steel picks of varying shapes, Dremel and accessories

Cost: 2 hours of my time
 

Attachments

  • REV205.29.jpg
    REV205.29.jpg
    61.5 KB · Views: 2,523
  • REV205.28.jpg
    REV205.28.jpg
    107.1 KB · Views: 2,548
  • REV205.27.jpg
    REV205.27.jpg
    124.2 KB · Views: 2,506
  • REV205.26.jpg
    REV205.26.jpg
    121.7 KB · Views: 2,550
  • REV205.25.jpg
    REV205.25.jpg
    182.4 KB · Views: 2,610
  • REV205.30.jpg
    REV205.30.jpg
    94.5 KB · Views: 2,534
  • REV205.31.jpg
    REV205.31.jpg
    70.8 KB · Views: 2,558

Sharps40

Senior Member
When you get ready...after cleaning and repairs...

---try shooting it (single loaded) with no magazine tube and no forend

---or forend but no mag tube.

Could be that between the bent forend screw and the front magazine band the barrel might walk a bit screwy under a variety of tensions and pressures from other parts.

If it smooths out after cleaning and repairs with no no mag tube, try it fully assembled. Ya might find its simply a bound band, possibly the front.
 

Sharps40

Senior Member
Ya may be able to peen and reshape that rear barrel notch back down at the lip for the new screw install....might also wrap a thin brass shim, say 1 or 2 thousands stock (or what ever it needs for a snugster fittin sleeve) around the screw as a shim to tighten it up a bit, keep it from slippin forward and bending another screw.

When ya roll up the brass into a sleeve, super glue/contact cement the edge to keep it that way and a dab of auto silykone will hold it in the groove till yer able to assemble..... Just need to have a sort section that goes in the groove and stays there till ya slip on the band and install the screw threw it.
 

hayseed_theology

Senior Member
When you get ready...after cleaning and repairs...

---try shooting it (single loaded) with no magazine tube and no forend

---or forend but no mag tube.

Could be that between the bent forend screw and the front magazine band the barrel might walk a bit screwy under a variety of tensions and pressures from other parts.

If it smooths out after cleaning and repairs with no no mag tube, try it fully assembled. Ya might find its simply a bound band, possibly the front.

If I keep having trouble with it after I get done, I will try that.

Ya may be able to peen and reshape that rear barrel notch back down at the lip for the new screw install....might also wrap a thin brass shim, say 1 or 2 thousands stock (or what ever it needs for a snugster fittin sleeve) around the screw as a shim to tighten it up a bit, keep it from slippin forward and bending another screw.

When ya roll up the brass into a sleeve, super glue/contact cement the edge to keep it that way and a dab of auto silykone will hold it in the groove till yer able to assemble..... Just need to have a sort section that goes in the groove and stays there till ya slip on the band and install the screw threw it.

That sounds like a great idea. I was trying to think of some sort of sleeve for it.
 

hayseed_theology

Senior Member
Update #1 6/8/14

I finally got the chance to tinker around with the gun some more. Sunday night I played around with my new crown facing tool. I wanted to practice using the crown cutter so I worked on the muzzle. It was rusted, pitted, and had a couple nicks in it. The tool worked well. I could feel when it was cutting well and when it was chattering.

It's the 3/4" 79 Degree Muzzle Crowning Cutter from Brownell's. You buy the handle and bore specific pilots separately. You apply some cutting oil. Slide it in the bore. Apply a little pressure and turn. Simple as that. Stop frequently to clean up chips. I am gonna practice some more on scrap pieces of barrel before I use it on the actual gun.

Tools: Gun vise, crown cutting tool w/ handle, .30 cal brass pilot, cutting oil, small paint brush for removing chips

Cost: $90
 

Attachments

  • REV205.32.jpg
    REV205.32.jpg
    58.9 KB · Views: 2,359
  • REV205.33.jpg
    REV205.33.jpg
    143.9 KB · Views: 2,409
  • REV205.34.jpg
    REV205.34.jpg
    57.4 KB · Views: 2,372
Last edited:

hayseed_theology

Senior Member
Update #2 6/8/14

I also measured the barrel on Sunday night to prepare it for cutting. There are a number of way to do this. I used the cleaning rod method. With the bolt closed, slide the cleaning rod down the muzzle until it contacts the face of the bolt. I put a little blue tape on the cleaning rod to mark the depth. Then use a tape to measure from the end of the cleaning rod to the tape. Why is this so important? Rifle barrels have to be at least 16", and I want to make sure the gun is legal after I cut it down.

Numrich lists the Revelation 205 barrels at 20.5". Measuring from the muzzle to the receiver gives you 19.5". Using the cleaning rod method (the correct way to measure), I come up with 20.25" on the dot.

Here's a good video from Larry Potterfield on how to measure all sorts of barrels:


Attachments

  • REV205.35.jpg
    REV205.35.jpg
    75.4 KB · Views: 2,336
  • REV205.36.jpg
    REV205.36.jpg
    78.8 KB · Views: 2,323
Top