Another Lever Gun Project **Update 8/23/15**

hayseed_theology

Senior Member
Update #2 7/13/14

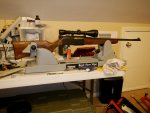
I had more time to work on the gun this past weekend than I have had in the past 2 months combined.

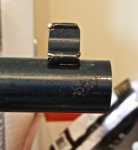
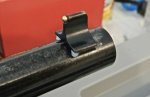
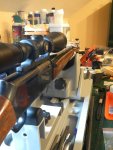
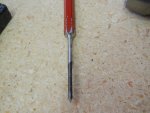
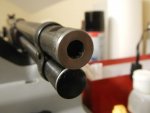
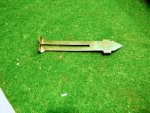
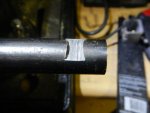
I worked on cutting the dovetail for the front sight. I figured a dovetail was easier for a beginner than drilling and tapping a couple blind holes.

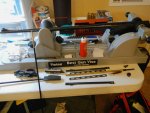
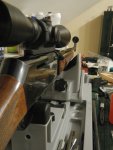
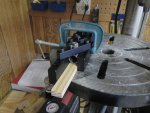
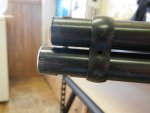
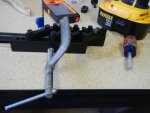
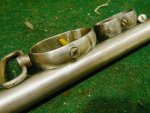
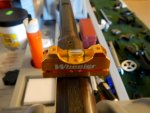
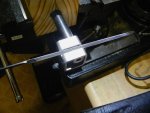
I have a Wheeler Engineering scope leveling kit. It includes two levels. One is a small magnetized piece that sits on the top of the frame(or other flat surface). The other clamps to the barrel and then is adjusted to match the first level. The clamped one stays put allowing for a scope to be mounted or, in my case, the magnetized level to be put on the dovetail cutting jig. All that said, you want the jig to be aligned and properly centered, and the best way to do that is by leveling the gun and leveling the jig.

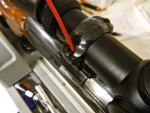
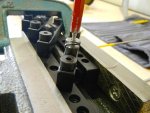
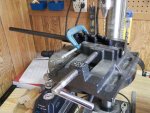
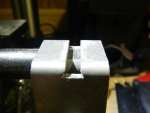
I started by cutting with the hacksaw to remove as much metal as I could that way. Then, I used my little safe sided triangular file to do the rest. That was a mistake. I should have used the edge of a larger file to remove some more material. It took me forever with that little file! My thumbs are still sore today. I made a mistake using a new hacksaw blade and new file for roughing in the cut. They are completely dull after making a little contact with that hardened jig.

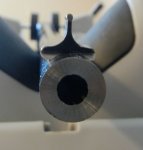
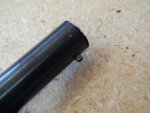
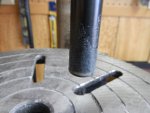
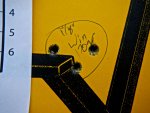
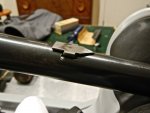
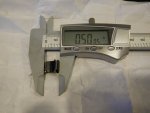
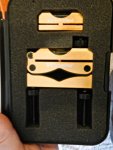
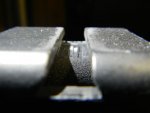
The jig works fine. The dovetail cut in the jig is a little rough as you can see in the 4th pic. I wish it was a little cleaner. The jig is supposed to be undersized, but I feel it's a little too undersized. A standard dovetail is supposed to be .375". The jig is supposed to cut .360"-.370". It's good to have the cut a little undersized. Then, you just take a little off the sight, and you have a great fit. But, my cut is .330" which means I have a long ways to go before I get close to even getting the sight started. The cut is a bit shallow too. I think some careful work with a new file will have it in good shape.

I think it will turn out fine though. I haven't screwed anything up. It just needs a little more work.

Tools: vise, wheeler engineering scope leveling kit, safe sided smooth triangular file, dovetail cutting jig, chalk, wire brush, hacksaw

Cost: $46 for jig and file
 

Attachments

  • REV205.70.jpg
    REV205.70.jpg
    107.3 KB · Views: 1,015
  • REV205.71.jpg
    REV205.71.jpg
    83.9 KB · Views: 1,013
  • REV205.72.jpg
    REV205.72.jpg
    81.4 KB · Views: 1,003
  • REV205.73.jpg
    REV205.73.jpg
    67.7 KB · Views: 1,010
  • REV205.74.jpg
    REV205.74.jpg
    60.7 KB · Views: 1,007
  • REV205.78.jpg
    REV205.78.jpg
    71.3 KB · Views: 1,008
  • REV205.77.jpg
    REV205.77.jpg
    74 KB · Views: 1,016
  • REV205.76.jpg
    REV205.76.jpg
    65.9 KB · Views: 1,006
  • REV205.75.jpg
    REV205.75.jpg
    95.6 KB · Views: 1,034
Last edited:

Sharps40

Senior Member
Consider a one sided triangular file to lengthen the foot of the dovetail front to back. Just be careful in any event so you don't angle around the barrel. Its about 360 wide, you just can't get calipers in there to measure it due to the pinching.

A dovetail sight with a slight lead (many press in R to L when your behind the gun) cut into the base should be a snug fit one third of the way in and then require drift/pusher to move it further.
 

tree cutter 08

Senior Member
We're busy how about y'all? Yea moving but not far, got a little more room to stir around on. How did you like that crown cutting tool. Been thing of buying on for cleaning up some crowns on some 22. Rifles.
 

hayseed_theology

Senior Member
Consider a one sided triangular file to lengthen the foot of the dovetail front to back. Just be careful in any event so you don't angle around the barrel. Its about 360 wide, you just can't get calipers in there to measure it due to the pinching.

A dovetail sight with a slight lead (many press in R to L when your behind the gun) cut into the base should be a snug fit one third of the way in and then require drift/pusher to move it further.

I will grind the next one with two safe sides for opening it up a little. The sources I've checked say the depth should be .090". Mine measures .081". It just seems small all the way around. I am gonna be very careful opening it up. I will still leave it a little undersized and take the rest off the sight base. Thanks for continuing to follow the thread and help me out.

We're busy how about y'all? Yea moving but not far, got a little more room to stir around on. How did you like that crown cutting tool. Been thing of buying on for cleaning up some crowns on some 22. Rifles.

Yeah, we've been pretty busy too. The crown cutting tool works well. Pretty pleased with it. I like it better than the models sold by MidwayUSA. I bought the 3/4" diameter cutter so I could work on .45 cal stuff too, but if I had it to do again, I might go with the 1/2" cutter so I could do a recessed crown.
 

hayseed_theology

Senior Member
Update 7/28/14

I haven't gotten a chance to post lately, but I did some more work on the dovetail a week or so ago. Front sight is in.

I bought a couple new files and ground one down so that it only cut on one side. I smoothed out the bottom of the dovetail a little, and then carefully widened it. I removed a good bit of material, then I moved to the sight base. It must have been a really hard alloy because I filed on it forever. It ended up at .365" with a slight lead on the left side. It took me about 2 hours to open the cut and remove enough off the sight base to get it to fit.

It came out decent. The sight would push in about 1/3 of the way by hand, and I tapped it in the rest of the way with a brass hammer. I oiled it up before pushing it in to help it slide. It appears to be pretty straight. The bottom of the cut didn't come out perfectly flat because the jig isn't near straight. So if I hold it just right, I can see a just a hair of daylight (see 2nd pic).

I am planning on buying a different front sight, so this is just a tester to see what height I need to go with the Skinner Lo-Pro. I will have the chance to level it out some more when I put a different front sight on it.

Tools: vise, woodblocks, safe sided file, brass hammer, chalk, wire brush, gun oil

Cost: $6 for a new file
 

Attachments

  • REV205.79.jpg
    REV205.79.jpg
    85.5 KB · Views: 922
  • REV205.80.jpg
    REV205.80.jpg
    122.5 KB · Views: 943
  • REV205.81.jpg
    REV205.81.jpg
    81.8 KB · Views: 945
  • REV205.82.jpg
    REV205.82.jpg
    83.6 KB · Views: 885

hayseed_theology

Senior Member
Update 9/2/14

After not working on the lever gun for a month, I finally had some time yesterday to work on it. I will post on it later this week.

Here's what's been taking up my time in August: I decided to go back to school and get a little more education. It started up this month. Unfortunately, it's not gunsmith school. Needless to say, school has taken up a lot of my time. Also, I had a friend drop off a BAR that wasn't shooting where it was supposed to.

I started by doing a complete cleaning on his gun. Anytime a gun doesn't shoot where it's supposed to, cleaning it is the place to start. It is a Belgium made BAR in .270 WIN. I'd never disassembled a BAR before, but it wasn't too bad. There are some tricks to it, but there are some good videos on youtube.

I also switched out the scope mounts for him. It had the old style Leupold/Redfield base and rings with adjustable rear windage screws. That's a fine system. I have it on my 7 Mag, but not the best option for this gun. This gun is his truck gun (Yes, a Belgium BAR for a truck gun!). He farms and this stays in his truck all the time. It gets bounced around and knocked around quite a bit. For a gun like that, the fact that the Leupold base and rings have moving parts makes them less desirable. I know, I know, they have worked for umpteen million years on your deer rifle, but there are better options available today for this gun. We went with a solid one piece DNZ mount to totally eliminate the possibility of the base/rings shifting.

It took a while of soaking the ring/base screws in penetrating oil before they broke loose. No loctite on them, just been cranked down for years. Got to break in my new FAT Wrench. It works great. Awesome tool. The DNZ mounts get torqued down to 25 in/lbs on rings and base, and NO LOCTITE per DNZ's instructions. Also tried a new Bushnell magnetic boresighter. We'll see if it got me on paper. Got 3 boxes of ammo to try in it this weekend to see what it likes and sight it in.
 

Attachments

  • Graham.BAR.5.jpg
    Graham.BAR.5.jpg
    109.6 KB · Views: 804
  • Graham.BAR.4.jpg
    Graham.BAR.4.jpg
    107.7 KB · Views: 754
  • Graham.BAR.3.jpg
    Graham.BAR.3.jpg
    80.2 KB · Views: 765
  • Graham.BAR.2.jpg
    Graham.BAR.2.jpg
    93.8 KB · Views: 799
  • Graham.BAR.1.jpg
    Graham.BAR.1.jpg
    94.4 KB · Views: 792
  • Graham.BAR.6.jpg
    Graham.BAR.6.jpg
    101.7 KB · Views: 778
  • Graham.BAR.7.jpg
    Graham.BAR.7.jpg
    111.4 KB · Views: 805
  • Graham.BAR.8.jpg
    Graham.BAR.8.jpg
    90 KB · Views: 792

hayseed_theology

Senior Member
Update #1 9/5/14

As I mentioned in the previous post, after a month of not getting to work on the gun, I spent a good portion of Labor Day tinkering with it.

The first order of business was to drill out the holes for the screw at the end of the mag tube. You will remember that this had proven near impossible to do. It seems simple - drill two holes straight through the round tube, but it was not simple. I had ordered a Williams scissor jig to help me drill the holes. That turned out to be the right tool for the job. I did a practice round on the old cut off section, and it came out perfect on the first try. So I got brave and tried it in the mag tube.

I used a c-clamp to hold the jig on the tube and then put it all in the vise. A little oil. A #31 drill bit. 3000 rpms. And we have our first hole. I took Sharps40's suggestion and ground down a punch to use as a center punch in the jig. Center punched the bottom hole. Lined everything back up and sent it through. Then I pulled the jig off and used the #31 bit that was still in the drill press to recenter the hole under the drill press. I clamped it in with the vise and made sure the #31 bit would slide up and down through the holes with no resistance, then I changed over to a 1/4" bit and drill the large hole for the screw head to recess into.

The holes lined up perfectly. It took a little cleaning up with a needle file, and the screw fit perfectly. But, you will notice in the pics that the mag tube end cap did not line up perfectly. This was intentional. I left some extra metal on the end of the tube so that I didn't have to be as precise with the location of the holes. I knew the holes were lined up with each other, so all I had to do was remove a little metal from the end of the tube until the end cap lined up. A few times of holding it up to the disc sander and it was perfect. Note how bad the end cap screw looks. Somebody chewed it up. That somebody wasn't me, but I will have to fix it cuz it looks terrible.

Tools: drill press, drill bits, Williams Sight/Scope Drilling Scissor Jig, center punch, c-clamps, vise, screw driver, disc sander

Cost: $125 for the jig
 

Attachments

  • REV205.89.jpg
    REV205.89.jpg
    109.9 KB · Views: 756
  • REV205.88.jpg
    REV205.88.jpg
    96.1 KB · Views: 776
  • REV205.87.jpg
    REV205.87.jpg
    72.4 KB · Views: 757
  • REV205.86.jpg
    REV205.86.jpg
    137.8 KB · Views: 783
  • REV205.85.jpg
    REV205.85.jpg
    113.8 KB · Views: 770
  • REV205.94.jpg
    REV205.94.jpg
    78.5 KB · Views: 797
  • REV205.93.jpg
    REV205.93.jpg
    68.5 KB · Views: 769
  • REV205.92.jpg
    REV205.92.jpg
    63.2 KB · Views: 771
  • REV205.91.jpg
    REV205.91.jpg
    102.2 KB · Views: 800
  • REV205.90.jpg
    REV205.90.jpg
    117.8 KB · Views: 779

hayseed_theology

Senior Member
Update #2 9/4/14

The next job was opening up the forward barrel band. I have used a Dremel before to do this, but I thought I'd try something different this time. I took the cut off blank from the barrel and lathered it up with course valve grinding compound. I ran a long screw through it and chucked it in the drill press. Turned it at about 3000 rpms. I ran the barrel band up and down on the blank as it turned, making sure to not let it get too hot. Opening up the barrel band is a slow process. Remove a little metal. Clean it up. Test it. Remove a little metal. Clean it up. Test it.

I finally got it to where it would easily slide to the point I wanted it to. I put the mag tube on the gun with the forward barrel band in place. I then marked a hole where the mag tube end cap screw sits in the barrel. I used the scissor jig again to drill a shallow hole for the screw to ride into. Let me say, that jig is great. I love it already.

With the forward barrel band in place, I slide a piece of braided wire through the screw hole. I used a sawing motion back and forth on the wire to create marks for the location of the screw relief notches on both the barrel and mag tube. It didn't leave a large mark, but it wore off a small patch of blueing which was just enough to get me on target.

I cut the relief notches with a small chainsaw file. I went slow removing the material. I was constantly checking for alignment and fit. After a few minutes, everything went together.

Tools: scissor jig, #31 drill bit, cordless drill, c-clamp, valve grinding compound, drill press, braided wire, small round smooth cut file, screwdriver

Cost: none
 

Attachments

  • REV205.100.jpg
    REV205.100.jpg
    51.3 KB · Views: 752
  • REV205.99.jpg
    REV205.99.jpg
    63 KB · Views: 773
  • REV205.98.jpg
    REV205.98.jpg
    66.4 KB · Views: 779
  • REV205.97.jpg
    REV205.97.jpg
    103.3 KB · Views: 795
  • REV205.96.jpg
    REV205.96.jpg
    74.9 KB · Views: 772
  • REV205.101.jpg
    REV205.101.jpg
    92.8 KB · Views: 759

Sharps40

Senior Member
I been usin my scissors jig for bout 20 years now. Somma the best money I ever spent. Even sawed one leg off short so I can get up closer to actions and frames with it.

And, learned something new....two things. Valve grinding in the band and marking the cross bolt location with wire instead of by eye. Neat!
 

hayseed_theology

Senior Member
Update #3 9/4/14

I have mentioned before that the trigger pull on this gun was atrocious. At times, it felt like I was trying to pull a train with my trigger finger. There is only so much that you can do with this trigger. It is a slightly different design than a Marlin. I think it's an overall poor design, but nobody asked me when they made it.

When the trigger moves with the lever, the sear remains in the frame and in contact with the hammer. There is a spring that keeps the sear in contact with the hammer. When the trigger is pulled, you are working directly against this spring. This spring adds a good bit to the trigger pull weight. Now this spring could be bent to reduce the force exerted(and thus the trigger pull), but then there is the risk of not maintaining solid contact with the hammer notches. That is a recipe for an AD when dropped or bumped. So, I did not touch that spring. I just don't think it's safe or wise to do so. So, I am really limited by that spring.

I did take a little 800 and 1000 grit sand paper to the engagement surfaces of the hammer, sear, and trigger. I didn't change the shape of anything, just smoothed some things out.

I take a little bit off the hammer mainspring with a Dremel and cut off wheel. Just one coil on each side. They were short coils, not full width. In my opinion, this spring was far too stiff. The hammer had actually slipped on me a couple times while lowering it with my thumb because of the stiffness of this spring. It was outrageous. I think that might be why the striker portion of the firing pin was missing. I think the hammer was striking it too hard and probably broke the retaining pin. The hammer still seems to fall with plenty of authority. I am going to test it with an array of ammo tomorrow. If I have any light strikes(but I don't expect any), I will order a replacement spring and leave it alone. Cutting the spring will reduce the trigger pull a bit, but it will also increase lock time (the time between when the trigger breaks over and when the firing pin ignites the primer). Normally, I would leave the hammer spring alone, because a fast lock time is preferable. So, cutting the spring is probably a wash as far as accuracy - lighter pull but longer lock time.

I used the muzzle radius cutter from Brownells to round off the edges of the muzzle. The tool works good. Works pretty quick. I took some 400, 800, and 1000 grit to the muzzle. Then hit it with a little Oxpho Blue for now.

I chunked a cheap 3-9x40 scope on it to shoot with tomorrow to see what kinda ammo it likes, and see if we can get a decent group out of it. Hopefully we will beat that 6" group from last time.

Once I figure out what it likes, I am gonna pull the scope off and put the Skinner Lo-Pro on and see where it shoots with the front sight I have on it. I plan on putting a Williams fiber optic front sight on it, but this will help me determine what height to order.

Tools: Dremel, sandpaper, cordless drill, muzzle radius cutter, cutting oil,

Cost: $30 for muzzle radius tool
 

Attachments

  • REV205.103.jpg
    REV205.103.jpg
    129.9 KB · Views: 756
  • REV205.102.jpg
    REV205.102.jpg
    55.7 KB · Views: 723
  • REV205.95.jpg
    REV205.95.jpg
    58.9 KB · Views: 735
  • REV205.84.jpg
    REV205.84.jpg
    179.5 KB · Views: 755
  • REV205.83.jpg
    REV205.83.jpg
    194.7 KB · Views: 769

Sharps40

Senior Member
Predicting the 170s will shoot best.
 

hayseed_theology

Senior Member
Update 9/6/14

Well, I had a good morning. Shot the Revelation 205, the ole Marlin 30 AW, and the .270 BAR.

I got them on paper at 25 yds and moved out to 100 yds with the Rev 205 and BAR. I was disappointed with the BAR. I may not have been letting the barrel cool down enough, I don't know. It shot 1.75"-2.25" groups. It is a sweet shooting gun. I just think it should be more accurate than that.

The Marlin 30 AW did great with my hand loads. You can read about it at the end of the original Lever Gun Project thread. I shot it at 50 yds because of the scout scope.

The Revelation shot much better than it did before. You will remember that the first group I shot with it came out to be around 6". I tried several different kinds of ammo. Without exception, it shot better. The second best group came from Hornday LeverEvolution 160 gr. That group was a round 1.5". The best group came from 170 gr Winchester PowerPoints. Sharps40 called it. That group was around 1 1/8". That's a pretty dang good group from a cheap lever action with a cheap scope at 100 yds. I'll take it.

The trigger is better but it is still stiff. It registers between 6.5 - 9 lbs on my Lyman Trigger Pull Gauge. That's pretty dang heavy. It breaks pretty crisp, but it is heavy. If the trigger was better, I could get even better groups. I believe I shot about 20 or so rounds through this gun. Several different manufacturers. No light hammer strikes, so I think our hammer spring mod is good.

The action on this thing is smooth. I am happy with the way everything is turning out. I ran out of time and didn't get to try to the Lo-Pro yet. That'll be the next job.
 

Attachments

  • REV205.105.jpg
    REV205.105.jpg
    181.7 KB · Views: 1,274
  • REV205.104.jpg
    REV205.104.jpg
    158.8 KB · Views: 1,265
  • REV205.106.jpg
    REV205.106.jpg
    108.5 KB · Views: 1,262
  • REV205.107.jpg
    REV205.107.jpg
    109.2 KB · Views: 1,259
Last edited:

Sharps40

Senior Member
Sure is nice when a plan and good basic hand smithing skills come together. Welcome to the world of middle intensity home gunsmithing. Once the basics are down, and the two leveractions show they are, you find out that the advanced home gunsmithing is mostly about making good jobs better and good cosmetics better. Advanced home gunsmithing is about approaching with confidence (knowing it'll be accurate/reliable despite the armchair naysayers) and moving from slappin it cute to flogging it beautiful. I'd say yer pretty much in the Advanced stage! Nice work. Go slay something juicy and tender with each of em.
 

hayseed_theology

Senior Member
Sure is nice when a plan and good basic hand smithing skills come together. Welcome to the world of middle intensity home gunsmithing. Once the basics are down, and the two leveractions show they are, you find out that the advanced home gunsmithing is mostly about making good jobs better and good cosmetics better. Advanced home gunsmithing is about approaching with confidence (knowing it'll be accurate/reliable despite the armchair naysayers) and moving from slappin it cute to flogging it beautiful. I'd say yer pretty much in the Advanced stage! Nice work. Go slay something juicy and tender with each of em.

Thank you, sir. I enjoy it more and more. Just wish I had more time for it.
 

hayseed_theology

Senior Member
Update 12/2/14

Man, it has been way too long!!! I haven't worked on this gun in a while, and it has been driving me crazy. Free time has been hard to come by, and what little I get has been spent deer hunting(aka squirrel watching).

I still need to sight the gun in with the Skinner sight to see what height front sight I need. I figured I could do that without a magazine tube or forend, so I started pulling her apart again.

The next step is preparing the wood and metal to be refinished. It is going to involve quite a bit of sanding as there is a good bit of pitting all over the metal, and the wood looks very rough. I wanted to try draw filing the sides of the receiver to get them smooth, but the serial number is located on one side of the receiver. Not allowed to file that off.

I started tonight out by sanding on the barrel bands and magazine tube. You will remember that I nicked the forend barrel band with the Dremel cutoff tool. Sanding that little mistake out took the longest time. I worked on it for a while with 220 gr. All the other parts got some 320 then 400 to prep them. They will need to be prepped again before bluing, but the goal for this sanding was to get all the major pitting out. Mission accomplished.

You can clean up the head of a boogered-up screw a little bit by spinning it on some sandpaper. They aren't "good as new," but it is a marked improvement.

I needed a dovetail fill block for the rear sight. When I bought the gun, it was missing the rear sight. Since I am using a receiver mounted rear sight, I needed something to go in that slot. I had an old rear sight off my Marlin laying around. It was missing the elevator and was removed to make room for the scout scope rail.

I took the Marlin rear sight and cut it off right in front of where it splits. After a little filing, it was pretty well squared up and free of rust pitting. A little filing on the dovetail portion of the sight and it was ready to slide into the gun. It's not the prettiest thing ever, but it does the job. And, it was free.


Tools: Magna-Tip Screwdriver set, hammer, brass drift punch, cutting tool, sandpaper (220, 320, 400 gr), sanding block, safe sided triangular file, flat file

Cost: Free
 

Attachments

  • REV205.112.jpg
    REV205.112.jpg
    81.1 KB · Views: 1,119
  • REV205.111.jpg
    REV205.111.jpg
    158.2 KB · Views: 1,124
  • REV205.110.jpg
    REV205.110.jpg
    131.4 KB · Views: 1,131
  • REV205.109.jpg
    REV205.109.jpg
    119 KB · Views: 1,113
  • REV205.108.jpg
    REV205.108.jpg
    131.6 KB · Views: 1,127
  • REV205.113.jpg
    REV205.113.jpg
    82.2 KB · Views: 1,125

hayseed_theology

Senior Member
Finally got around to taking a couple shots with the Skinner Lo-Pro installed. It shot a little high even with the Lo-Pro down as low to the receiver as possible. That means we are going to need a taller front sight. That's not a surprise given that receiver mounted peep sits higher than a standard barrel mounted rear sight. Also, this front sight was from a different gun.

There are a number of formulas out there to help you calculate front sight height. Google is your friend. To figure the change needed, I multiplied the desired shift in impact in inches by the sight radius in inches and then divided by the distance of the shot in inches. You will need to take precision measurements for this, not a tape measure or eyeball.

My front sight was .500" tall, and by my calculations, I needed something about .040" taller. I ordered a Williams Fire Sight from Midway. It's backorder, but should be here relatively soon.
 

Attachments

  • REV205.114.jpg
    REV205.114.jpg
    75.1 KB · Views: 1,052

bullgator

Senior Member
Great read! Thanks.
 

hayseed_theology

Senior Member
I have a rookie question. Why would you chop a barrel?

It's a legit question. There are several reasons, but the main one is that it makes the rifle much handier. All other things being equal, a shorter rifle is lighter, quicker pointing, and more maneuverable. I don't think I have measured the overall length of this gun yet, but it is probably 35-37" total. My 7mm Rem Mag bolt action is about 47". So this thing is almost a foot shorter than my primary deer rifle. In a ground blind, a lock-on stand, in the woods, carried on the person or in a truck, a shorter gun is better. The .30-30 isn't a hot load with a bunch of powder to burn so it does ok in a short tube. Yes, I am sacrificing some velocity, but the old dirty-thirty is not a long range cartridge anyway. Believe it or not, a shorter barrel is stiffer and will often improve accuracy. I think the shorter barrel is one of the reason my groups improved so much on this gun.

When using iron sights, a shorter barrel reduces the sight radius and thus the shooters ability to place shots accurately, but since I have moved the rear sight to the receiver, I have gained a few inches of sight radius so I should be able to shoot it more accurately than before. If you slap a scope on it, sight radius is not an issue either way.

Why chop a barrel down? Honestly, it's a feel thing. If you spend a day in the woods with a handy little carbine like this, you can't help but fall in love with it.
 

Sharps40

Senior Member
+1 on that. Chopped fer the right reasons.
 
Top