Lever Gun Project

hayseed_theology

Senior Member
Update 8/24/13

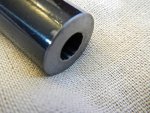
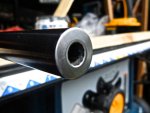
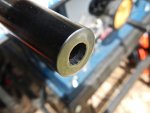
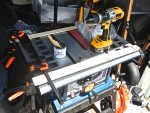
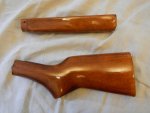
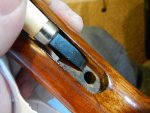
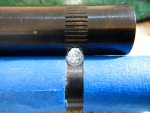
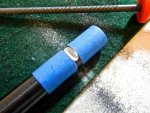
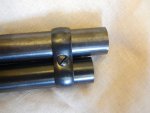
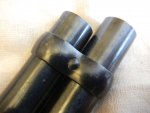
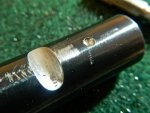
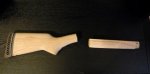
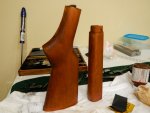
I had a chance to do a little more work on the stock. I ordered a 1/4" spacer. The color doesn't quite match the black on the recoil pad, but it will work. The first pic shows it on the stock after I finished sanding it down. That's the stock right before I began staining.

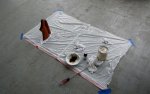
I did the staining on the front porch. Because I am dealing with birch wood, I started with a pre-stain wood conditioner from Minwax. I already had a bottle of Birchwood Casey water based Walnut stain, so that's what I went with. This stain has received good reviews on MidwayUSA and is supposed to work well with Tru Oil. If you use a wood conditioner, make sure that you match water based wood conditioner to water based stain or oil based wood conditioner to oil based stain. I put a double coat of conditioner on the end grain and a single coat on the rest of the wood. I wish I had done two coats on the whole thing, because I still ran into a little blotching. The conditioner really raised the grain, so I did a little light sanding before stain. I wiped everything down with a rag to get the dust off. You guys working with walnut can skip that step.

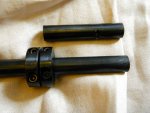
I used two coats of stain. I didn't thin it down because the birch is such a light wood. It came out okay. There was a little blotchiness. A couple spots came out really dark. A couple spots came out lighter.

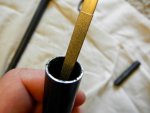
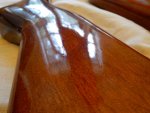
I let it dry for 24 hours, then I began applying Tru Oil. I applied the first coat of Tru Oil, let it get tacky, then applied a second coat. I tried to do a little wet sanding with 400 grit paper to help fill in the pores. That didn't end up working well, and I actually took off a little stain in one spot.

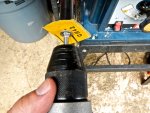
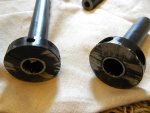
I have been applying a coat of Tru Oil every night. Today, I felt like the finish had built up enough to be able to sand it down. I hit it with some 400 grit and smoothed it out a bit. I applied another coat and hung it up to dry. I will do some more sanding and apply a few more coats before I finish. I have been hanging them up to dry with an old coat hanger I cut up.

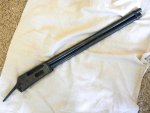
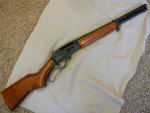
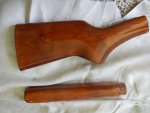
Overall, I think it is going to turn out fine. It is not perfect. It is certainly better than it was though. The forend is turning out to be a little lighter.


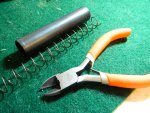
Tools: electric sander, sandpaper, pre-stain wood conditioner, stain, Tru-Oil, lots of rags, tack cloth, coat hanger, rubber gloves

Cost: $22; starting from scratch $50-75
 

Attachments

  • DSCN1045.jpg
    DSCN1045.jpg
    60.7 KB · Views: 1,830
  • DSCN1047.jpg
    DSCN1047.jpg
    91.8 KB · Views: 1,813
  • DSCN1056.jpg
    DSCN1056.jpg
    84.8 KB · Views: 1,837
  • DSCN1065.jpg
    DSCN1065.jpg
    74.1 KB · Views: 1,803
  • DSCN1089.jpg
    DSCN1089.jpg
    111.1 KB · Views: 1,815
Last edited:

hayseed_theology

Senior Member
Update #1 8/25/13

I had a good weekend to get some things done on the gun. This afternoon, I sanded and put another coat on the stock.

I worked on the barrel and magazine, as well.

To finish off the crown on the barrel, I wanted to chamfer the bore a little to protect the ends of the rifling lands. I had seen someone on the internet use a small conical stone designed to fit a drill which they turned by hand to accomplish the chamfer. I picked up some stones from Harbor Freight and did a trial run on the cut off side of the excess barrel blank. Well, it chewed up the stone, and there was no visible change on the barrel blank. So much for that idea.

So, I went with valve grinding compound and a 1/4" carriage bolt. I had to do some searching to find the right carriage bolts that didn't have letters cast into the head. I found some with the letters printed on them instead.

I clamped the barrel down. Slid an oiled patch a couple inches down the barrel. Put some grinding compound on the screw. Clamped it down in the drill. I started out going pretty slow. I wobbled the drill around to help keep it cutting evenly. I only let it take a very little off. Once it had chamfered a little, I wiped everything down and put a small piece of 800 grit sandpaper over the head of the bolt. I spun it a little then switched to 1000 grit. This gave the chamfer a mirror polish. The cut looks pretty even. In the pics with it all cleaned up, it is kinda tough to spot it.

I am interested to see what the accuracy is like when I get it all put together. My first impression is that this may be a reasonable option for a rough truck gun, but I think the crown cutting tool is worth the money. After I finish the build, I will save up and buy one so that I can do a comparison.


Tools: drill, clamps or vise, 1/4" carriage bolts, sandpaper, valve grinding compound

Cost: $10; starting from scratch $50-75
 

Attachments

  • DSCN1083.jpg
    DSCN1083.jpg
    130.1 KB · Views: 1,768
  • DSCN1080.jpg
    DSCN1080.jpg
    71.3 KB · Views: 1,770
  • DSCN1079.jpg
    DSCN1079.jpg
    72.4 KB · Views: 1,771
  • DSCN1078.jpg
    DSCN1078.jpg
    125.9 KB · Views: 1,787
  • DSCN1077.jpg
    DSCN1077.jpg
    138.2 KB · Views: 1,804

hayseed_theology

Senior Member
Here's a video from Larry Potterfield on a DIY barrel crown:


hayseed_theology

Senior Member
Update #2 8/25/13

I cut the magazine off yesterday. It makes it a little easier if you take off from the end close to the receiver. I used the collar clamps again to get a square cut. I cleaned it up with a couple files and some sandpaper.

Cutting off from the receiver end means that the notch for the screw on the forend is no longer in the proper location. This means you have to file out a new one. I put the magazine on the receiver and made a mark with the file to get the spot right. Once again, I used the collar clamps to help me keep the file in the right spot and keep the cut going straight. It took about 20 min of elbow grease to get a good cut. You might could do this with a Dremel, but like always with the Dremel, you risk making a mess of it. I didn't get a chance to try it out yet because a coat of Tru Oil was drying on the forend, but it looks like it will line up well.


Tools: collar clamps, hacksaw, vise or clamps, file, sandpaper

Cost: free; starting from scratch $40-50
 

Attachments

  • DSCN1069.jpg
    DSCN1069.jpg
    154.3 KB · Views: 1,758
  • DSCN1070.jpg
    DSCN1070.jpg
    131.1 KB · Views: 1,770
  • DSCN1072.jpg
    DSCN1072.jpg
    68.3 KB · Views: 1,734
  • DSCN1074.jpg
    DSCN1074.jpg
    135.9 KB · Views: 1,766
  • DSCN1093.jpg
    DSCN1093.jpg
    111.6 KB · Views: 1,742
  • DSCN1095.jpg
    DSCN1095.jpg
    61.5 KB · Views: 1,734

Sharps40

Senior Member
Wood finish looks super.

Comeing along very nice...good even color and you can still see the grain. A big improvement over factory sprayed on brown mud finish.
 

Sharps40

Senior Member
Excellent crown. It'll shoot like a house a fire. You've recreated a standard 1000 yd match crown that was/is on all the best long range BPC rifles....flat face, slight recess, smooth and even.
 

tree cutter 08

Senior Member
Looking good man! Done a few barrels similar to the way you did yours with great results. Cant wait to see it when your done!
 

HossBog

Senior Member
Whew, hay, looking good to me old eyes! I'm afraid to even take my Marlin apart that much for cleaning, let alone going this far! Looking forward to seeing the end.
 

hayseed_theology

Senior Member
Looking good man! Done a few barrels similar to the way you did yours with great results. Cant wait to see it when your done!

Thanks, buddy. Do you do a good bit of work on your guns? I have really enjoyed this project.

Whew, hay, looking good to me old eyes! I'm afraid to even take my Marlin apart that much for cleaning, let alone going this far! Looking forward to seeing the end.

Thanks, Hoss. Sharps40 is the real Marlin expert around here. His Marauder Restyle Part Duex is the real deal.
 

hayseed_theology

Senior Member
Update 9/23/13

Well, I lost count of how many coats of Tru Oil that I ended up putting on the stocks. I think it was around 10. Once I had built up the finish a little, I started sanding in between coats. I started with 400 grit and worked my way up. The last few coats got a touch of 1000 grit between them.

The first 5 or so coats I applied with my fingers and rubbed it in by hand. This puts a lot of oil on the wood, and it doesn't provide the most even application. After I began sanding, I applied with a small piece of cloth. This gave a thinner but much more uniform finish.

There are a few imperfections. It wanted to build up in a few places. It does build up some where the stock fits into the receiver. It required a little work with a carving tool and sandpaper to make everything fit again. I anticipated this, and it actually made everything fit a little snugger.

The finish is a little too shiny for a brush gun. Before I put it all back together, I will use some Birchwood Casey Stock and Sheen Conditioner, which is supposed to give it more of a satin finish.

Overall, I am very happy with the way it turned out for my first one. I feel like it's definitely an improvement over the way it did look. Most of all, I love the narrowed down forend.
 

Attachments

  • DSCN1127.jpg
    DSCN1127.jpg
    89.3 KB · Views: 1,557
  • DSCN1128.jpg
    DSCN1128.jpg
    95.3 KB · Views: 1,566
  • DSCN1158.jpg
    DSCN1158.jpg
    101.2 KB · Views: 1,572
  • DSCN1132.jpg
    DSCN1132.jpg
    98.2 KB · Views: 1,533

Sharps40

Senior Member
Weee Ohhhh, that wood is soundin off like a Campaign Shoutin Diplomat! Looks great!

What finish on the metal? Dura/Cerma/Rammalamma? Looks good too. Fine contrast, satin and gloss. I like it.
 

Sharps40

Senior Member
If you want it satiny, knock off the gloss/level the finish with oooo steel wool then buff it back to what ever you want using brownells fff rubbing compound. If you follow that with fffff brownells it'll come up shinier than a Sportin Gals boobies on Payday Saturday. But the fff is nice for a satin to low shine and makes the wood smooth and soft to touch.
 

hayseed_theology

Senior Member
Weee Ohhhh, that wood is soundin off like a Campaign Shoutin Diplomat! Looks great!

What finish on the metal? Dura/Cerma/Rammalamma? Looks good too. Fine contrast, satin and gloss. I like it.

The metal is still the factory blue. I'm gonna touch up some spots with Brownell's Oxpho Blue. At that angle, somehow the stock is catching light and the metal wasn't.
 

Sharps40

Senior Member
Darn fine condition then. I thought you went and had it soda or glass beaded and then applied slo rust or one of the Union of Fence-Post Installers & Gun Destroyers favorite finishes, Paint.

I'd say yer on the right track then...a touch up here and there and get that baby out on the 100 and 200 meter steels cause Deer season is comein fast.
 

hayseed_theology

Senior Member
one of the Union of Fence-Post Installers & Gun Destroyers favorite finishes, Paint

Haha. I rattle-canned a slide on a Kel-Tec once. That's when I found out that Breakfree CLP breaks down High Temp Flat Black Krylon in a matter of seconds. It came off quicker than it went on.

No more paint for me. (But I probably still qualify as a Gun Destroyer).
 

hayseed_theology

Senior Member
Update 9/27/13

I have been working on the forward barrel band for a while. I have, for the most part, tried to avoid using the Dremel tool on this project. For this part though, it is a must. Like all Marlin lever guns, this 30AW has a modestly tapered barrel. This means that after I hacked a few inches off, the barrel band no longer fit. I mean, I couldn’t even get it started onto the barrel. So the first step is opening up the band to fit around the barrel. To do this, I used the Dremel to remove metal. I was constantly moving the tool in an attempt to remove the material evenly. This took a lot of patience. I would periodically check the fit. I wanted something that wasn’t too snug, so hopefully it didn’t affect the harmonics as much.

Once the barrel band is sanded out enough to fit over the barrel and slide down a couple inches, I moved to the magazine end of the barrel band. Because of the greater diameter of the barrel, the band pulls up on the magazine to the point that it was touching at the end. While it might function like that, it was not very pretty to look at. I had to remove a considerable amount of material from the bottom side to make the magazine look right. This took a long time as well. To be honest, I eventually lost patience and stopped when I got to a point that I could live with it. In a perfect world, I would have a little more space between the end of the barrel and the end of the magazine, but I am comfortable with where it is. There is actually more of a gap than there appears to be in the pics.

Once I was satisfied with the barrel band, it was time to cut a relief in the bottom of the barrel for clearance for the barrel band screw. This is the notch that runs perpendicular to the bore. If memory serves me correctly, the factory notch was .111” deep. My new notch was not as deep. The screw didn’t require as much room as the factory allowed. The notch was made by hand with a couple files and some fine sandpaper. I tried the Dremel tool, but it got away from me. That’s why I try to stay away from the Dremel. The file got away from me once, but it doesn’t do near as much damage as a power tool. I worked on it for a few minutes before I realized a couple wraps of painters tape would protect the finish. I Bubba’d it up a little bit before that realization. I took a close up so you can see the damage. The good news is that it’s hidden by the magazine, and a little cold blue should make it pretty much disappear. If I had it to do over again, the blue tape would be the first step.

The screw that holds the magazine end cap on also fit into a slot cut in the end of the barrel to help keep the magazine in the right place. I don’t own a tool that could reproduce the factory slot that runs parallel to the bore, so I debated on what to do. I eventually settled on drilling a small hole for the screw to sit in. A drill press would have made that very simple. Unfortunately, I don’t own one yet. I used a cordless drill. It is not perfectly centered, but it is satisfactory. Because there is less space between the barrel and magazine, I filed a little off the end cap screw. I rounded off the screw a little to help it fit the hole a little tighter.

Finally, I cut a little off the magazine spring so it won’t be too stiff. I simply used the magazine blank as a guide. This translates into about 3.5" off. Because I took off a little over 20% of the magazine, I could have taken off up to 20% of the spring. I didn't, but I can always cut off more. The 3.5" ensure that the spring is plenty stiff but not too bad.

Everything seems to line up well. Other than the scratches, I am pleased with it. It will be time to touch up the blueing then reassemble. Added a pic of it partially assembled, I am getting excited now. I picked up the scope from a fellow GON forum member yesterday. Can't wait to get her back together and get to the range!

Tools: digital caliper, various files, blue tape, drill, drill bits, screwdriver, side cut pliers, Dremel

Cost: Free. Starting from scratch – at least $125.
 

Attachments

  • DSCN1137.jpg
    DSCN1137.jpg
    101.3 KB · Views: 1,420
  • DSCN1136.jpg
    DSCN1136.jpg
    101 KB · Views: 1,431
  • DSCN1134.jpg
    DSCN1134.jpg
    160.1 KB · Views: 1,375
  • DSCN1123.jpg
    DSCN1123.jpg
    67.5 KB · Views: 1,393
  • DSCN1121.jpg
    DSCN1121.jpg
    102.5 KB · Views: 1,374
  • DSCN1138.jpg
    DSCN1138.jpg
    113.5 KB · Views: 1,390
  • DSCN1142.jpg
    DSCN1142.jpg
    77.9 KB · Views: 1,366
  • DSCN1147.jpg
    DSCN1147.jpg
    90.8 KB · Views: 1,453
  • DSCN1152.jpg
    DSCN1152.jpg
    66.6 KB · Views: 1,429
  • DSCN1153.jpg
    DSCN1153.jpg
    173.4 KB · Views: 1,398
  • DSCN1145.jpg
    DSCN1145.jpg
    105.9 KB · Views: 1,421

Sharps40

Senior Member
Nice work boss. Putta scope on it and zero it for 100m an go blast them deer out to 150m or more. It'll carry great and just jump up to yer shoulder for snap shots. I like a 4 power scope on these, nice wide view. 1.5 to 4.5 is the berries and a 3x9 ain't shabby either cause ya can hit the pieplate kill zone on deer clear to 200m with these shorties.
 

HossBog

Senior Member
Thanks for that link, hay. Just went and read his thread! This is great!
 

hayseed_theology

Senior Member
Finally got some time to work on the gun tonight. Touched up the blueing. Pics to come later in the week.
 
Top