Al33
Senior Member
Before I go into how I made these up I first have to give credit and thanks to all the folks who have tutored me along in these pursuits. The first person I ever asked about how to go about it was Nicodemus and that was a few years back. Since then I have had the help of others like Dan Spiers (Dirty Dan here), Ben Kirkland (chehawknapper), Jay Ford, You-Tube tutorials, and more. All of this help came in the form of telephone conversations and PM’s so you do not have to have hands on lessons to learn how to make them but I would recommend hands on if you can arrange it. You will have to experience a lot of trial and error, especially in the beginning, but the rewards are worth the efforts. If you are contemplating making your own my first piece of advice would be to tell the kids to vacate the area where you are working if you don’t want them to hear you swear. These arrows are not like fast food so be prepared to spend a lot of time making them.
I also want to say that my ways will likely differ from many others and certainly may not be the best ways of going about it but I am still learning. If anyone sees a better way of doing something I am showing here I welcome the feedback.
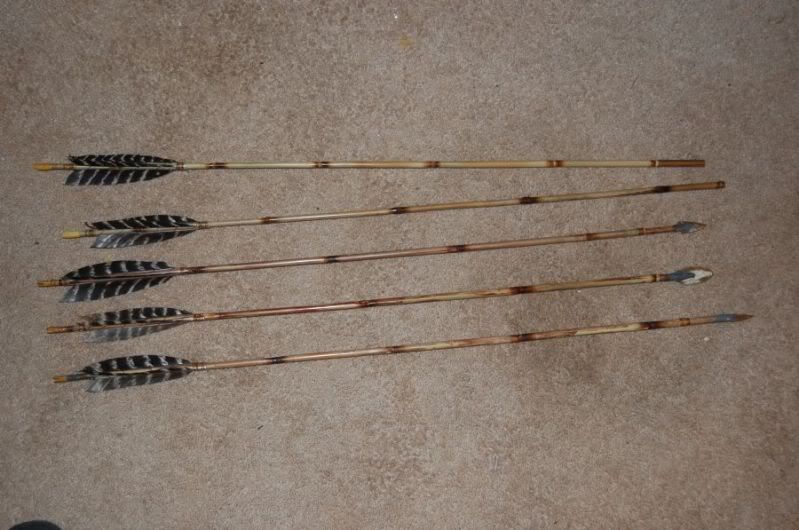
I have been making them from cane I get in North Georgia but I recently tried making them from river cane that comes from the Georgia coast. Last summer Mr. Dan Spiers gave me about a dozen coastal canes he had cut and I had them stored away curing out up until this past week. I had already studied them and decided they were not big enough in diameter to make good arrows but boy was I wrong. After winning an arrow at the NGTA banquet made by Jay Ford from the same coastal river cane species I shot it from my56# Osage self bow and could not believe how well it flew. That was all I needed to get me started with the canes Dan gave me and all but one of the ones in this pictorial is the coastal river cane. BTW, Dirty Dan helped me make my first successful Osage self bow.
")
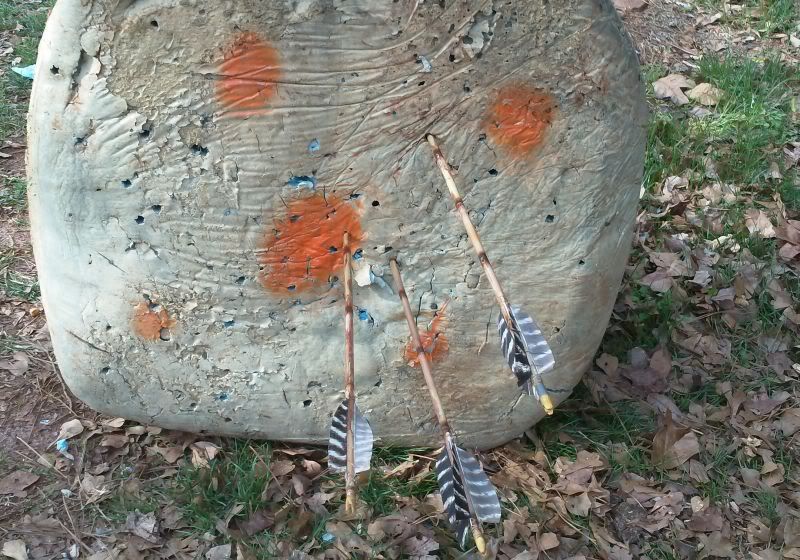
Just for the record I did not do everything primitive style, opting instead to use things like a heat gun versus hot coals, cordless drill versus bow drill, JB Weld epoxy versus pine pitch glue, and artificial sinew versus real sinew. My purpose for making these arrows are to use them primarily to kill a turkey this Spring shooting my Osage self bow but that part remains to be seen.
This coastal river cane has smaller/flatter nodes than the upland cane which is a big plus. I used a heat gun this time versus an alcohol burner but I will bypass the straightening parts because that has already been well covered in other tutorials here.
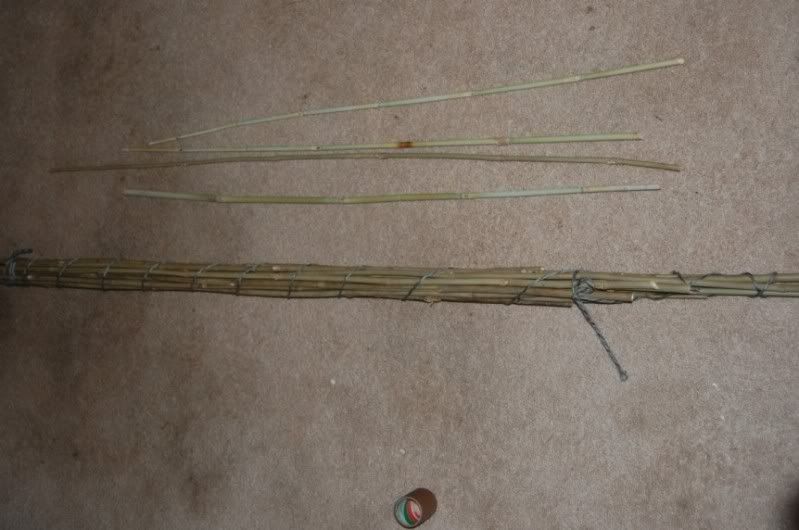
The bundled cane is the upland cane and the other few shafts are the coastal cane.
Here are a few failures of both kinds of cane. The lighter colored green ones are the coastal cane and they do not cure out to a light brown like the upland cane.

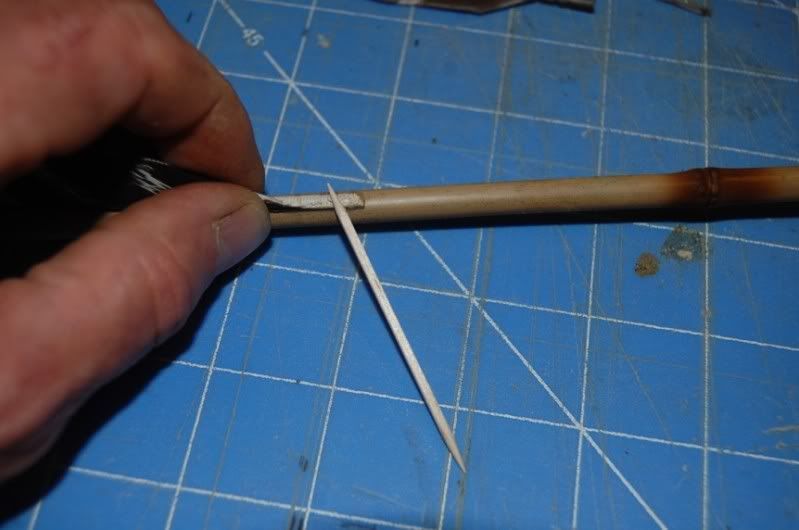
Making the Nocks:
I have made them both with actual inserted nocks and just carving the nock into the cane itself. With the coastal cane being so small on the nock ends I felt I needed to make the insert type nocks.
I had some left over pieces of Osage from my bow stave and I used them to make my nocks. The nock ends of the coastal cane is extremely small and most required 1/8th inch diameter inserts. I carved mine with a knife and found it is best to not carve the string slots in the nocks until after you have inserted them into the shafts. This is because sometimes the lock may not align perfectly with the shaft but you can re-align them by shaping the nock with the knife. Once aligned you can see better where to center and cut the string slot. The top piece in this photo is a piece of Osage, the middle is a nock already in the shaft and carved to align with the shaft, and the bottom piece shows the small shaft of the nock that inserts into the cane.
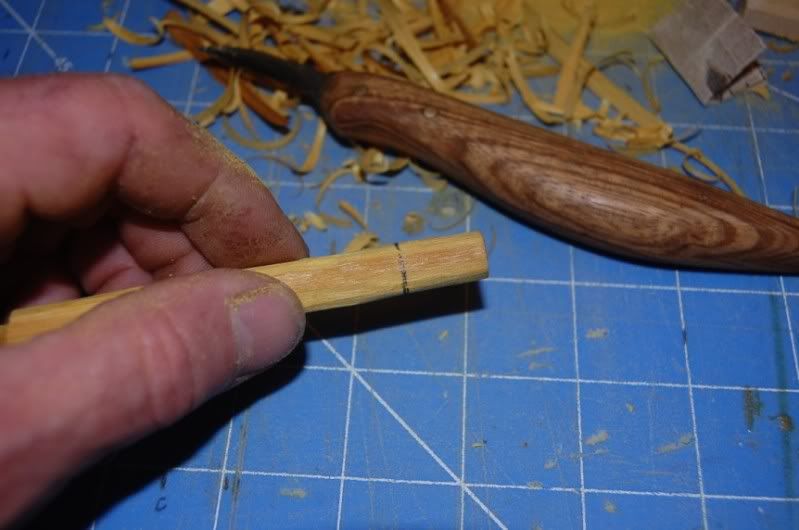
Here is a pic of the Osage scrap being carved to round for a nock. Note the grain because you want the string groove to run perpendicular to this grain which will give it strength.
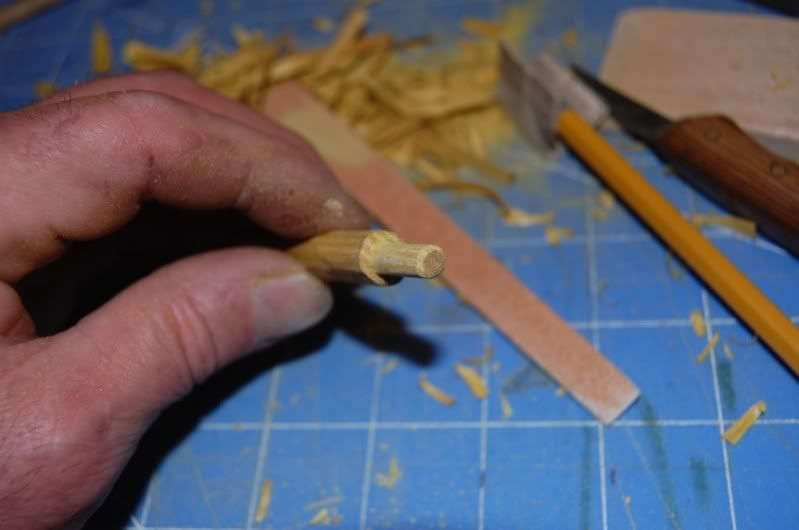
Carving the dowel end. Note: An emery board makes smoothing out the small dowel quick and easy.
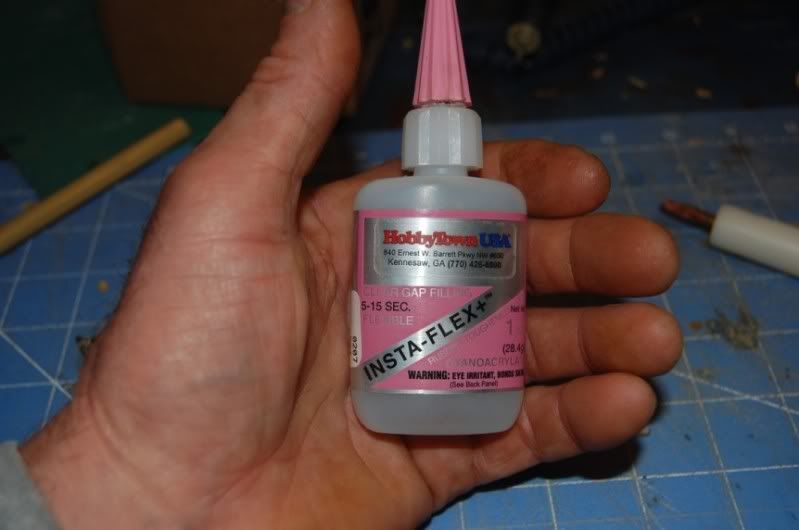
If you want to bypass making the pitch glue you can use this flexible type gap filling CA glue which works great for quick setting the point later to be secured with the JB Weld.
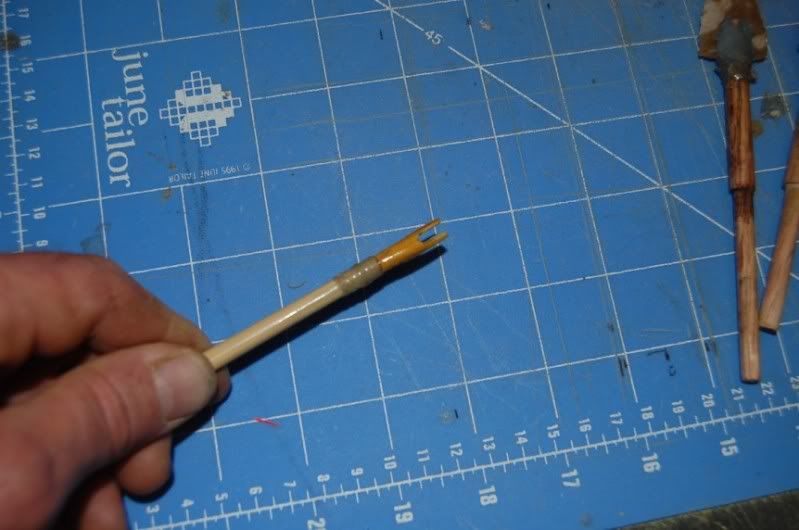
Here is a nock glued in with the back end of the cane wrapped tight with dental tape to support the cane. I usually use the artificial sinew but just happened to notice this piece of dental tape laying in my hobby room and used it instead.
Making the Fore Shafts:
I used pieces of POC from broken arrow shafts for my fore-shafts but most any hardwood will work I suppose. Just as I did with the nock inserts I had to carve the dowel portion of the fore-shaft to be inserted into the front end of the shaft. Each shaft has a slightly different inside diameter and has a soft interior core that needs to be removed. I have found I can use my cordless drill with the proper size bit to remove this pulpy interior but it’s important to wrap the ends with sinew first to help avoid splitting the cane when drilling. Also, GO SLOW and allow the cane to spin in your hand a good bit to keep the bit going in straight. About 2.5” deep works well for me. You may find it best to start with a smaller bit size and work up in size to get the diameter you need after drilling out with the smaller bit first.
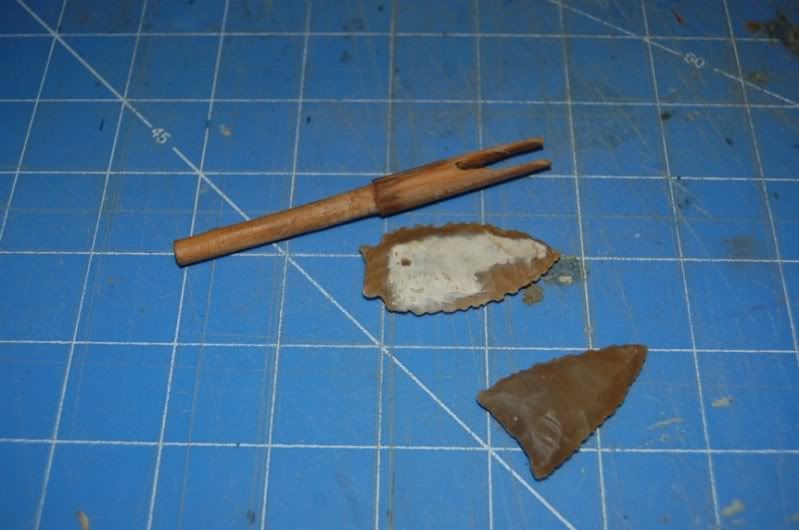
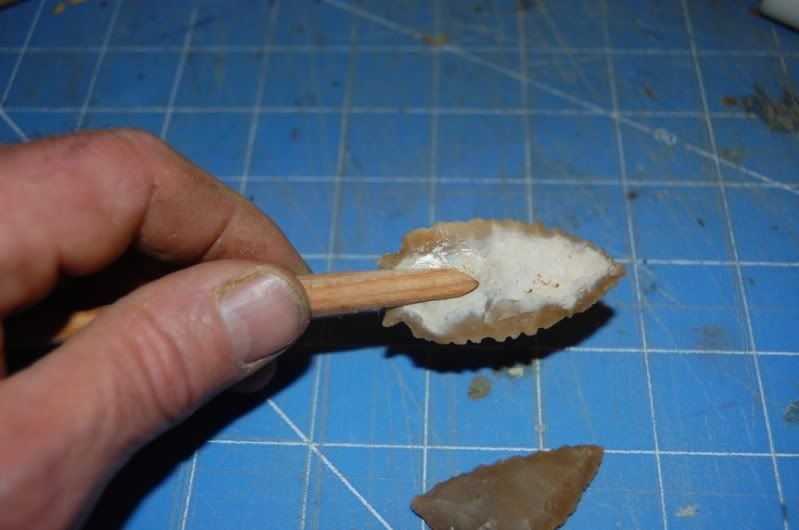
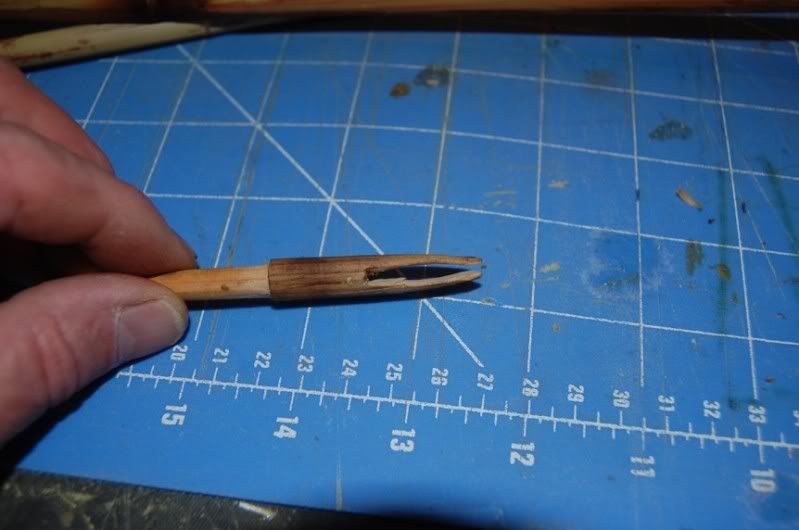
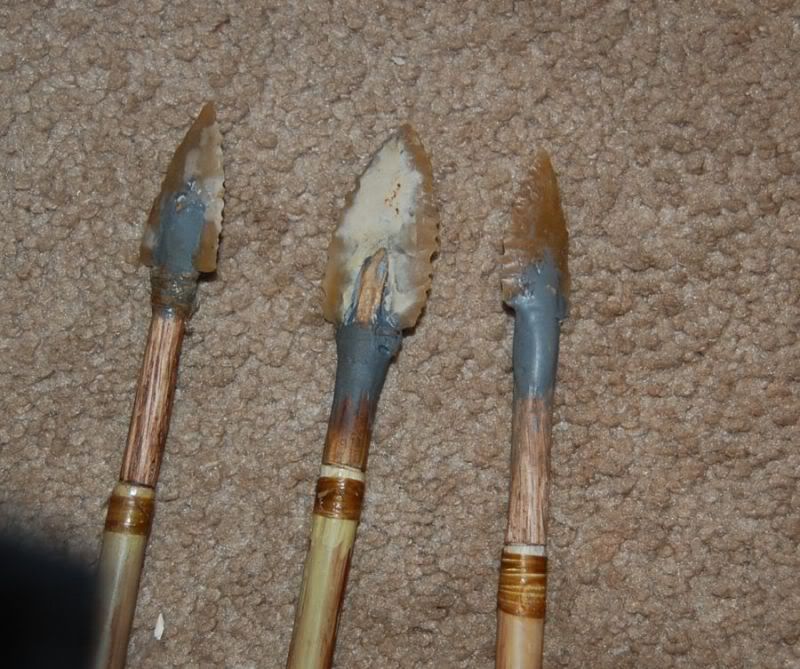
Here are some pic’s of a finished fore-shaft almost ready for one of my knapped points. I used a Dremel type tool to cut out for the point. I try to carve the cut out to fit a particular point.
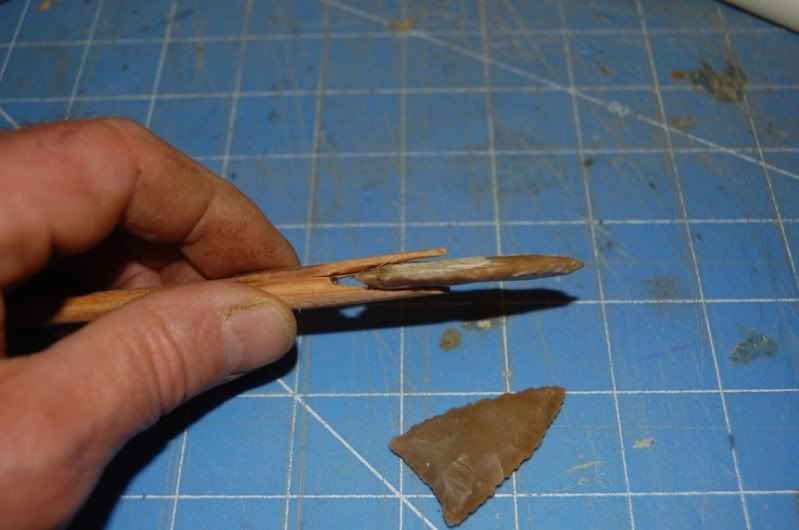
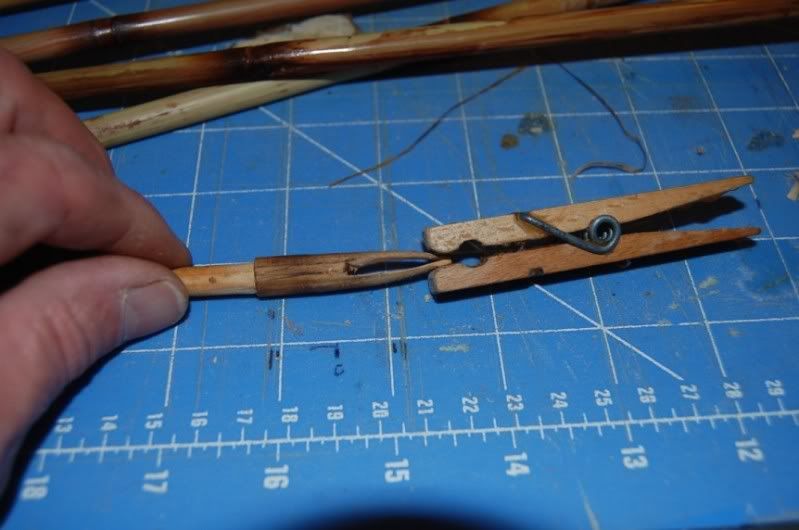
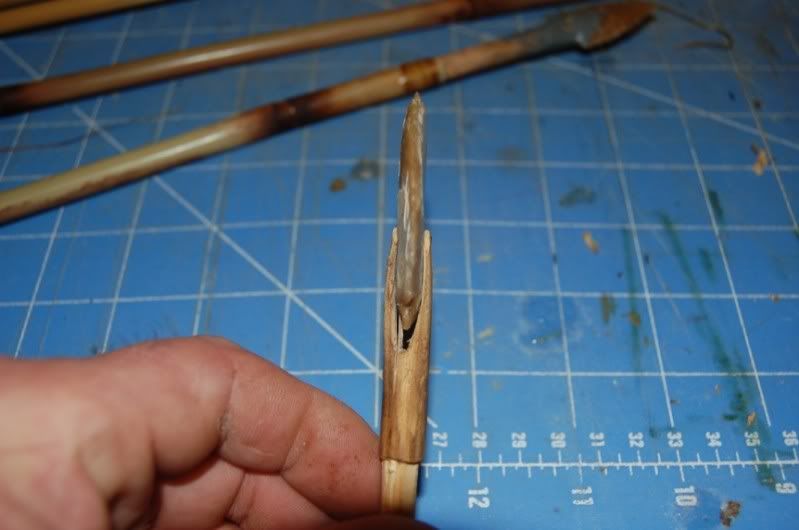
I discovered I can soak the carved fore-shaft in water and using a clothespin clamp the tine ends together for a flatter fit on the point. Once dry the tine ends remains closed and makes for a better and more flush fit on the point. Note that I make the cut for the point a lot deeper than where the base of the point ends up. I do this to allow the tines to flex more and can fill in the gap with my JB Weld epoxy. You can see in the last pic here how much better the tines fit around the point after the wetting and bending.
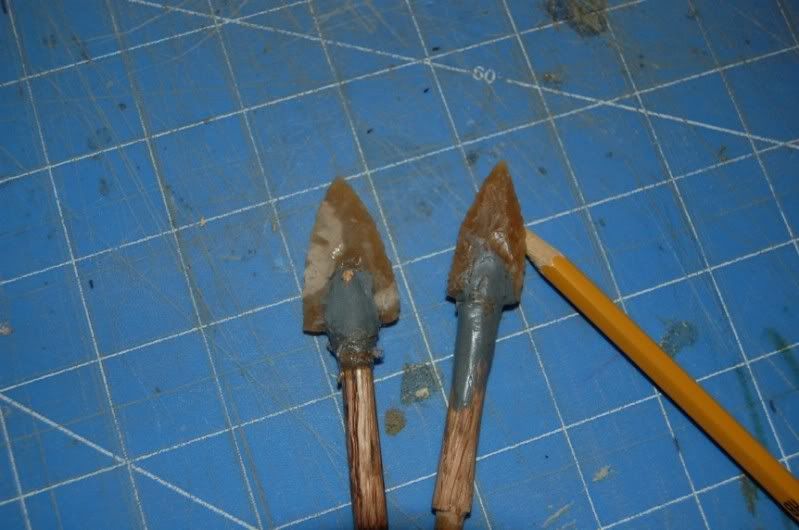
Here are a couple of points mounted to the fore-shafts. I first applied a mix of the JB Weld between the tines, positioned the point then secured them with artificial sinew. You can slightly wet your fingers and smooth out the epoxy over the sinew. Doesn’t look real pretty but is solid as a rock once cured.
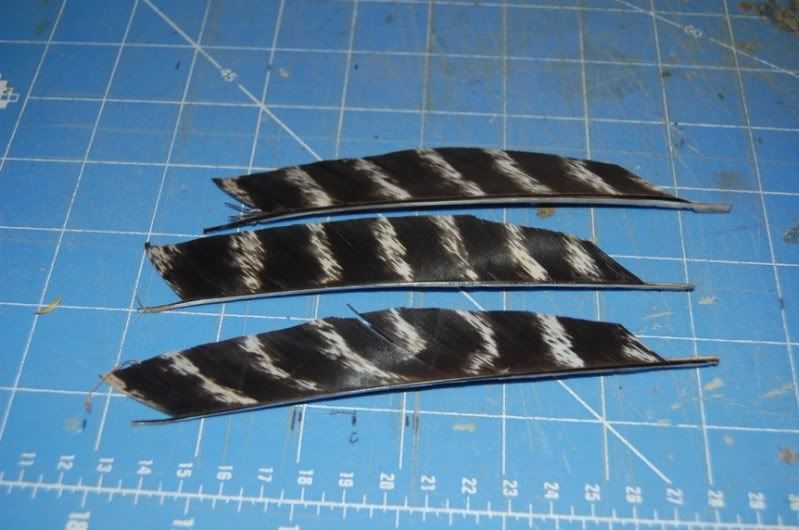
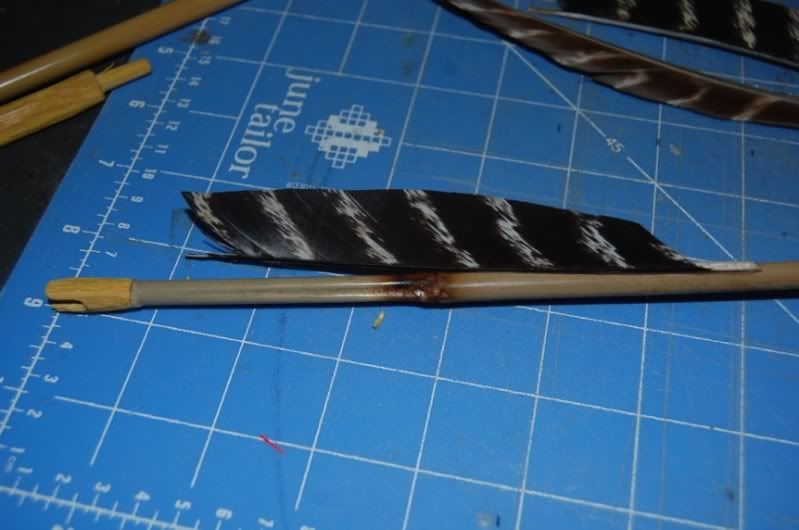
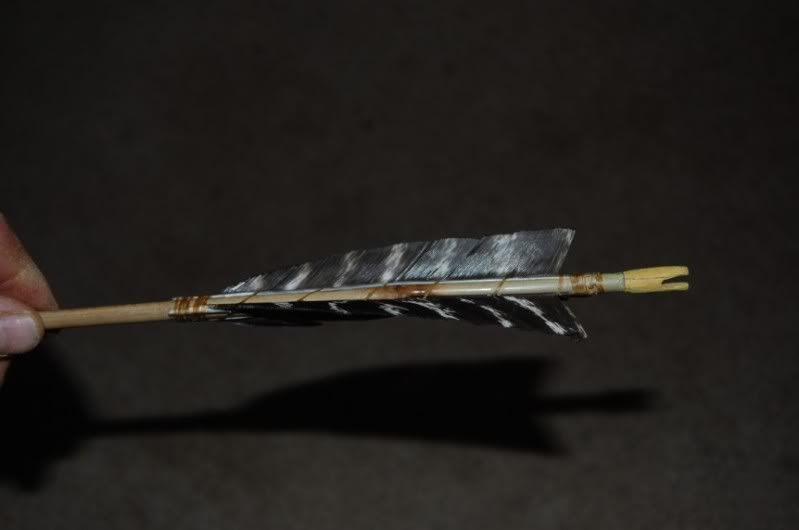
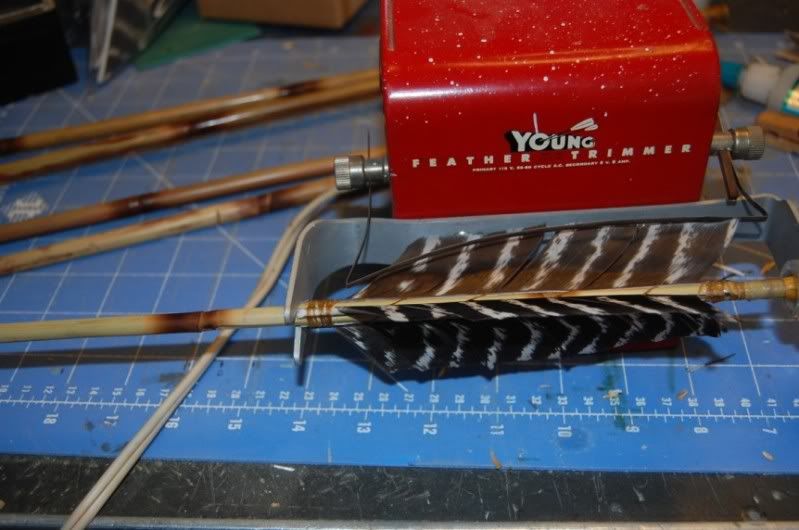
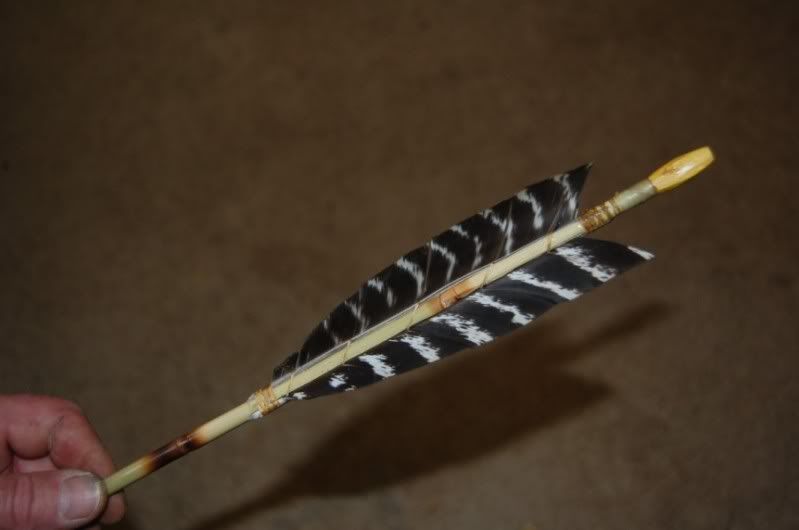
OK, I have sealed up the shafts with a coat of wipe-on poly and they are ready to be fletched up with some wild turkey fletchings I made up. Using a short bead of gap filling CA glue I attach the front end of the first one to the shaft and use a toothpick to hold it in place while it sets. A spray on accelerator for the glue makes for quicker work but is not necessary. Being careful to space them out correctly around the shaft I continue to until all three are glued in place on the front ends.
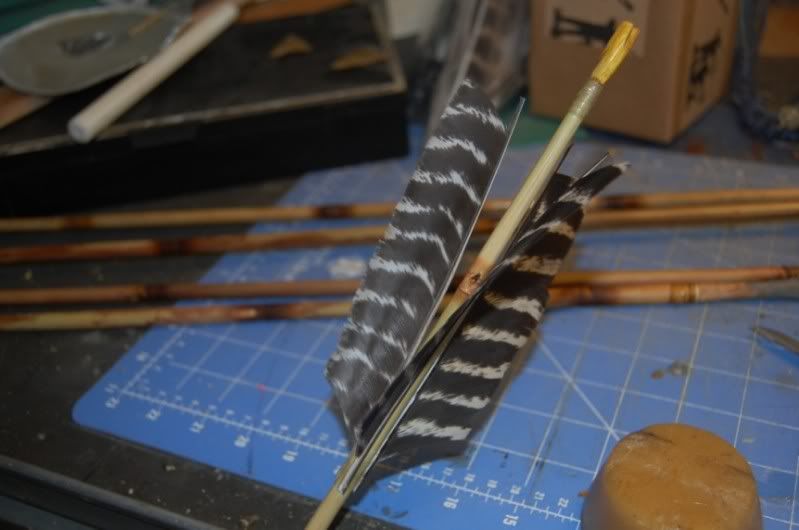
Now it’s time to spiral wrap them to the shaft with the sinew. Starting at the front end I wrap them with several turns then work into the vanes. I have found it works best if you follow a rotation that puts the sinew into the curvature of the fletching versus the backside. Confused???? You want to work the sinew from the underside of the feather (dull colored) versus the outside (brighter colored) because it works into the vanes much easier with the resistance of the feather shape.
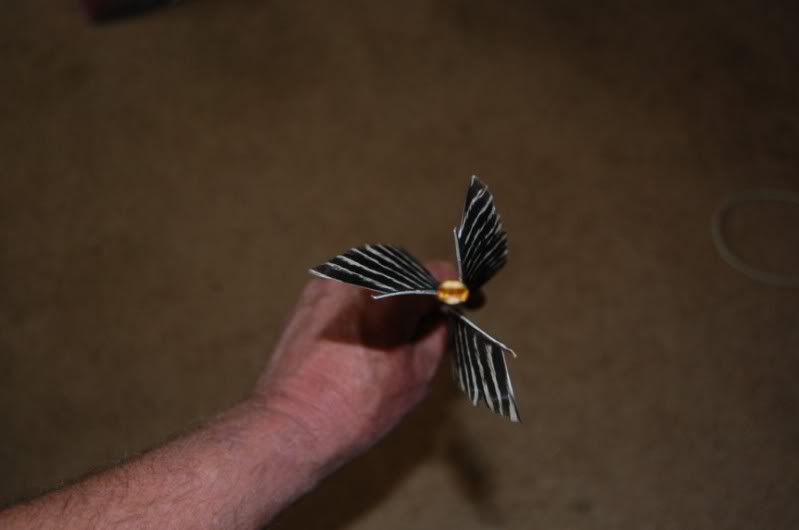
I like to wrap them firm but not too tight and once I get to the nock end make a few wraps and hold it there while I position all three to where they need to be. This is easily done by pushing and sliding them under the sinew spiral wrap as you eyeball them for consistency in alignment. Once that is done I finish the wrap with a few cinch loops and cut off the tag ends of the sinew. I check it all again before adding drops of the CA glue on one side of each fletching where the sinew passes over it. This just helps to secure both the fletching and the sinew to the shaft where the sinew crosses both. Of course a drop or two at the front and nock ends of the wraps is recommended also.
I also want to say that my ways will likely differ from many others and certainly may not be the best ways of going about it but I am still learning. If anyone sees a better way of doing something I am showing here I welcome the feedback.
I have been making them from cane I get in North Georgia but I recently tried making them from river cane that comes from the Georgia coast. Last summer Mr. Dan Spiers gave me about a dozen coastal canes he had cut and I had them stored away curing out up until this past week. I had already studied them and decided they were not big enough in diameter to make good arrows but boy was I wrong.
After winning an arrow at the NGTA banquet made by Jay Ford from the same coastal river cane species I shot it from my56# Osage self bow and could not believe how well it flew. That was all I needed to get me started with the canes Dan gave me and all but one of the ones in this pictorial is the coastal river cane. BTW, Dirty Dan helped me make my first successful Osage self bow.Just for the record I did not do everything primitive style, opting instead to use things like a heat gun versus hot coals, cordless drill versus bow drill, JB Weld epoxy versus pine pitch glue, and artificial sinew versus real sinew. My purpose for making these arrows are to use them primarily to kill a turkey this Spring shooting my Osage self bow but that part remains to be seen.
This coastal river cane has smaller/flatter nodes than the upland cane which is a big plus. I used a heat gun this time versus an alcohol burner but I will bypass the straightening parts because that has already been well covered in other tutorials here.
The bundled cane is the upland cane and the other few shafts are the coastal cane.
Here are a few failures of both kinds of cane. The lighter colored green ones are the coastal cane and they do not cure out to a light brown like the upland cane.
Making the Nocks:
I have made them both with actual inserted nocks and just carving the nock into the cane itself. With the coastal cane being so small on the nock ends I felt I needed to make the insert type nocks.
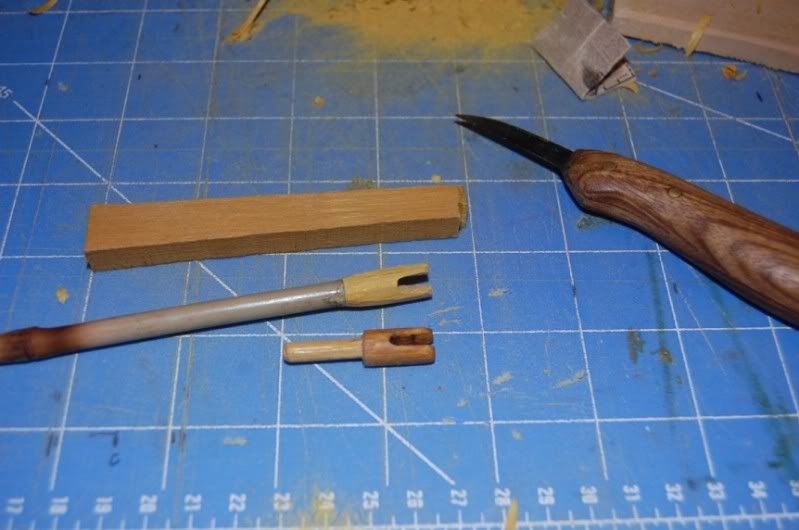
I had some left over pieces of Osage from my bow stave and I used them to make my nocks. The nock ends of the coastal cane is extremely small and most required 1/8th inch diameter inserts. I carved mine with a knife and found it is best to not carve the string slots in the nocks until after you have inserted them into the shafts. This is because sometimes the lock may not align perfectly with the shaft but you can re-align them by shaping the nock with the knife. Once aligned you can see better where to center and cut the string slot. The top piece in this photo is a piece of Osage, the middle is a nock already in the shaft and carved to align with the shaft, and the bottom piece shows the small shaft of the nock that inserts into the cane.
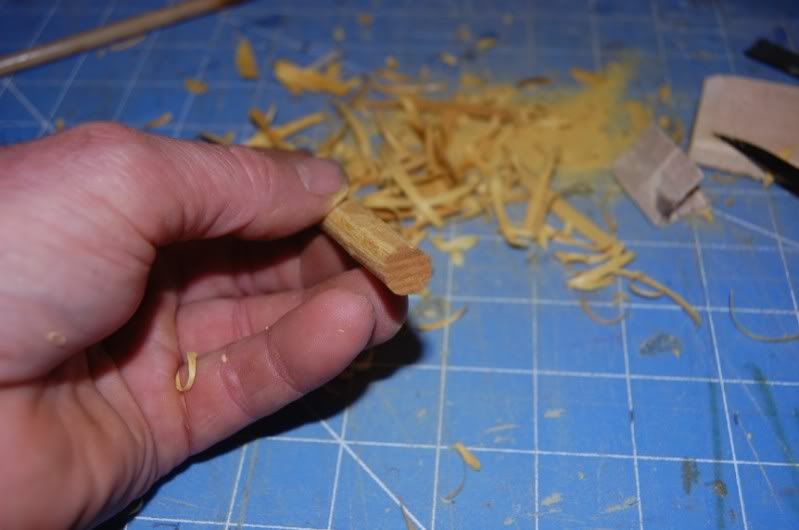
Here is a pic of the Osage scrap being carved to round for a nock. Note the grain because you want the string groove to run perpendicular to this grain which will give it strength.
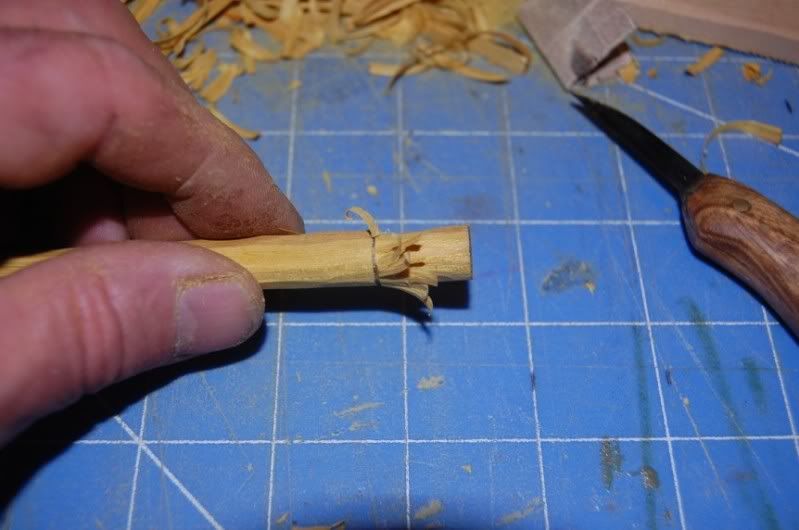
Carving the dowel end. Note: An emery board makes smoothing out the small dowel quick and easy.
If you want to bypass making the pitch glue you can use this flexible type gap filling CA glue which works great for quick setting the point later to be secured with the JB Weld.
Here is a nock glued in with the back end of the cane wrapped tight with dental tape to support the cane. I usually use the artificial sinew but just happened to notice this piece of dental tape laying in my hobby room and used it instead.
Making the Fore Shafts:
I used pieces of POC from broken arrow shafts for my fore-shafts but most any hardwood will work I suppose. Just as I did with the nock inserts I had to carve the dowel portion of the fore-shaft to be inserted into the front end of the shaft. Each shaft has a slightly different inside diameter and has a soft interior core that needs to be removed. I have found I can use my cordless drill with the proper size bit to remove this pulpy interior but it’s important to wrap the ends with sinew first to help avoid splitting the cane when drilling. Also, GO SLOW and allow the cane to spin in your hand a good bit to keep the bit going in straight. About 2.5” deep works well for me. You may find it best to start with a smaller bit size and work up in size to get the diameter you need after drilling out with the smaller bit first.
Here are some pic’s of a finished fore-shaft almost ready for one of my knapped points. I used a Dremel type tool to cut out for the point. I try to carve the cut out to fit a particular point.
I discovered I can soak the carved fore-shaft in water and using a clothespin clamp the tine ends together for a flatter fit on the point. Once dry the tine ends remains closed and makes for a better and more flush fit on the point. Note that I make the cut for the point a lot deeper than where the base of the point ends up. I do this to allow the tines to flex more and can fill in the gap with my JB Weld epoxy. You can see in the last pic here how much better the tines fit around the point after the wetting and bending.
Here are a couple of points mounted to the fore-shafts. I first applied a mix of the JB Weld between the tines, positioned the point then secured them with artificial sinew. You can slightly wet your fingers and smooth out the epoxy over the sinew. Doesn’t look real pretty but is solid as a rock once cured.
OK, I have sealed up the shafts with a coat of wipe-on poly and they are ready to be fletched up with some wild turkey fletchings I made up. Using a short bead of gap filling CA glue I attach the front end of the first one to the shaft and use a toothpick to hold it in place while it sets. A spray on accelerator for the glue makes for quicker work but is not necessary. Being careful to space them out correctly around the shaft I continue to until all three are glued in place on the front ends.
Now it’s time to spiral wrap them to the shaft with the sinew. Starting at the front end I wrap them with several turns then work into the vanes. I have found it works best if you follow a rotation that puts the sinew into the curvature of the fletching versus the backside. Confused????
I like to wrap them firm but not too tight and once I get to the nock end make a few wraps and hold it there while I position all three to where they need to be. This is easily done by pushing and sliding them under the sinew spiral wrap as you eyeball them for consistency in alignment. Once that is done I finish the wrap with a few cinch loops and cut off the tag ends of the sinew. I check it all again before adding drops of the CA glue on one side of each fletching where the sinew passes over it. This just helps to secure both the fletching and the sinew to the shaft where the sinew crosses both. Of course a drop or two at the front and nock ends of the wraps is recommended also.
 I cannot give enough thanks to so many here who have helped me along not only with making river cane arras but just about everything else. I received fire starting tools from Nicodemus, an arra straightener made and given to me by Nugefan, and the Lord knows I'm gonna leave someone out if I keep name dropping. I have been encouraged by all of you!