Kydex Holster Tutorial

11b30b4

Member
I am new here and looking to contribute. I am not sure this is the correct place to post this but I hope it is. I have seen several posts about holsters so I figured I would put up this tutorial to help anyone interested in making their own.

Disclaimer, I am only a hobbyist. I am doing this tutorial to help others in making their own Kydex holsters.

So you may have purchased a holster from some company for $50-$100. We have all been there; however if you are like me, you have more guns than holsters. Dropping another $100 every time you get a gun or add a tactical light or whatever can get costly. Worse is if you have some combination of light and gun that no one makes a holster for, or you have to give them your gun for a week for them to make the holster. This is what eventually forced me to learn how to make a quality Kydex holster. So once you get the basics down, you can make a holster, sheath, or whatever with Kydex. I figured that since I have seen several posts about what holster to get I would do this tutorial.

Up front you will need some tools and supplies but once this is acquired, you can produce a quality holster for about $10-$15. Most of these tools can be purchased from Harbor Freight, Northern Tool, etc… and are often on sale.

The basic tools:
Retractable Utility Knife ($5.00)
Metal Ruler ($2.00)
Non-contact Infrared Thermometer ($30.00)
Leather Work Gloves ($20.00)
Drill with ¼” Drill Bit ($30.00)
Heat Gun ($22.00)
Toaster Oven ($20.00)
¼” eyelet hand setter ($12.00)
Hammer ($10.00)
Kydex Press ($30.00-$40.00) You will need to build this, see below
Belt loop jig ($20.00) You will need to build this, see below
These are the minimum tools you will need.

If you have the following tools it will make everything easier on you:
Drill Press
Belt Sander
Vice
Band Saw
Dremel

Perishables:
Medium-Grit Sanding Sponge ($8.00)
Blue Painters Tape ($2.00)
Wood Dowels Assorted Sizes ($10.00) Michel’s Craft store sells an assortment kit
Wood Craft Sticks ($5.00) Tongue Depressors

Materials:
So Kydex comes in different thicknesses, .60, .80, .93, and .125. I recommend using the .80 thickness and this tutorial is designed for this thickness. .80 is ideal for holsters and will deliver a good balance of definition and durability. For one typical holster you will need two pieces of Kydex at 9”x7” and another piece of 2”x6” for the belt loops. Kydex is sold in 12”x12” sheets but you can also buy it in bulk up to 4’x8’ sheets. I normally get 2’x4’ sheets and that lets me make several holsters. All the Kydex and hardware can be purchased from knifekits.com, diyholsters.com, or Amazon.

The hardware is determined by the thickness of the Kydex so for .80 Kydex you will need the following hardware:
Kydex .80 ($5.00-$30.00)
Eyelets #8-10 ¼” ($10.00)
8-32 Philips head .500 (1/2”) machine screws ($10.00)
8-32 Philips head .375 (3/8”) machine screws ($10.00)
¼” slotted pass through post ($10.00)
7/32” rubber tubing ($5.00) get this from an ACE hardware or similar shop and you will only need a few inches, I just go ahead and buy it in 2’ sections at a time. You will be cutting the tube in 1/8” sections. These slices will be silencers. This is cheaper and more customizable than using rubber washers or O-rings.

Kydex Press:
So you can buy a Kydex press for about $100.00 but I recommend you build your own. You will need to purchase two pieces of 8”x12”x1” thermoforming foam. Each piece cost about $10.00 from knifekits.com
http://www.knifekits.com/vcom/product_info.php?cPath=41_524&products_id=4290
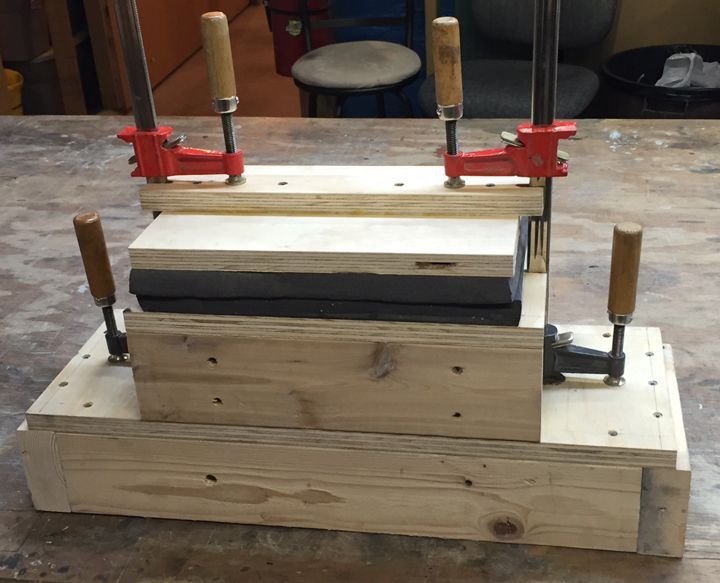
Once you have the foam you can use plywood and some bar clamps to build the press. Here is a picture of the press I built.


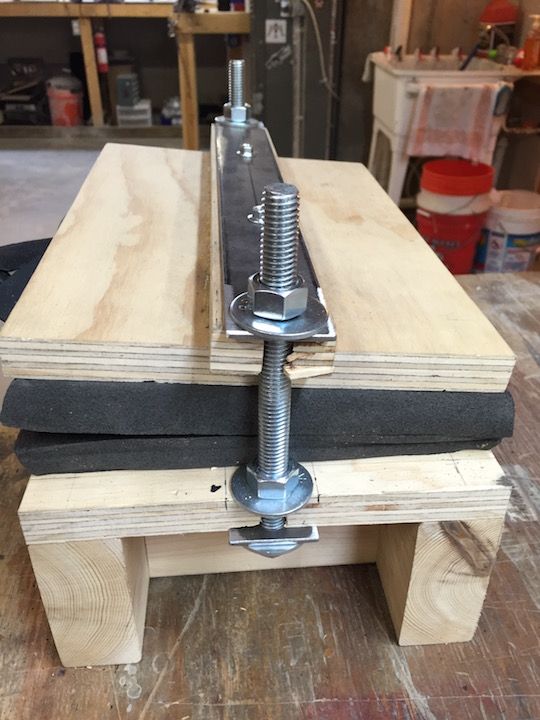
Once I started this tutorial, I decided to upgrade my press. I used some flat 1.5”x14”x1/8” thick steel from home depot. I cut it to fit then I used two ½”x 6” lag bolts with nuts and washers. Once I got it all together, I can now use a cordless drill to squeeze the press. A word of caution, you want it to press tight but you do not want to crush the gun so I use the slowest setting on my drill and since I was already familiar with how much pressure I applied with the clamp press, I had a good idea of how much pressure to apply here. Here is a side view.


I recommend you build a horizontal press rather than a hinged press. A hinged press will apply force unevenly and I have found them to push objects out of alignment. I am sure you can find plans on the internet for building a press, I just knocked my press out without plans, it works great.

To be continued...
 

11b30b4

Member
Belt Loop Press
So you can buy belt loops made of polymer or metal but I just make my own. To do this you will need to make a press. Figure out the size belt loops you will need, keep in mind that the belt loops will need to match mounting holes on the holster. Standardizing this will make thing easier. For my belt loops, they are ¾â€� wide and they will fit a 1 ¾â€� wide belt and come out ½â€�. The mounting holes are 2 ¾â€� on center. This allows for about ¼â€� of Kydex material around the holes. To make them, I just heat up the Kydex to about 300 degrees (definition is not an issue with belt loops) and lay the Kydex in the press, then I close the press and apply some clamps to hold it closed for about 10 minutes. Next I open and remove the Kydex. I mark and cut the belt loops slightly larger than ¾â€� wide, then I sand and drill them. You can buy ¼â€� eyelets that are shorter and you can put these eyelets in the holes; however, I don’t worry with them. Here are some pictures to the belt loop press.


Ok, Kydex has an ideal working temperature of 350 degrees, and Kydex gets floppy at about 220 degrees. This means that you can shape it at 220 but to get the desired definition, you really need to get as close to 350 as possible. Also you want to get to the desired temperature slowly. Fast heating of Kydex and/or heating over 350 degrees will cause it to deform and shrink on one or more sides and instead of a square you will have a trapezoid. Another important aspect about Kydex is that it will come with a rough side and a smooth side. It should be self-evident that the rough side is for the outside of the holster and the smooth for the inside.


Ok so lets get started
I recommend you experiment with a piece of Kydex. Cut a square piece and place it smooth side down in your toaster oven and set the temperature to ~150. Check it every few minutes and in several places to see where the temperature is. My oven has a “Stay On� setting that I use rather than the timed on setting. Once the Kydex is at 150, I rotate the Kydex but I do not flip it (meaning I rotate the Kydex in the oven so that the side that was towards me is now away from me) and turn the temperature up another 50 degrees. Repeat this process till you are at 350. If the Kydex is still a square, then you did it correctly, if its deformed then you got it too hot or heated it too fast. Let the Kydex cool and retry it. Kydex can be reformed several times before it loses its strength. I have even taken old holsters and reformed them for new guns.

So once you have the heating down, we move on to making a holster. I will explain this in 4 phases. Each phase will have several steps. Everything should take you about 4 hours if you do everything correctly as I have outlined here.

To be continued…
 

11b30b4

Member
Phase 1
Prepare the gun for forming. Make sure the gun and magazine are unloaded and safe. Once this is accomplished you will need to use the blue painters tape, wooden dowels, and wooden craft sticks to increase the bulk of the gun to allow it to side completely into a holster. For this tutorial I am using a Sig P227 with a Streamlight TLR-3 tactical light attached.

I suppose this is a good time to mention that if your gun has a polymer lower or magazines you will be able to make a holster for it but some level of caution should be taken when using the heat gun in the next few phases. You can heat up polymer but I do not recommend heating it past 250 degrees. I know this is a safe temperature because that is the recommended baking temperature for Cerakote on Polymer guns.


Above is a picture of the Sig P227 masked off. If you are not using a light or laser on you gun then the amount of masking should be minimal. Almost all guns will require some masking. At a minimum, you will need to mask the front sight post, in these pictures you can see that I uses a small (~3/16�) wooden dowel along the top of the slide from the rear sights to the front sight. You should be able to figure out that there needs to be a channel the entire length of the holster for the front sight to slide in, otherwise you may be able to get the gun in the holster but it will be almost impossible to get out of the holster. On Kydex holsters, the retention is primarily centered on the ejection port. So when we later adjust the retention, this is where we will do it; however, if you are working with a gun and no light or laser, then the retention will also be controlled at the trigger guard as well. Another note of caution here, I have seen lots of Kydex holsters that you can see the trigger molded into the Kydex, I am always concerned about the Kydex causing an accidental discharge if the trigger is molded, so for this reason I normally mask off the inside of the trigger guard or a relieve the tension in this area with the heat gun once everything else is done. When masking the gun all the levers and anything that protrudes more than 1/8� of an inch is a good rule to follow. Consider the magazine release, if you do not mask it, the only time there is no tension being applied to it will be once it is in the holster, this means that inserting it and drawing it, the magazine release may have Kydex pushing on it and you may eject the magazine. So to compensate for this, we mask the magazine release all the way to top of the holster. Ok, so we have the gun masked off, we move on to Phase 2.

Phase 2
Cut and heat the Kydex. So you can lay the gun on the Kydex and trace around it (leaving plenty of room for eyelets and the Kydex to form up on the contours of the gun). I have done this a few times so I have a good idea of how the holster will look so I have traced this onto the Kydex. If you are unsure about the shape, just cut a large enough square of Kydex (keep in mind it will need to fit inside your oven so that is the largest you can work with) also in this tutorial I intend to have a shirt guard on the inside of the holster so my Kydex must be almost the entire length of the gun.

I guess there are several ways to make a holster but I have only worked with two methods. One piece holsters (this wraps around the gun) or a two piece holster. In this tutorial, I am making a two piece holster, this means that we form the inside (side closest to the body) and then the outside. I am also making this holster with leather wings to allow it to conform with the body more. For these wings I cut some cowhide leather about ¼â€� thick to the size I need that will match with the holster mounting holes and belt loop holes. I dye the leather black and I will add eyelets to the holes once they dry. The leather wings are not necessary but I like them so I added them to this holster. For this tutorial, you can just mount the belt loops directly to the holster if you want.


Ok, to cut Kydex, you can lay a metal ruler on the line you want to cut and score the Kydex with the utility knife along the ruler several times applying more force each time. Once you have made 4 or 5 scores, then use the edge of a table and bend the Kydex along the scored line. It will snap and make a clean break. Or if you have a band saw, just cut it like you would wood. Once cut, you may want to clean up the edge but I usually do this in a later phase.


So then we put the body-side piece of Kydex in the oven and slowly bring it to 350 degrees. Between checking the temperature and rotating the Kydex, I use a heat gun and start heating up the forming foam and gun. This is where I said to be careful if you are working with a polymer gun. The idea here is to get the foam and gun warm enough that we do not transfer all the heat from the Kydex to them. We want everything to be warm, this will ensure that we get really good definition in the molding process. The foam and gun do not need to be 350 degrees. They just need to be warm so just wave the heat gun over them for a bit and recheck on the Kydex temperature. Once we have 340-350 degrees on the Kydex we move to Phase 3.

To be continued…
 

11b30b4

Member
Phase 3
Forming the Kydex. Once the Kydex is at 350 and the foam and gun are warm, remove the Kydex from the oven and turn the oven off (we want it to be cool for the next piece of Kydex in a few minutes. Lay the Kydex on the foam and place the gun on it. Remember this is the inside half of the holster so make sure you have everything properly lined up. Next press the top foam on top of the gun and apply pressure with clamps or whatever. Set a timer for 15 minutes and let everything sit.


Once the 15 minutes are up, release the clamps and remove the top foam. Leave the inside Kydex and gun on the lower foam. Do not separate them or move them at all. Now we start heating the outside half of Kydex in the oven and slowly bring it to 350 degrees. This time we will only heat up the top foam with the heat gun. If we use the heat gun on the bottom foam or the gun we will mess up the inside half of Kydex. Once the outside half of Kydex is at 350 and the top foam is warm, remove the Kydex from the oven and lay it on top of the gun. Apply the top foam and apply pressure and clamp it for another 15 minutes. Once the time is up, remove the clamps, top foam, both halves of Kydex, and the gun. The Kydex may stick to the top foam, no big deal, just pull it off.


In the 15 minutes between these phases, I finish the belt loops, leather, and I cut the silencers from the 7/32” rubber tubing.


Once all this is done we move on to Phase 4. To be continued…
 

11b30b4

Member
Phase 4
Cutting and finishing the holster. So at this point you should have two halves of the holster and the gun with the masking still on it. I normally keep the gun in the holster and tape the two halves of the holster together. I do not want the holster to shift for these next few steps. This is the time to finish all the outer edges. I do a rough cut and sand with the band saw, belt sander, and Dremel. Once this is done I remove the gun and separate the holster halves then I finish all the edges with the sanding sponge. I put is all back together and re tape the halves together. If you want to angle the sides of the holster, you can heat up the area you want to angle and place it in a vice then bend the holster to the desired angle. Be careful doing this so that you do not heat up any area that was molded, if you do, you will loos all the detail you worked so hard to achieve. On this holster I heat up the Kydex on both halves of the holster above the slide. On this right hand holster that means that I am shaping the side of the holster that faces forward. Then I do the other side. On the finished pictures you will see the angle I am talking about.


Next I drill out the holes on the holster halves. This is best done with both halves taped together so that they line up. I also keep the gun in the holster to help in keeping both halves aligned. Once the holes are drilled. Now is the time to remove the masking from the gun and put it back in the holster. Now I add the eyelets. If the gun is hard to pull out of the holster once the eyelets are mounted, do not panic, we want it tight. This is where you will adjust the tension with a heat gun on the ejection port and/or trigger guard. For this holster I heated up the Kydex at the ejection port a little too much, you will notice that it’s a bit shinny there. If you use a lower heat setting to work slower you can avoid this shinny effect. I also heated up the mouth of the holster where the light would slide in and with a gloved hand I bent the Kydex out a bit to assist in holstering. When you are adjusting the tension at the ejection port, heat up the Kydex till its slightly bendable, then work the gun in and out of the holster till the Kydex cures. You should still have some resistance but the gun should be able to draw out of the holster. Over time this will ease a slight bit, I also apply a light coat of 3in1 oil to the inside of the holster and this makes a big difference.

So once you have the retention where you want it, I apply the leather and belt loops with the 8-32 Philips head machine screws, ¼â€� slotted pass through post, the 1/8â€� cut 7/32â€� rubber tubing. I place the rubber tubing (silencers) next to the Kydex. I use the 1/2â€� screws for attaching the leather to the holster and the 3/8â€� screws for attaching the belt loops. I use thread-loc on all the hardware. Clean everything up and you are done.


I hope this tutorial helps and is clear. I look forward to any questions or comments.
 

sbroadwell

Senior Member
That is great info! You certainly put a lot of work into that, and I appreciate it. I've been thinking about making a couple of holsters, and this will make it much easier.
 

Anvil Head

Senior Member
Nice tutorial and well explained. Same principal applies to knife sheaths in kydex. Thing about your setup is now the next one will be quicker and easier.
Thanks for sharing.

Even though I'm not a big "plastics" fan (doesn't compliment my style of knives), hard to beat a well thought out kydex holster.
(I just prefer the creak of leather over the "snack" of plastic.)
 

11b30b4

Member
Sbroadwell, thank you for your comments and good luck on your Kydex attempts. If you have the time, check out PhillyEDC videos on youtube. I found them very helpful. https://www.youtube.com/watch?v=wntntfsrfEQ&list=PL49D80D54C9E9D4B6

Anvil Head, I hear you. I prefer leather for most of my bushcraft knives. They just don’t seem at home in Kydex. As for holsters, with me being in Law Enforcement, I need that positive “snap” when re-holstering. It frees up my mind when I move in to cuff a suspect. Also, given the amount of draws and holstering, and the added factor of exposure to weather, Kydex preforms better for me. I tend to wear out a leather holster’s thumb break annually.
 

Anvil Head

Senior Member
I imagine so. Be safe.
 
Top