Hey guys. I am not certain how many of you folks use kayaks, but I have to here in Florida. I picked up an Ascend FS10 sit in kayak and I have been tweaking a blind for the kayak since I bought it last year. If I am being honest, I told myself that this would only be used for a short while before I bought a duck boat, but now I am really enjoying it to the point I may hold off a while longer.
Many of the blinds that you can buy, and there aren't many for the 10 foot model kayaks, are flat with the kayak and don't help break up your outline to the ducks. The exception to this rule is if you use a 12 foot ascend and buy the readhead blind that turns it into a layout/sneak boat (we will discuss that further, and why I don't like that blind anyways). I elected to go with a 10 ft kayak so it would be light and easier to conceal. Hunting the prairie lakes up here provides very little cover at times and the shorter the yak, the easier to hide. Not to mention I am an out of shape fella and it shaved a great deal of weight as well as slides into the back of my xterra a bit better.
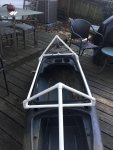
The entire frame is built out of 1/2 inch pvc pipe. Keep in mind, the main goals of this blind were as follows, easy to get on and off, cheap as possible without sacrificing efficiency, and I didn't want to drill into the kayak in the inevitable even that I want to change something down the road as I test out the blind.
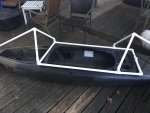
Let's get started. On the FS10, and many other sit in kayaks, there is a small lip around the seating area to prevent water from rolling into the kayak. I elected to use this as the main brace for the body of my frame. I cut a square of pvc pipe connected with two 90 degree joints, and two three way joints, that matches the width and the length of this lip. Near the back of the seating area, there are two docking cleats. This is where the body will be attached in the middle of the kayak. Two medium strength zip ties go here.
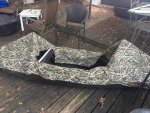
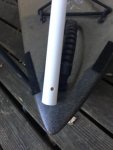
Originally I was going to just do a simple triangle in the front and back to elevate the profile of the blind to allow me to conceal myself a bit easier without having to uncomfortably lay down into the kayak. After doing this, I quickly realized it was a bit sharp to the outline of the kayak and the triangle in the front would impede a passing shot on a bird flying low and close to the ground. To correct this, I picked up four 45 degree joints and attached the first two in the back. You'll have to cut a small piece of pvc to connect the three way to the the 45 angle but having done so you can now angle the pvc that comes off these joints towards the rear of the kayak. Add one more three way joint to connect the PVC coming off the rear and cut one final piece to run down to the handle in the back of the kayak.
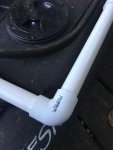
This process will be the same for the front, with one notable exception. In order to have space in the front for storage, and to bring the blind a little tighter to the middle, add two T joints to the pvc that runs parallel to the seating area. Insert these approximately 12 inches from the front. One thing to note here is that, although it doesn't show up in the photo, the pvc in the front is a good deal lower than that in the back. That is to allow you to swing over the front and fire off that third and final shot in vain as they soar off into the horizon.
Next, drill a small hole a couple inches from the end of the pvc that runs to the front and back handle of the kayak. Here you will attach zipties to secure the frame from moving left and right. If you don't have these anchor points that I do for zip ties, or if you want to add more (I am toying with the idea) you can pick up small replacement hooks for a few bucks. These are the loops at the front and back that the bungie is held in place by and they are easy to install and seal with silicon caulk.
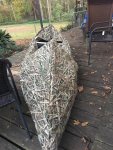
I am in the process of cutting and sewing the blind material that will cover this frame. It is a single piece of 500D cordura fabric in max 5 camo. It is thin, waterproof and very tough. There will be two flaps of fabric that will lay across me in the kayak, and since the seat reclines in the kayak, I am entirely hidden with the exception of my gun, of which I am not concerned.
I mentioned above why I didn't like the redhead blind. The reason is that although it folds up to enable paddling, when released it is very lengthy and runs into the water several inches. I hunt floating peat mats with grass on them, or thick grassy areas with shallow water and those create serious resistance when sliding in and out. In addition to that, when paddling in open water to retrieve a bird it can be a son of a gun as well. Finally, they cost way too much money and unfortunately duck season has way too long of an off season. This is a fun way to build a blind for very cheap.
If you subtract the cost of beer, I have $35 in PVC, and $14 in the cordura fabric. $49 brings you a dollar under the cheapest blind offered for a ten foot kayak, and it will conceal you MUCH better than a piece of fabric draped across the top of the kayak leaving you exposed.
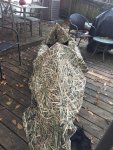
I will post photos of the blind material later, perhaps tonight, and show you how I am attaching nylon straps strategically to allow native vegetation to be attached for varying locations.
Hope this helps.
The Feve'
Many of the blinds that you can buy, and there aren't many for the 10 foot model kayaks, are flat with the kayak and don't help break up your outline to the ducks. The exception to this rule is if you use a 12 foot ascend and buy the readhead blind that turns it into a layout/sneak boat (we will discuss that further, and why I don't like that blind anyways). I elected to go with a 10 ft kayak so it would be light and easier to conceal. Hunting the prairie lakes up here provides very little cover at times and the shorter the yak, the easier to hide. Not to mention I am an out of shape fella and it shaved a great deal of weight as well as slides into the back of my xterra a bit better.
The entire frame is built out of 1/2 inch pvc pipe. Keep in mind, the main goals of this blind were as follows, easy to get on and off, cheap as possible without sacrificing efficiency, and I didn't want to drill into the kayak in the inevitable even that I want to change something down the road as I test out the blind.
Let's get started. On the FS10, and many other sit in kayaks, there is a small lip around the seating area to prevent water from rolling into the kayak. I elected to use this as the main brace for the body of my frame. I cut a square of pvc pipe connected with two 90 degree joints, and two three way joints, that matches the width and the length of this lip. Near the back of the seating area, there are two docking cleats. This is where the body will be attached in the middle of the kayak. Two medium strength zip ties go here.
Originally I was going to just do a simple triangle in the front and back to elevate the profile of the blind to allow me to conceal myself a bit easier without having to uncomfortably lay down into the kayak. After doing this, I quickly realized it was a bit sharp to the outline of the kayak and the triangle in the front would impede a passing shot on a bird flying low and close to the ground. To correct this, I picked up four 45 degree joints and attached the first two in the back. You'll have to cut a small piece of pvc to connect the three way to the the 45 angle but having done so you can now angle the pvc that comes off these joints towards the rear of the kayak. Add one more three way joint to connect the PVC coming off the rear and cut one final piece to run down to the handle in the back of the kayak.
This process will be the same for the front, with one notable exception. In order to have space in the front for storage, and to bring the blind a little tighter to the middle, add two T joints to the pvc that runs parallel to the seating area. Insert these approximately 12 inches from the front. One thing to note here is that, although it doesn't show up in the photo, the pvc in the front is a good deal lower than that in the back. That is to allow you to swing over the front and fire off that third and final shot in vain as they soar off into the horizon.
Next, drill a small hole a couple inches from the end of the pvc that runs to the front and back handle of the kayak. Here you will attach zipties to secure the frame from moving left and right. If you don't have these anchor points that I do for zip ties, or if you want to add more (I am toying with the idea) you can pick up small replacement hooks for a few bucks. These are the loops at the front and back that the bungie is held in place by and they are easy to install and seal with silicon caulk.
I am in the process of cutting and sewing the blind material that will cover this frame. It is a single piece of 500D cordura fabric in max 5 camo. It is thin, waterproof and very tough. There will be two flaps of fabric that will lay across me in the kayak, and since the seat reclines in the kayak, I am entirely hidden with the exception of my gun, of which I am not concerned.
I mentioned above why I didn't like the redhead blind. The reason is that although it folds up to enable paddling, when released it is very lengthy and runs into the water several inches. I hunt floating peat mats with grass on them, or thick grassy areas with shallow water and those create serious resistance when sliding in and out. In addition to that, when paddling in open water to retrieve a bird it can be a son of a gun as well. Finally, they cost way too much money and unfortunately duck season has way too long of an off season. This is a fun way to build a blind for very cheap.
If you subtract the cost of beer, I have $35 in PVC, and $14 in the cordura fabric. $49 brings you a dollar under the cheapest blind offered for a ten foot kayak, and it will conceal you MUCH better than a piece of fabric draped across the top of the kayak leaving you exposed.
I will post photos of the blind material later, perhaps tonight, and show you how I am attaching nylon straps strategically to allow native vegetation to be attached for varying locations.
Hope this helps.
The Feve'
Attachments
-
 24176799_10155669947081041_121860168622695429_n.jpg87.3 KB · Views: 712
 -
 23915526_10155669947076041_1693763955332198277_n.jpg75.3 KB · Views: 711
 -
 24129633_10155669947101041_5916476021944446314_n.jpg79.3 KB · Views: 709
 -
 24068265_10155669947166041_1876587342281874601_n.jpg49 KB · Views: 707
 -
 24176757_10155669947096041_732244560127916704_n.jpg49.2 KB · Views: 706
 -
 24232401_10155669947176041_3885799642966461978_n.jpg49.2 KB · Views: 705