Gobbler Down
Senior Member
Foremost, what is it about us Southern Gentlemen ( I use the term loosely) that jump off the sanity speed train and feel the need to "do it ourselves" on what seems to be an all too frequent occasion? I'm convinced there is a direct correlation to do so that is linked to the corresponding increase in number of rings in our tree!
Ladies and Gentlemen I present to you my tutorial of a recently completed bowling ball vise and the various steps taken to actually putting it to use. The drive wasn't so much for knife work...I've managed over the past five years to make do with scrounged equipment- I'm getting ready to try my hand at wire inlay and this happens to lay the foundation.
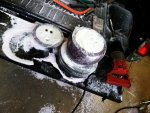
I visited several thrift stores in my area and scored two bowling balls that were destined for the island of misfit toys for the cheerful sum of $10. I started the project with the more distressed and chipped ball. Halfway through the project I decided that it would meet my needs and kept trudging along.
After researching blogs, wogs and yewtube I came to the conclusion that no one place had the magic bullet for the build so I took the knowledge gained and plugged in the "Sawzall", slapped on a dust mask and goggles and the rest is history.
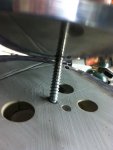
I would recommend drilling a hole for an appropriate sized rod or dowel in the portion of the ball that has the finger/thumb holes. Insert the rod, tie a loop on a piece of string and then a loop on the end for your marker. Slip the loop over the rod, slowly tighten the string to the predetermined length for the cut line and mark it. I used a Sharpie.
After the line meets your satisfaction drill two holes approx. 2-4 inches apart on the line. This will serve as the cut groove for your saw. I strapped my bowling ball to a board with a tie-down strap and used two dowels, one on each side of the ball that was in contact with the board, to keep it from rolling. All you have to do is get busy with the saw. I was told that there is concrete in the center of the resin exterior...mine was not the case. It was a non-tinted resin that had the appearance of concrete.
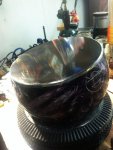
After sawing through the top I took it to my belt grinder with a 60 grit belt and trued up the surface. I cannot impress upon you enough to wear your PPE (Personal Protective Equipment). The resin is bad juju when inhaled and in your eyes.
I had a scrap piece of aluminum that I cut out for the mounting plate on my permanently mounted portable Harbor Freight band saw. I guess it's up to you what you use but leaving the surface of the bowling ball in it's natural state will not work for your needs, nor mine for that matter!
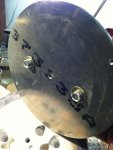
If you are like me, not an engineer, finding the center of the fresh cut bowling ball mounting surface is rather simple. Here is an easy method http://www.mathopenref.com/constcirclecenter2.html
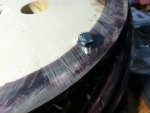
Drill a hole in your mounting plate if you like and mount a rod or bolt through it for stability and an added measure of over building an object...like most of us are probably guilty of. (like ending the previous sentence with a preposition..living on the edge I tell ya!) You will need to epoxy or JB Weld the rod into the base plate if you aren't a welder or machinist. Epoxy worked well with the resin and screw I used.
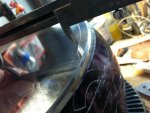
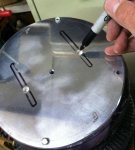
Once the center is found and semi-finished plate is temporarily assembled without epoxy, mark the hole drill line around the perimeter of the top surface with a metal dial caliper if you have one. If not you can mark the drill hole by eyeballing the plate, lifting it to see the area to be drilled and so forth. I call this Alabama exceptionalism. Drill your holes for the hold down bolts or screws. You will have to epoxy these too because of the soft nature of the resin shell. I made an attempt at tapping it for screws and it worked the first time in and stripped when removed.
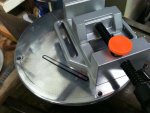
Next step is to mark your mounting holes for the vise you are going to use and mount the bolt through the base. I used lock washers on the underside, then another nut on the upper surface and then the vise, washer, nut for final mounting.
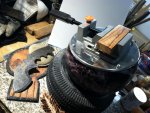
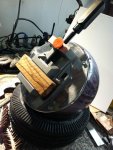
As for the pivot point I purchased a lawn mower tire from Tractor Supply but if I had to do it over again, which I'm sure BB Vise II is coming... I would purchase a $6-8 hard tire from HF and knock the metal rim out. Live and learn.
As for the vise, I have a more robust drill press vise but it would be serious overkill for my intended purpose.
Costs involved disregarding time are as follows: $13.00 for the vise, $5 for the bowling ball, misc. screws, epoxy, $2-3, tire $12, posting the completed adventure on GON. Priceless!
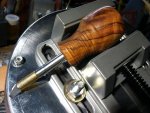
I turned a piece of olive wood and mounted an Xacto knife body into a drilled hole with epoxy for my wire inlay project.
I don't have a clue how wide the blade is supposed to be or how deep a cut it should make...but those will come with more web surfing I'm sure. I am hoping that a forum member will share their wisdom.
Enjoy....I'll be happy to answer any questions for you.
Hooah! Go Army!
Ladies and Gentlemen I present to you my tutorial of a recently completed bowling ball vise and the various steps taken to actually putting it to use. The drive wasn't so much for knife work...I've managed over the past five years to make do with scrounged equipment- I'm getting ready to try my hand at wire inlay and this happens to lay the foundation.
I visited several thrift stores in my area and scored two bowling balls that were destined for the island of misfit toys for the cheerful sum of $10. I started the project with the more distressed and chipped ball. Halfway through the project I decided that it would meet my needs and kept trudging along.
After researching blogs, wogs and yewtube I came to the conclusion that no one place had the magic bullet for the build so I took the knowledge gained and plugged in the "Sawzall", slapped on a dust mask and goggles and the rest is history.
I would recommend drilling a hole for an appropriate sized rod or dowel in the portion of the ball that has the finger/thumb holes. Insert the rod, tie a loop on a piece of string and then a loop on the end for your marker. Slip the loop over the rod, slowly tighten the string to the predetermined length for the cut line and mark it. I used a Sharpie.
After the line meets your satisfaction drill two holes approx. 2-4 inches apart on the line. This will serve as the cut groove for your saw. I strapped my bowling ball to a board with a tie-down strap and used two dowels, one on each side of the ball that was in contact with the board, to keep it from rolling. All you have to do is get busy with the saw. I was told that there is concrete in the center of the resin exterior...mine was not the case. It was a non-tinted resin that had the appearance of concrete.
After sawing through the top I took it to my belt grinder with a 60 grit belt and trued up the surface. I cannot impress upon you enough to wear your PPE (Personal Protective Equipment). The resin is bad juju when inhaled and in your eyes.
I had a scrap piece of aluminum that I cut out for the mounting plate on my permanently mounted portable Harbor Freight band saw. I guess it's up to you what you use but leaving the surface of the bowling ball in it's natural state will not work for your needs, nor mine for that matter!
If you are like me, not an engineer, finding the center of the fresh cut bowling ball mounting surface is rather simple. Here is an easy method http://www.mathopenref.com/constcirclecenter2.html
Drill a hole in your mounting plate if you like and mount a rod or bolt through it for stability and an added measure of over building an object...like most of us are probably guilty of. (like ending the previous sentence with a preposition..living on the edge I tell ya!) You will need to epoxy or JB Weld the rod into the base plate if you aren't a welder or machinist. Epoxy worked well with the resin and screw I used.
Once the center is found and semi-finished plate is temporarily assembled without epoxy, mark the hole drill line around the perimeter of the top surface with a metal dial caliper if you have one. If not you can mark the drill hole by eyeballing the plate, lifting it to see the area to be drilled and so forth. I call this Alabama exceptionalism. Drill your holes for the hold down bolts or screws. You will have to epoxy these too because of the soft nature of the resin shell. I made an attempt at tapping it for screws and it worked the first time in and stripped when removed.
Next step is to mark your mounting holes for the vise you are going to use and mount the bolt through the base. I used lock washers on the underside, then another nut on the upper surface and then the vise, washer, nut for final mounting.
As for the pivot point I purchased a lawn mower tire from Tractor Supply but if I had to do it over again, which I'm sure BB Vise II is coming... I would purchase a $6-8 hard tire from HF and knock the metal rim out. Live and learn.
As for the vise, I have a more robust drill press vise but it would be serious overkill for my intended purpose.
Costs involved disregarding time are as follows: $13.00 for the vise, $5 for the bowling ball, misc. screws, epoxy, $2-3, tire $12, posting the completed adventure on GON. Priceless!
I turned a piece of olive wood and mounted an Xacto knife body into a drilled hole with epoxy for my wire inlay project.
I don't have a clue how wide the blade is supposed to be or how deep a cut it should make...but those will come with more web surfing I'm sure. I am hoping that a forum member will share their wisdom.
Enjoy....I'll be happy to answer any questions for you.
Hooah! Go Army!
Attachments
-
 BBVise1.jpg143.1 KB · Views: 2,047
 -
 BBVise2.jpg62.7 KB · Views: 2,107
 -
 Caliper measure.jpg79.3 KB · Views: 2,038
 -
 bolt fit.jpg80.4 KB · Views: 2,001
 -
 BBVise3.jpg90.6 KB · Views: 2,650
 -
 caliper score.jpg93.4 KB · Views: 2,028
 -
 center anchor plate fit.jpg70.9 KB · Views: 2,146
 -
 drill oversized holes.jpg93.9 KB · Views: 2,094
 -
 marking plate bolt holes on BB.jpg129 KB · Views: 2,077
 -
 mount and lock washer bolts.jpg89.8 KB · Views: 2,015
 -
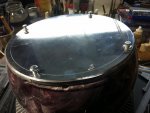 plate test fit.jpg86.5 KB · Views: 2,686
 -
 vise hole layout.jpg95.8 KB · Views: 2,070
 -
 final three.jpg126.7 KB · Views: 2,548
 -
 final two.jpg110.1 KB · Views: 2,994
 -
 inlay tool.jpg110.5 KB · Views: 2,201
Last edited:
